Rocky Linux and AlmaLinux are the default RHEL-family distributions for production Graylog deployments. This guide walks through installing Graylog 7 on Rocky Linux 10, Rocky Linux 9, Rocky Linux 8, AlmaLinux 10, AlmaLinux 9, and AlmaLinux 8, with SELinux enforcing the whole way. Most tutorials either skip SELinux or tell you to disable it. This one shows Graylog running cleanly with it on, and it calls out the one repository path that breaks on EL10 today.
Graylog 7 ships with a bundled Java 21 runtime (the 7.2.2 web UI footer reports Eclipse Adoptium 21.0.13) and a bundled OpenSearch Data Node, so you do not need to install Java separately or manage OpenSearch yourself. The three processes you will run are MongoDB (metadata storage), Graylog Data Node (log storage and search), and Graylog Server (web UI, API, processing pipeline). We reran every step in November 2026 on Rocky Linux 10.2 and AlmaLinux 10 with Graylog 7.2.2, MongoDB 8.2.12 and the Data Node’s bundled OpenSearch 3.7.0, and checked the repositories on Rocky Linux 9 and 8.
Hardware and OS Requirements
Graylog 7 is resource-hungry. Graylog Server and the Data Node are JVM processes, and the Data Node starts a separate OpenSearch JVM with its own heap. On our Rocky 10 test VM with 8 GB RAM, free -m reported about 4.5 GB used a few minutes after all three services came up, with roughly 3 GB still available. That headroom is mostly page cache, so it shrinks fast once messages start arriving and OpenSearch begins merging segments. Size for the ingest you expect, not for the idle number.
- RAM: 8 GB minimum, 16 GB recommended for production ingestion
- CPU: 4 cores for production (our 2 vCPU lab VM worked, just slowly). Must support AVX instructions for MongoDB 8.x
- Disk: 50 GB minimum on SSD (the Graylog message journal needs fast storage)
- OS: Rocky Linux 10 / 9 / 8 or AlmaLinux 10 / 9 / 8
- SELinux: Enforcing (default). The whole stack ran with zero AVC denials in our lab
- Java: Bundled with both Graylog packages. No separate installation needed
Ports that must be reachable between clients and the Graylog server, and internally between the server and the Data Node:
| Port | Service | Protocol | Exposure |
|---|---|---|---|
| 9000 | Graylog web UI and REST API | TCP | External |
| 9200 | Data Node (OpenSearch REST) | TCP | Internal |
| 9300 | Data Node (OpenSearch transport) | TCP | Internal |
| 8999 | Data Node management API | TCP | Internal |
| 27017 | MongoDB | TCP | Internal |
Here is how those ports fit together on a single host. Only the web UI and the log inputs cross firewalld; everything the server talks to on the data side stays local:

MongoDB binds to 127.0.0.1 by default, which is why it never needs a firewall rule. The Data Node listens on all interfaces, so keep 9200, 9300 and 8999 closed in firewalld unless you later move the Data Node to its own server.
Check your CPU supports AVX before you start. MongoDB 8.x crashes immediately with signal=ILL on CPUs without AVX. This is most common on virtual machines configured with a generic CPU type:
grep -c avx /proc/cpuinfoAny value above 0 means AVX is available. A value of 0 has no software workaround here: every MongoDB release since 5.0 requires AVX, and Graylog 7.2 only supports MongoDB 7.x through 8.2.x. On a VM, switch the CPU type to host (or another model that exposes AVX); MongoDB’s production notes list a Haswell or later Intel, or a Bulldozer or later AMD, as the x86_64 minimum.
Step 1: Prepare the System
Update the system to the latest packages and install a few utilities needed for the rest of the install:
sudo dnf update -y
sudo dnf install -y policycoreutils-python-utils firewalld
The cloud images already carry curl (or curl-minimal), so it is left out to avoid a package conflict on images that ship the minimal build. The policycoreutils-python-utils package provides semanage and audit2allow, which you need if Step 6 ever finds a denial; ausearch comes from the audit package that is already installed. Enable and start the firewall:
sudo systemctl enable --now firewalldSet the system timezone to UTC. Graylog stores all timestamps in UTC internally, and mismatched host clocks cause confusing log displays:
sudo timedatectl set-timezone UTCReboot if dnf update pulled in a new kernel, so the rest of the install runs on the kernel the server will keep.
Step 2: Install MongoDB 8.2
Graylog stores its configuration metadata (users, streams, pipelines, dashboards, alerts) in MongoDB. Log messages themselves go to the Data Node, not MongoDB. We use the MongoDB 8.2 repository here, the same series the Graylog 7.2 lab behind our web interface tour runs on.
Create the repository file:
sudo vi /etc/yum.repos.d/mongodb-org-8.2.repoAdd this definition. Note the redhat/9 path, even on Rocky Linux 10 and AlmaLinux 10:
[mongodb-org-8.2]
name=MongoDB Repository
baseurl=https://repo.mongodb.org/yum/redhat/9/mongodb-org/8.2/x86_64/
gpgcheck=1
enabled=1
gpgkey=https://pgp.mongodb.com/server-8.0.asc
MongoDB now publishes a redhat/10 tree, and its 8.2 directory even has valid repository metadata, but it only carries mongosh, the database tools and the Atlas CLI. There is no mongodb-org-server build in it yet, so pointing an EL10 box there fails at install time. The EL9 build of 8.2 installed and ran on both Rocky Linux 10.2 and AlmaLinux 10.2 in our lab. On Rocky Linux 8 or AlmaLinux 8, change the path to /yum/redhat/8/. The key URL stays on server-8.0.asc because MongoDB signs the 8.2 packages with it; a server-8.2.asc file does not exist.
“No match for argument: mongodb-org” on Rocky Linux 10
This is what the obvious redhat/10/mongodb-org/8.2 path produced on a fresh Rocky Linux 10.2 VM. The repository downloads fine, which makes the failure confusing, and every service that depends on MongoDB fails after it:
MongoDB Repository                               35 kB/s | 7.3 kB     00:00
No match for argument: mongodb-org
Error: Unable to find a match: mongodb-org
Switch baseurl to the redhat/9 path shown above, then run sudo dnf clean all before you install again so DNF drops the cached metadata from the empty repository.
Install the mongodb-org metapackage. It pulls in the server, mongos, mongosh and the database tools, so you get the shell for later troubleshooting without a second repository:
sudo dnf install -y mongodb-orgHere is the whole story on one Rocky Linux 10.2 host: the redhat/10 path failing, then the redhat/9 path installing the el9 packages. The transaction also pulled in an OpenSSL update as a dependency, the one non-MongoDB package in the list:

The RPM creates the unit and even enables it in the post-install scriptlet, but it does not start it. Start it now so the Data Node finds a database when it comes up in the next step, because the Data Node stores its own state in MongoDB too:
sudo systemctl daemon-reload
sudo systemctl enable --now mongod.service
Confirm MongoDB is running before you go further. Every Graylog component that follows depends on it, and a dead mongod shows up later only as a vague restart loop:
sudo systemctl status mongod.service --no-pagerYou should see the service in the active (running) state:
● mongod.service - MongoDB Database Server
     Loaded: loaded (/usr/lib/systemd/system/mongod.service; enabled; preset: disabled)
     Active: active (running) since Wed 2026-11-11 11:28:35 UTC; 5s ago
 Invocation: 0d862f4768de4545baaec21940ab1d79
       Docs: https://docs.mongodb.org/manual
   Main PID: 24977 (mongod)
     Memory: 115.7M (peak: 116.2M)
        CPU: 137ms
     CGroup: /system.slice/mongod.service
             └─24977 /usr/bin/mongod -f /etc/mongod.conf
Check which build you actually got. The version matters because the repository you pointed DNF at decides it, not the package name:
mongod --version | head -1The first line names the server build:
db version v8.2.12That is the EL9 package (mongodb-org-server-8.2.12-1.el9) running on an EL10 kernel. It stays bound to 127.0.0.1, which is all Graylog needs on a single host.
Step 3: Install the Graylog Data Node
Install the Graylog 7.2 repository package. This RPM adds the Graylog package repository and GPG key to your system:
sudo rpm -Uvh https://packages.graylog2.org/repo/packages/graylog-7.2-repository_latest.rpmRPM prints Header V4 RSA/SHA256 Signature, key ID b1606f22: NOKEY before it installs graylog-7.2-repository-1-1. That warning is expected: the key it cannot find yet is the one this package installs. Each Graylog minor release has its own repository package, so a server on the old 7.0 repository never sees 7.2 until you install this one.
Install the Data Node package. On first install, DNF imports the Graylog GPG key:
sudo dnf install -y graylog-datanodeThe package ends by telling you OpenSearch needs vm.max_map_count of at least 262144. Check the current value before you copy its fix:
sysctl vm.max_map_countRocky Linux 10.2 already answered vm.max_map_count = 1048576, four times the minimum. Writing the package’s suggested 262144 there would lower it, and that is exactly what happened in our first pass. Nothing broke, because 262144 still meets the minimum, but you lose headroom the kernel gave you for free. So only when the value is below 262144 (older EL kernels) set it and persist it:
echo 'vm.max_map_count=262144' | sudo tee /etc/sysctl.d/99-graylog-datanode.conf
sudo sysctl --system
Generate the password_secret. This value is used to encrypt session tokens and stored passwords, and the Graylog docs ask for at least 64 characters. Graylog uses it in two places: the Data Node configuration and the Graylog Server configuration. Both must have the exact same value:
openssl rand -hex 32The output is 64 hex characters. Copy it, because you will paste it into both config files in the next steps. If you script this step instead, print the length before you write it anywhere: an empty value starts both services into a restart loop, covered further down.
Open the Data Node configuration. Edit it by hand rather than with a one-line sed, because the file is long and most keys sit there as commented examples next to the few live ones:
sudo vi /etc/graylog/datanode/datanode.confThe package ships password_secret = empty (line 56 in the 7.2.2 file) and mongodb_uri = mongodb://localhost/graylog already set, so on a single host only the secret needs filling in:
password_secret = YOUR_GENERATED_SECRET_HERE
mongodb_uri = mongodb://localhost/graylog
There is no opensearch_heap line in the file, and the Data Node log on our 8 GB VM showed OpenSearch starting with heap size [1gb], the documented default. The log also warned that there was about 3.7 times more free memory than the configured heap. If you want OpenSearch to use more of it, append a line such as opensearch_heap = 2g, which the Data Node configuration reference lists under performance tuning. We left the default in place for the memory figures in this guide.
Start and enable the Data Node. It has to be running before Graylog Server starts, since the server’s preflight wizard looks for registered Data Nodes and has nothing to provision certificates for otherwise:
sudo systemctl daemon-reload
sudo systemctl enable --now graylog-datanode.service
Give it about 10-15 seconds to initialize, then check the status:
sudo systemctl status graylog-datanode.service --no-pagerThe output should confirm the service is active. Expect a few hundred megabytes of memory at this point, because the OpenSearch process does not start until the certificates exist:
● graylog-datanode.service - Graylog data node
     Loaded: loaded (/usr/lib/systemd/system/graylog-datanode.service; enabled; preset: disabled)
     Active: active (running) since Wed 2026-11-11 11:31:28 UTC; 45s ago
 Invocation: 0315e17594f142c5ba6e58fc79b4fb84
       Docs: http://docs.graylog.org/
   Main PID: 26021 (java)
      Tasks: 59 (limit: 48400)
     Memory: 315.9M (peak: 316.4M)
        CPU: 17.605s
At this stage the Data Node is running but not yet bound to OpenSearch ports 9200/9300. That happens after certificate provisioning in the web UI setup wizard later.
Step 4: Install and Configure Graylog Server
The Graylog repository was added during the Data Node install, so the server package is already available:
sudo dnf install -y graylog-serverGenerate the SHA-256 hash of your admin password. The plaintext password is never stored anywhere; only the hash goes into the config file. Replace YourSecurePassword with a real password:
echo -n "YourSecurePassword" | sha256sum | cut -d" " -f1Remember the plaintext password. You will use it to log in to the web UI later.
Edit the Graylog server configuration. It needs the same secret as the Data Node, plus the admin hash you just generated:
sudo vi /etc/graylog/server/server.confSet the three critical values. The password_secret must be the same string you generated for the Data Node:
password_secret = YOUR_GENERATED_SECRET_HERE
root_password_sha2 = YOUR_SHA256_HASH_HERE
http_bind_address = 0.0.0.0:9000
Setting http_bind_address to 0.0.0.0:9000 exposes the web UI on all network interfaces. The default (127.0.0.1:9000) restricts access to localhost only, which is useful if you’re running Graylog behind a reverse proxy on the same host.
Tune the Java heap. On RHEL-family distributions, the environment file lives at /etc/sysconfig/graylog-server, not /etc/default/ as on Debian-based systems:
sudo vi /etc/sysconfig/graylog-serverFor an 8 GB server, raise the heap from the default 1 GB to 2 GB. Change only the first GRAYLOG_SERVER_JAVA_OPTS= line (line 6 in the 7.2.2 file). Two later lines append -Djdk.tls.acknowledgeCloseNotify=true and -Dlog4j2.formatMsgNoLookups=true to the same variable, and a sed that matches every line starting with GRAYLOG_SERVER_JAVA_OPTS= overwrites those too, which our first scripted pass did. The edited first line reads:
GRAYLOG_SERVER_JAVA_OPTS="-Xms2g -Xmx2g -server -XX:+UseG1GC -XX:-OmitStackTraceInFastThrow"Start and enable the Graylog server. First startup takes 30-60 seconds because the server provisions its preflight setup mode:
sudo systemctl daemon-reload
sudo systemctl enable --now graylog-server.service
Confirm the server is running. At this point it is in preflight mode, so an active unit is all you should expect; the web UI is not usable yet:
sudo systemctl status graylog-server.service --no-pagerThe service should report active, with the 2 GB heap visible in the Java command line:
● graylog-server.service - Graylog server
     Loaded: loaded (/usr/lib/systemd/system/graylog-server.service; enabled; preset: disabled)
     Active: active (running) since Wed 2026-11-11 11:32:13 UTC; 1min 15s ago
 Invocation: 675014ae2db64177b7afa1acdf16675e
       Docs: http://docs.graylog.org/
   Main PID: 26127 (graylog-server)
      Tasks: 61 (limit: 48400)
     Memory: 342.4M (peak: 345.2M)
        CPU: 10.385s
     CGroup: /system.slice/graylog-server.service
             ├─26127 /bin/sh /usr/share/graylog-server/bin/graylog-server
             └─26129 /usr/share/graylog-server/jvm/bin/java -Xms2g -Xmx2g -server -XX:+UseG1GC -XX:-OmitStackTraceInFastThrow -Djdk.tls.acknowledgeCloseNotify=true -Dlog4j2.formatMsgNoLookups=true ...
Both appended flags are still on the command line, which confirms the sysconfig edit touched only the first line.
Graylog stuck in “activating (auto-restart)”
Our first pass on Rocky Linux 10 wrote an empty password_secret into both files, because the scripted openssl rand call returned nothing. Neither service logs much to the terminal. Status just shows them exiting with code 1 every few seconds:
● graylog-server.service - Graylog server
     Loaded: loaded (/usr/lib/systemd/system/graylog-server.service; enabled; preset: disabled)
     Active: activating (auto-restart) (Result: exit-code) since Wed 2026-11-11 11:27:03 UTC; 4s ago
    Process: 24157 ExecStart=/usr/share/graylog-server/bin/graylog-server (code=exited, status=1/FAILURE)
   Main PID: 24157 (code=exited, status=1/FAILURE)
The reason is in /var/log/graylog-server/server.log and /var/log/graylog-datanode/datanode.log, which is where to look for the configuration error that stopped the JVM. Run sudo grep -n '^password_secret' /etc/graylog/server/server.conf /etc/graylog/datanode/datanode.conf to see both values side by side, paste the same 64 character secret into each, and restart the Data Node first, then the server. In that same first pass MongoDB had not installed either (the EL10 repository path from Step 2), so also confirm systemctl is-active mongod answers active before you restart the Graylog services.
Step 5: Configure firewalld
Only the web UI port (9000/tcp) needs to be exposed externally. The Data Node and MongoDB ports stay internal. Open port 9000:
sudo firewall-cmd --add-port=9000/tcp --permanent
sudo firewall-cmd --reload
Verify the port is open. A typo in the port or a missing --permanent only shows up after the next reboot, so check now:
sudo firewall-cmd --list-portsThe output lists the allowed ports:
9000/tcpIf you’re setting up log ingestion on this same host, open the input ports too. Common ones:
sudo firewall-cmd --add-port=1514/udp --permanent    # Syslog UDP
sudo firewall-cmd --add-port=1514/tcp --permanent    # Syslog TCP
sudo firewall-cmd --add-port=12201/udp --permanent   # GELF UDP
sudo firewall-cmd --add-port=12201/tcp --permanent   # GELF TCP
sudo firewall-cmd --add-port=5044/tcp --permanent    # Beats
sudo firewall-cmd --reload
Open only the ones you will actually create inputs for. An open port with no input behind it does no harm, but it is one more thing to explain in a firewall review.
Step 6: SELinux Considerations
SELinux stays out of the way of the default install. On Rocky Linux 10.2 and AlmaLinux 10.2 with SELinux enforcing, a clean install of Graylog 7.2.2 produced zero AVC denials, and that held through the failed first start described above as well as normal mode. That matters because the usual advice for a Java service that will not start is setenforce 0, and here it would have been a wasted step while the actual problem sat in the config files. You can verify this yourself after all services are running:
sudo ausearch -m avc -ts recentOn a successful install, the output is:
<no matches>Confirm that SELinux is still enforcing (you should never disable it):
getenforceThe expected answer is a single word:
EnforcingIf you move a service to a non-default port or path and something stops working, look for AVC denials before you change anything else. List the denials from the last 10 minutes and turn them into a draft policy module:
sudo ausearch -m avc -ts recent | audit2allow -M graylog-customRead the generated graylog-custom.te before you load anything. audit2allow allows whatever was denied, and that can include something that should stay blocked. Only when every rule in it makes sense, load the module:
sudo semodule -i graylog-custom.ppRemove it later with sudo semodule -r graylog-custom if the underlying change is reverted.
Step 7: Complete the Initial Setup
On first start, Graylog runs in preflight mode with a temporary setup password. This password is generated randomly and written to the server log file:
sudo grep "Initial configuration" /var/log/graylog-server/server.logThe log line shows the temporary credentials:
Initial configuration is accessible at 0.0.0.0:9000, with username 'admin' and password 'XXXXXXXXXX'.The real password is 10 random characters, and we masked ours. It changes every time the server starts in preflight mode, so read the log again if you restart the service before finishing the wizard. Open http://10.0.1.50:9000 (your server’s address) in a browser. Preflight mode uses HTTP basic authentication, so the browser’s own login prompt appears rather than a Graylog page. Enter admin and the temporary password from the log, not the one you hashed. The initial setup wizard appears:
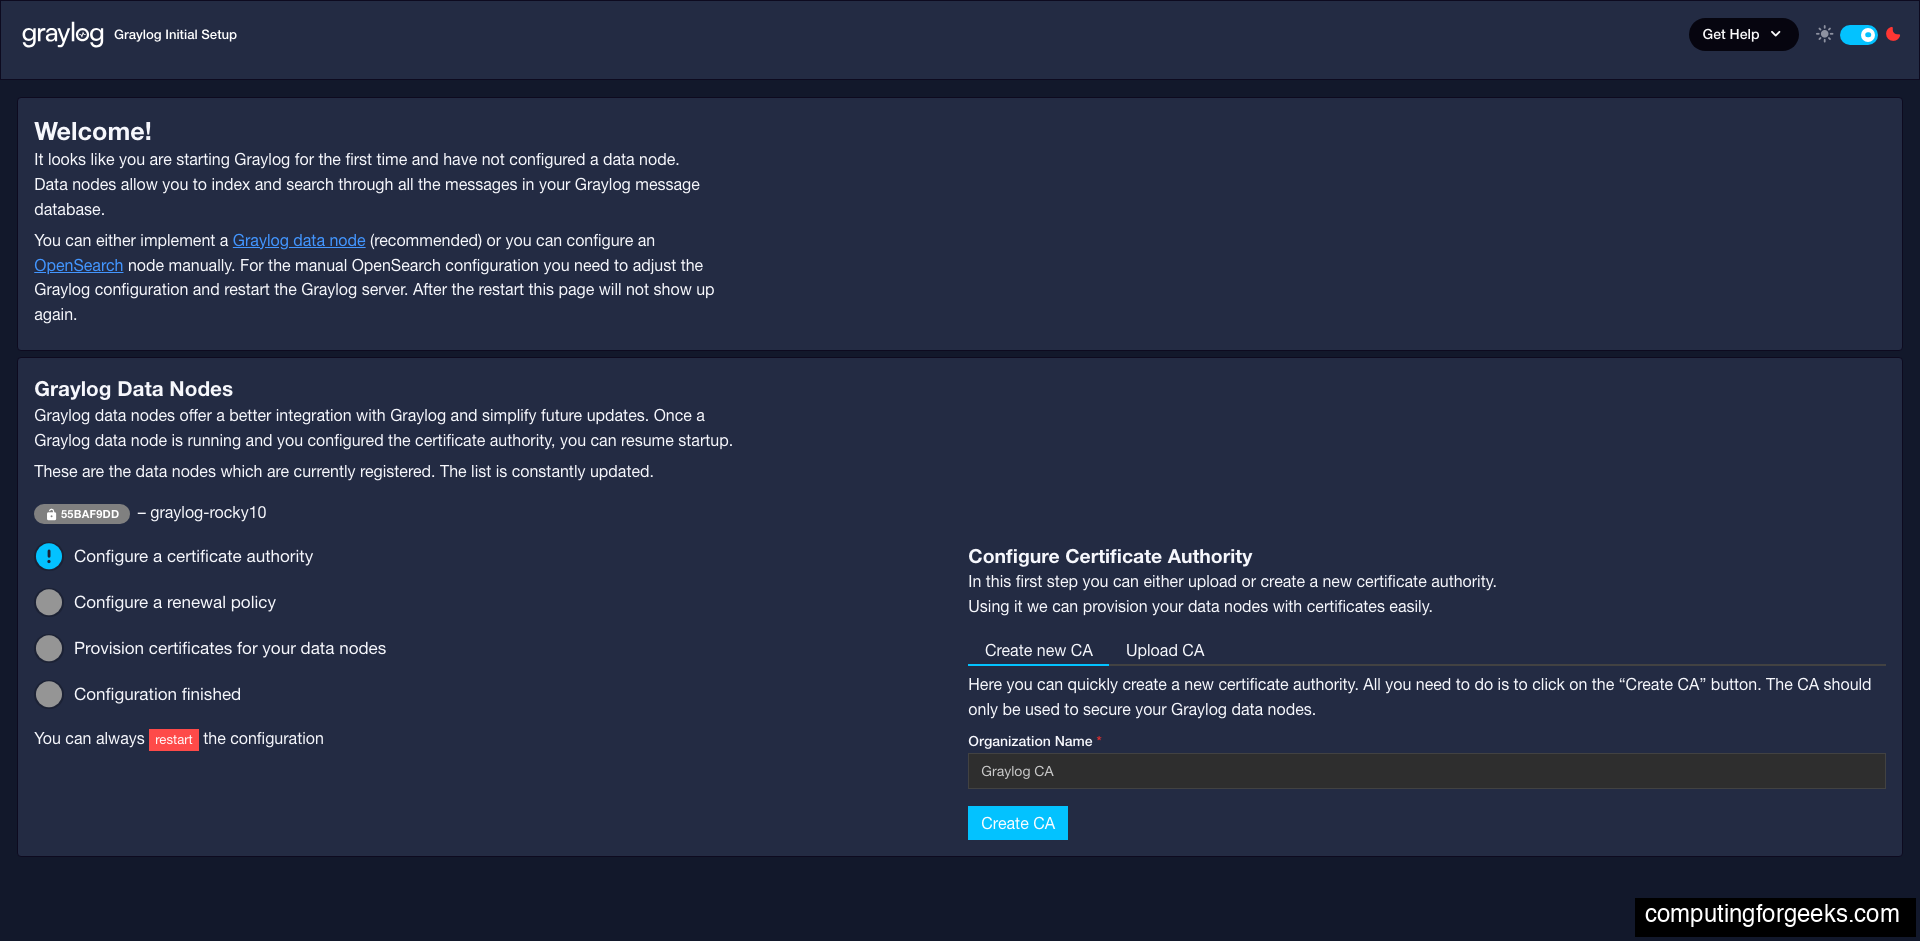
The wizard has four checklist items on the left side. Work through them in order.
Configure a Certificate Authority
Leave the Create new CA tab selected, keep the prefilled organization name Graylog CA or type your own, and click Create CA. A “CA created successfully” toast confirms it. This internal certificate authority issues TLS certificates to Data Nodes, so all communication between Graylog Server and the Data Node is encrypted.
Configure a Renewal Policy
The renewal policy decides what happens when certificates are about to expire. The defaults are Automatic renewal with a certificate lifetime of 30 Day(s), and they work well for most deployments. Click Create policy:
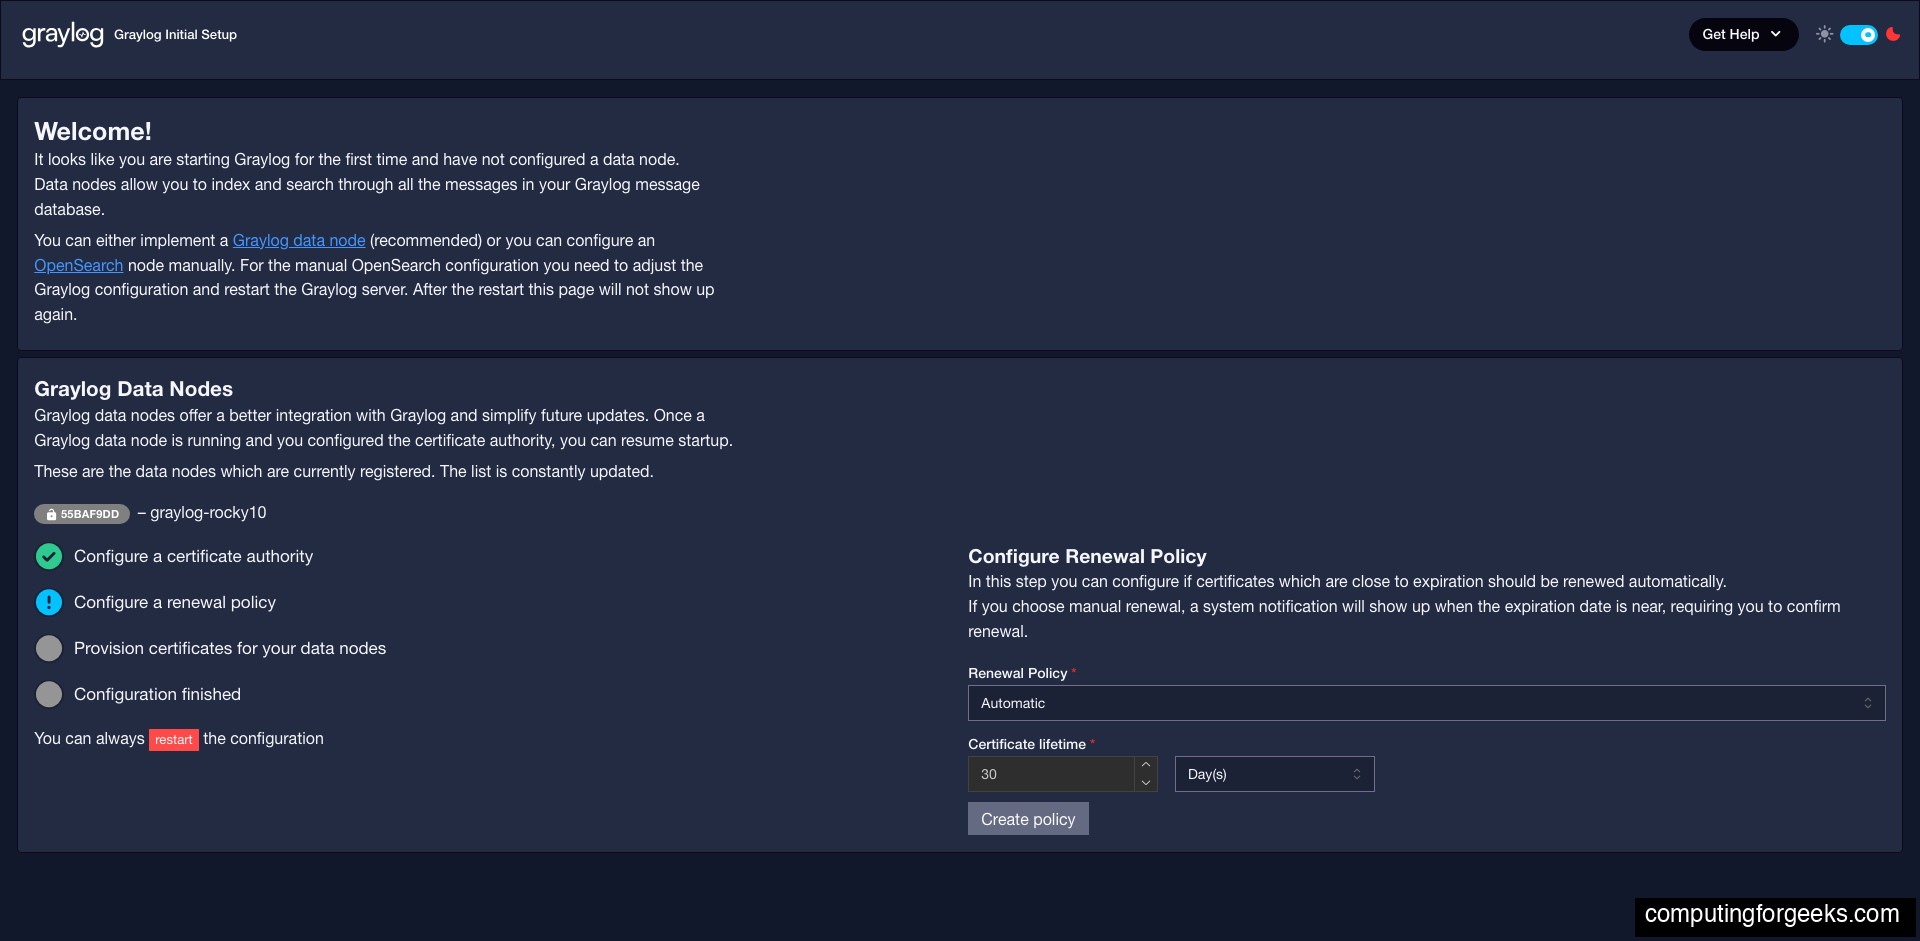
Manual renewal is the other option. With it, Graylog raises a system notification as the expiry date nears and waits for you to confirm, which is easy to miss on a box nobody logs in to every week.
Provision Certificates
Click Provision certificate and continue. Graylog generates a TLS certificate for the Data Node and uploads it. The Data Node restarts with the new certificate applied. On our 2 vCPU lab VM the button read “Provisioning certificate…” for about 75 seconds, so give it time before you assume it hung. When it finishes, the lock icon next to the Data Node in the list closes:
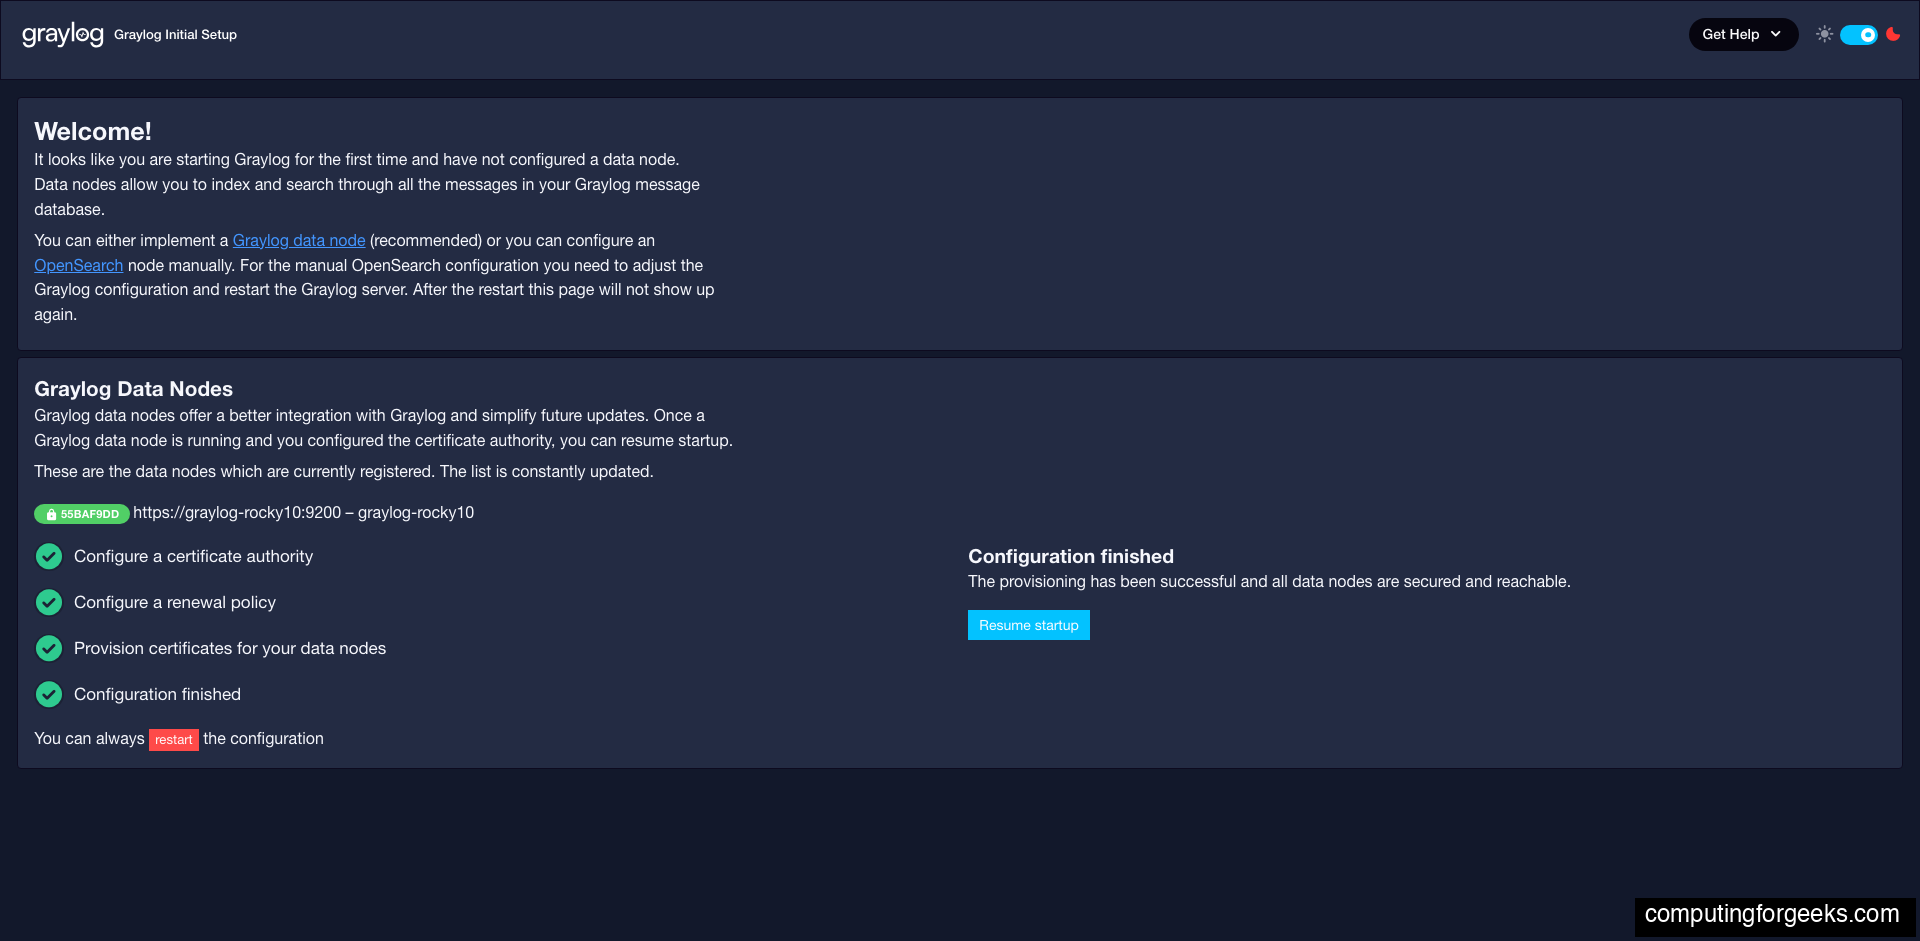
All four checklist items turn green, and the panel reports that all data nodes are secured and reachable. Click Resume startup. Graylog exits preflight mode and restarts into normal mode; the sign-in page took about 45 seconds to appear in our run.
Log in with Your Admin Password
After the restart, Graylog shows its own “Welcome to Graylog” sign-in page. Use admin and the plaintext password you hashed for root_password_sha2, not the preflight password. Graylog 7.2 does not open on the old dashboard of panels. It lands on an onboarding page with Enroll Collector (Preview) and Set up Input cards, and the first thing in front of it is a “Help us improve Graylog” prompt asking to collect anonymous usage data:

Pick Cancel or Ok; the prompt says you can change the choice later in your user profile. To swap the onboarding page for the regular welcome page, click Dismiss onboarding at the top right. Graylog asks first, because this setting applies to every user of the installation:

After Dismiss for everyone, the welcome page shows an Overview row (Messages Today, Alerts Today, Events Today, Top 5 Sources) above Favorite Items, Recent Activity, Last Opened, News and Releases. The top navigation reads Search, Streams, Alerts, Dashboards, Enterprise, Security and System. Graylog is now ready to receive logs.
If this is your first Graylog install, take the Graylog 7 web interface tour next. It starts from this dashboard and covers the top navigation, the input setup wizard, search, streams, dashboard widgets and a first alert.
Step 8: Verify the Installation
Confirm all three services are running. Do this after the preflight restart, because a service can look fine in preflight mode and fail once Graylog switches to normal mode:
sudo systemctl is-active mongod graylog-datanode graylog-serverAll three should return active:
active
active
active
Confirm all expected ports are listening. The awk keeps only the state, address and process columns. After certificate provisioning, the Data Node’s OpenSearch should be bound to 9200 and 9300:
sudo ss -tlnp | grep -E '9000|9200|9300|8999|27017' | awk '{print $1, $4, $6}'You should see five listeners, one more than there are Graylog packages, because OpenSearch runs as its own process:
LISTEN 127.0.0.1:27017 users:(("mongod",pid=24977,fd=9))
LISTEN *:9000 users:(("java",pid=26129,fd=48))
LISTEN *:8999 users:(("java",pid=26021,fd=430))
LISTEN *:9200 users:(("java",pid=26713,fd=734))
LISTEN *:9300 users:(("java",pid=26713,fd=730))
Read the PIDs, not just the ports. 9000 belongs to the Graylog server JVM, 8999 to the Data Node JVM, and 9200 plus 9300 to a third Java process: the OpenSearch 3.7.0 instance the Data Node launched after it received its certificate. If 8999 is there but 9200 and 9300 are missing, provisioning in Step 7 has not finished. MongoDB is the only listener on 127.0.0.1, as expected.
Test the REST API load balancer endpoint:
curl -s -u admin:YourSecurePassword http://localhost:9000/api/system/lbstatusA healthy node returns ALIVE. Here are the same checks in one terminal on the Rocky Linux 10.2 lab host, with the installed package versions at the end:

The AlmaLinux 10.2 VM produced the same five listeners and the same ALIVE answer. With all three services up for a few minutes, free -m showed about 4.5 GB used of 7.7 GB on Rocky and 4.4 GB of 7.9 GB on AlmaLinux, so 8 GB really is the floor for this stack.
OS Version Differences
The installation steps are the same across Rocky Linux 10, 9, 8 and AlmaLinux 10, 9, 8. The MongoDB repository path is the one line that changes, and EL10 is the trap because the obvious path is the wrong one:
| Item | Rocky 10 / AlmaLinux 10 | Rocky 9 / AlmaLinux 9 | Rocky 8 / AlmaLinux 8 |
|---|---|---|---|
| MongoDB 8.2 repo path | /yum/redhat/9/ (the redhat/10 8.2 tree has no server package) | /yum/redhat/9/ | /yum/redhat/8/ |
| What we ran | Full install on Rocky 10.2 and AlmaLinux 10.2 | Rocky 9.8: MongoDB 8.2.12 started, Graylog 7.2.2 packages installed | Rocky 8.10: MongoDB 8.2.12 started, Graylog 7.2.2 packages installed |
vm.max_map_count default | 1048576 on Rocky 10.2, leave it | Check with sysctl, raise to 262144 if lower | |
| Java heap config | /etc/sysconfig/graylog-server | ||
| Graylog repo package | graylog-7.2-repository_latest.rpm | ||
| SELinux behavior | Enforcing, zero AVC denials on the default install (Rocky 10.2, AlmaLinux 10.2) | ||
| Default firewall | firewalld | ||
Graylog’s own Red Hat installation page still only names Red Hat 8 and 9 and walks through MongoDB 8.0. So on EL10 you are running a combination the vendor does not list yet, even though every service in it came up clean for us. If you need a vendor-supported answer for a support contract, EL9 is the safe pick today. For Debian-family servers the same stack is covered in installing Graylog 7 on Ubuntu and Debian, and if you would rather skip the packages entirely there is a Graylog Docker Compose setup.
Production Hardening Notes
The installation above gives you a working Graylog 7 deployment, but there are a few things to address before exposing it to production traffic.
- TLS on the web UI: Put Graylog behind an Nginx reverse proxy with Let’s Encrypt and set
http_bind_addressback to127.0.0.1:9000. Never expose Graylog on plain HTTP over the internet. - Stronger admin password: The SHA-256 hash method is fine, but the underlying password should be at least 20 random characters. Consider moving to LDAP, OIDC, or SAML authentication for production.
- Resource limits: On servers with more RAM, increase both the Graylog Server heap (
-Xmx) and the Data Nodeopensearch_heap. Graylog’s Red Hat guide sizesopensearch_heapat half the system memory, up to 31 GB, which assumes the Data Node has the machine to itself. On a single host like this one, leave room for the server heap and MongoDB as well. - Message journal: Move
/var/lib/graylog-server/journalto a dedicated SSD partition if you expect more than 1000 messages per second. - Backup MongoDB: Configuration (users, streams, pipelines, dashboards) lives in MongoDB. A backup strategy for the
graylogdatabase is essential. - Monitor the Data Node: OpenSearch on 9200 now sits behind the certificates and tokens from Step 7, so a bare
curlto it is not the health check. Ask Graylog instead withcurl -s -u admin:YourSecurePassword http://localhost:9000/api/system/indexer/cluster/health, whosestatusfield readsgreenon a healthy node. Aredstatus means indexing has stopped. - Pin MongoDB: The 8.2 repository moves to new patch releases on every
dnf update. Graylog’s Red Hat guide addssudo yum versionlock add mongodb-orgafter the install so database upgrades happen when you choose them. Install the plugin first withsudo dnf install -y python3-dnf-plugin-versionlock, and lock themongodb-org-*subpackages too if you want the server itself held, not just the metapackage.
With the server running and the web UI reachable, the next step is creating your first input. Most Linux servers already run rsyslog. That makes a Syslog input on port 1514/udp the fastest path to real logs: the tour linked above walks through the input wizard, and the rsyslog centralized log server guide covers the forwarding side on the clients.