Repository navigation
Deployment guide
Prerequisites
To begin, you will need:
- Power Apps Studio
- SharePoint
- Power BI
- A copy of Associate Insights app package from GitHub repo https://github.com/OfficeDev/microsoft-teams-<>
This step is recommended if you want to set up a dedicated team of associates to access the Associate Insight Power App. If you already have a Team with all required members then you can ignore this step.
-
Open Teams desktop app or open https://teams.microsoft.com/go#
-
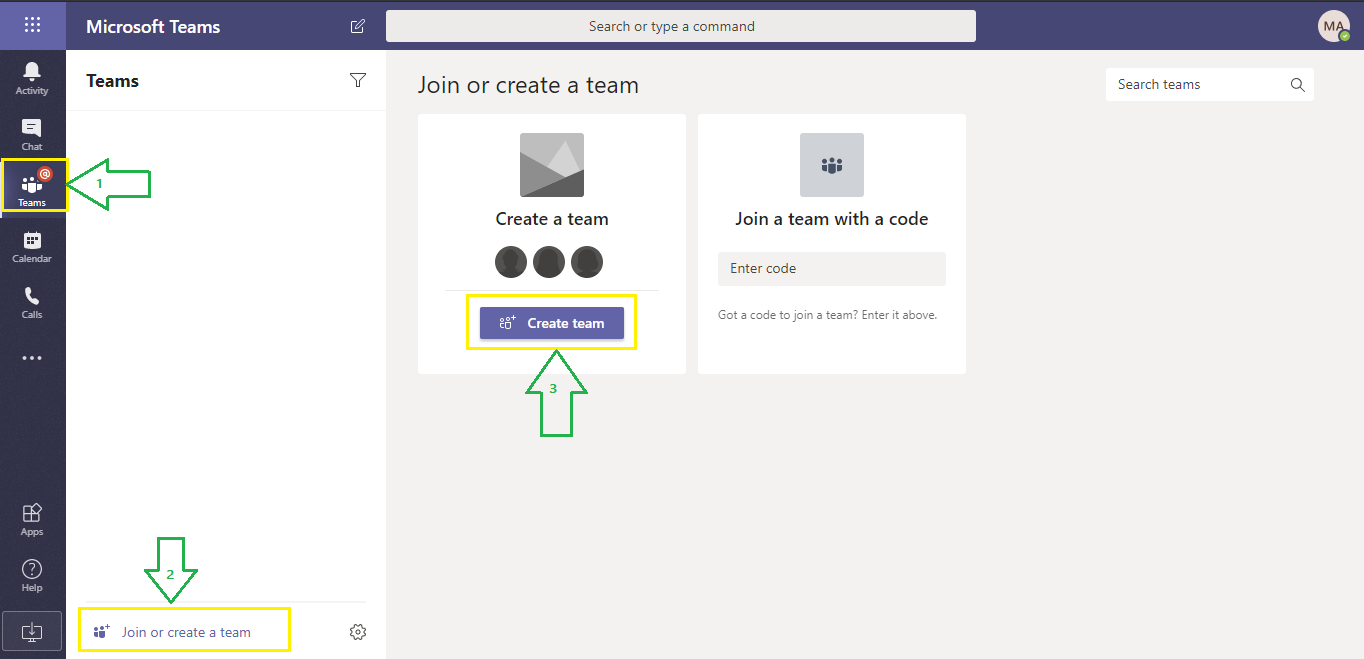
Click on the Teams tab in the left menu bar.
-
Click on Join or create team and then Click on Create team button.
-
In the resulting popup, select Build your team from scratch..
-
In the popup to select type of the team, select Private..
-
Enter the team details such as Team name and description and click Next to create the team.
-
Add any members that you may want to add in your newly created team and then close the popup tab.
-
The team will get created successfully which will also create a SharePoint site of the same name.
-
Enter the SharePoint URL https://{tenantname}.sharepoint.com/_layouts/15/sharepoint.aspx(replace the tenantname with your tenant name) in a browser and login using your SharePoint credentials. Check here and you will be able to see the SharePoint site of the same name under Site section.
-
Search the SharePoint site (if you have followed step 1 then your SharePoint site name will be same as your team name) https://{tenantname}.sharepoint.com/_layouts/15/sharepoint.aspx(replace the tenantname with your tenant name)
-
Alternatively you can see your Team name under the Site section, click on it to open your SharePoint site.
-
Click on + New > List:
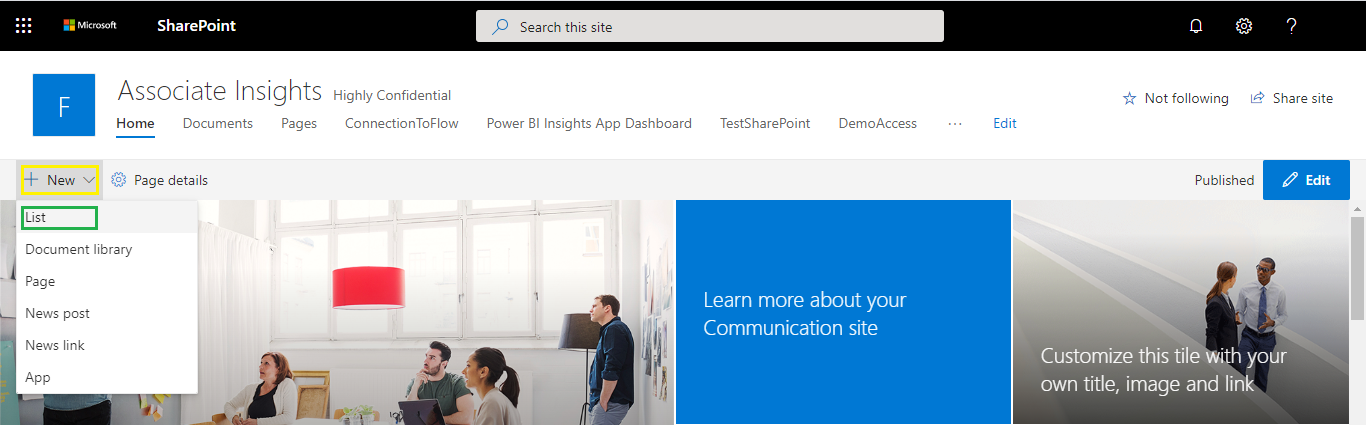
Note: Before getting started on creating SharePoint list, please take a note that SharePoint list name and columns should be named as-is for successful deployment.(Refer Step-3)
A. Application configuration list
-
List name: AppConfigurations
-
Description: SharePoint list to store configurable values used in app screens like titles, labels etc.
-
List structure:
Name of column Type Comment LabelName Single line of Text Unique value for each label LabelValue Single line of Text Values to configure the display UI for the application -
List Values: Label Name should be populated with below values. Label Values can be as per user requirement and Power Apps will display UI based on these values.
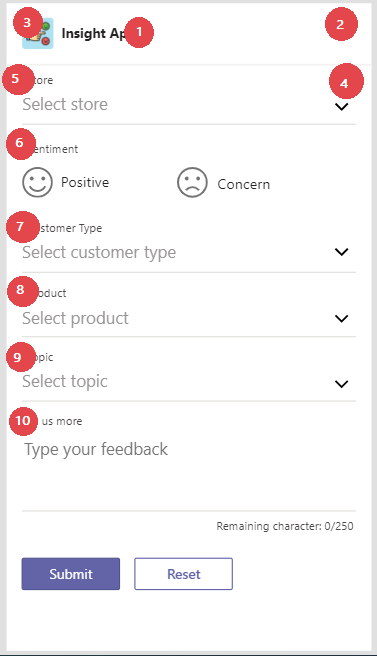
Sr. No. Label Name Label Value 1. AppTitle Title of the App (e.g. Fabrikam Electronics) 2. AppTitle_BGColor Background color of the header in hex code (e.g. #FFFFFF) 3. App_Logo Not applicable 4. App_BGImage Not applicable 5. Store_Title Title text for the Store label 6. Sentiment_Title Title text for the Sentiment label 7. CustomerType_Title Title text for the Customer Type label 8. Product_Title Title text for the Product label 9. TopicList_Title Title text for the Topic label 10. Comment_Title Title text for the Tell us more comment box label Note: The serial number given above in the table is only for pointing label name in the image below:
Note: Repeat "Step 2" (i.e. Step 2: Create SharePoint lists) each time for creating below five remaining SharePoint lists.
B. Product feedback list
-
List name: Product Feedback
-
Description: This list is used to capture product feedback from the app. Please ensure to create the list skeleton only and do not add any row values to the list.
Name of column Type Comment Store Single line of Text List of stores Customer Type Single line of Text Type of customer Product Single line of Text List of products Topic Single line of Text List of topics Comments Multiple line of Text Comments given by user Sentiment Single line of Text Sentiment of the user e.g.: Positive or Concern
C. Customer type list
-
List name: Customer Type
-
Description: The list is used to populate Customer Type drop-down field.
Name of column Type Comment CustomerType Single line of Text Type of customers
D. Product list
-
List Name: Product List
-
Description: The list is used to populate Product List drop-down field.
Name of column Type Comment ProductName Single line of Text List of the products
E. Store list
-
List Name: Store List
-
Description: The list is used to populate Store List drop-down field.
Name of column Type Comment StoreDescription Single line of Text List of stores
F. Topic list
-
List Name: Topic List
-
Description: The list is used to populate Topic List drop-down field.
Name of column Type Comment TopicName Single line of Text List of topics
-
Note: Please change Title name in each list as suggested in SharePoint list creation Step 2. (i.e. Step 2: Create SharePoint Lists)
-
Click on the Settings icon at the top right of the SharePoint list and click on the List Setting:

-
Under the “Columns” section, click on the “Title” column under Column (click to edit).

-
Now change Title name in each list as suggested in SharePoint list creation step (Step 2), Make sure to select “No” under “Require that this column contains information” and click “Ok” at the bottom.

We recommend to repeat this step after creating each list before adding columns. This is must for the application to work correctly as described.
1 Download the package. Click here and then click on "Download" button.
2 Import the package into the Power Apps environment:
-
Open Power Apps website (Click here)
-
Select Apps -> Import canvas app as shown below:

-
Upload the zip package that you downloaded via clicking on Upload button.
-
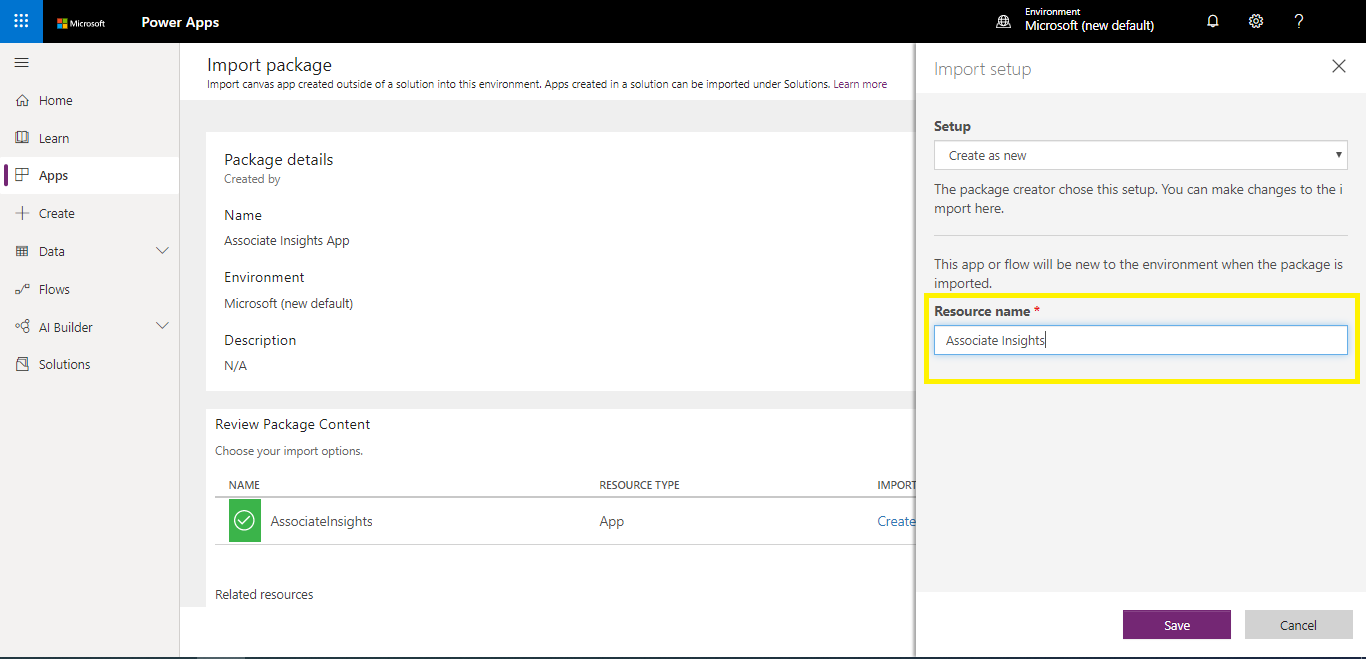
Click on the wrench icon present under ‘Action’ label to changes the name of the app. Change the name of the app and click on save:
-
Click on import button at bottom and check if imported successfully
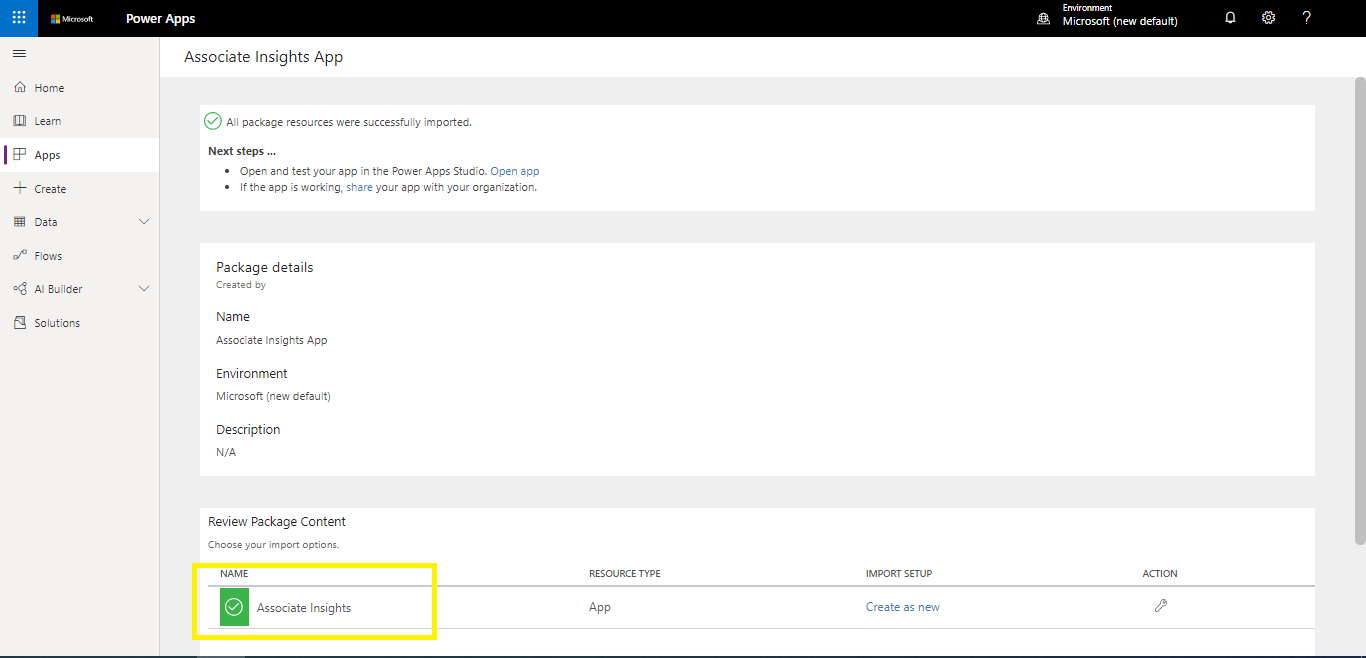
-
Click on the ‘Open App’ which is present in the first sentence "Open and test your app in the Power Apps Studio" under heading "Next steps ..." to open the app in edit mode.
-
Please provide consent to use SharePoint connectors.
-
After the app opens in edit mode, go to data source tab as below:
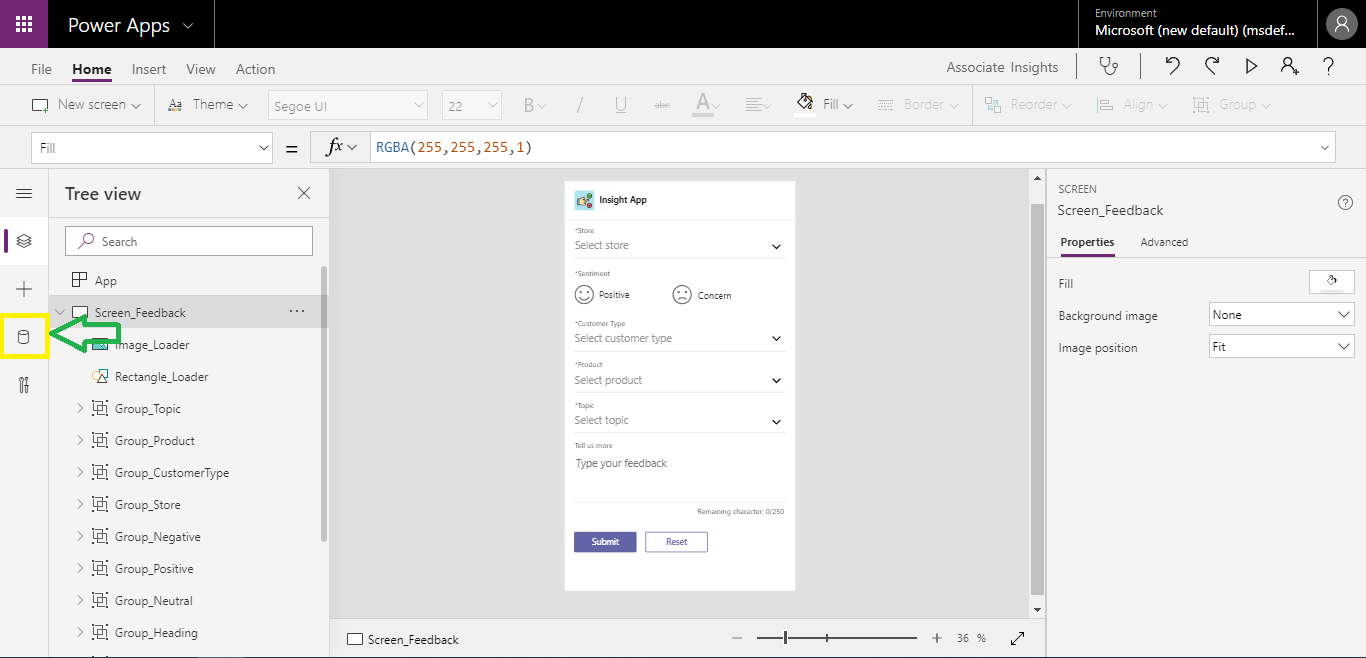
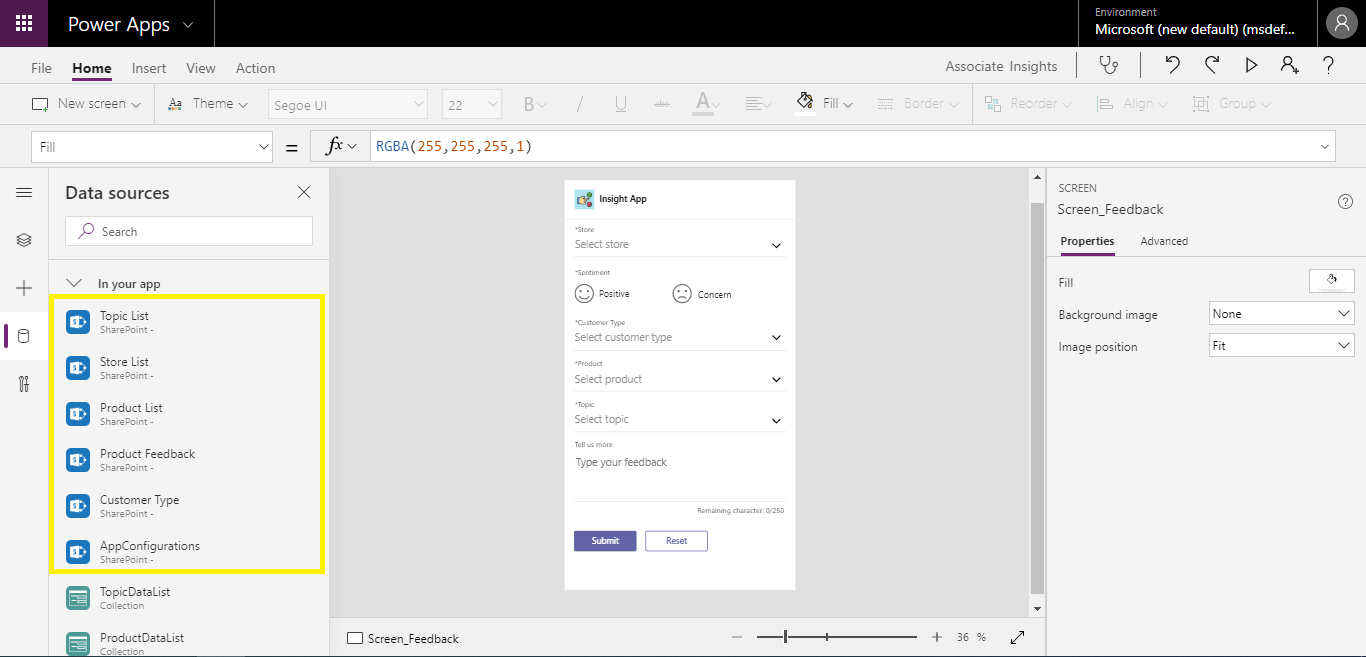
- Remove the existing SharePoint lists (if shown):
- Search for SharePoint in the Data sources search box and click on the SharePoint to create connection.
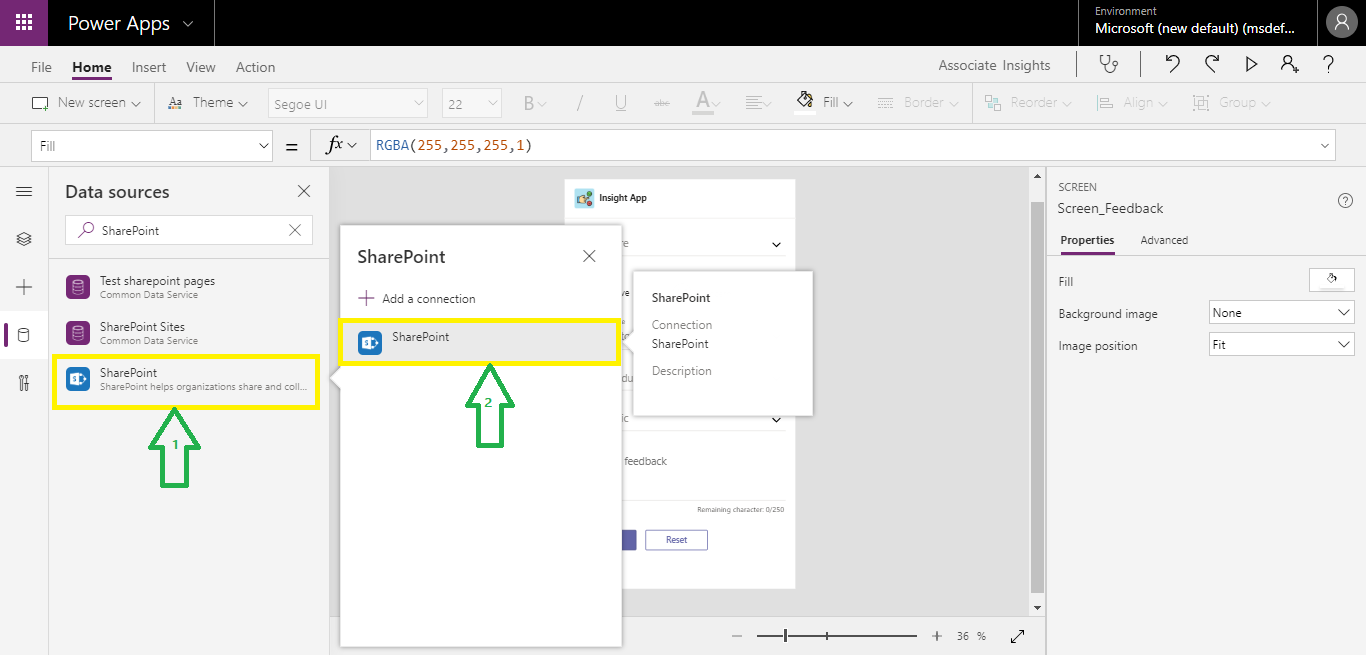
- Enter the URL of created SharePoint site and click Connect.
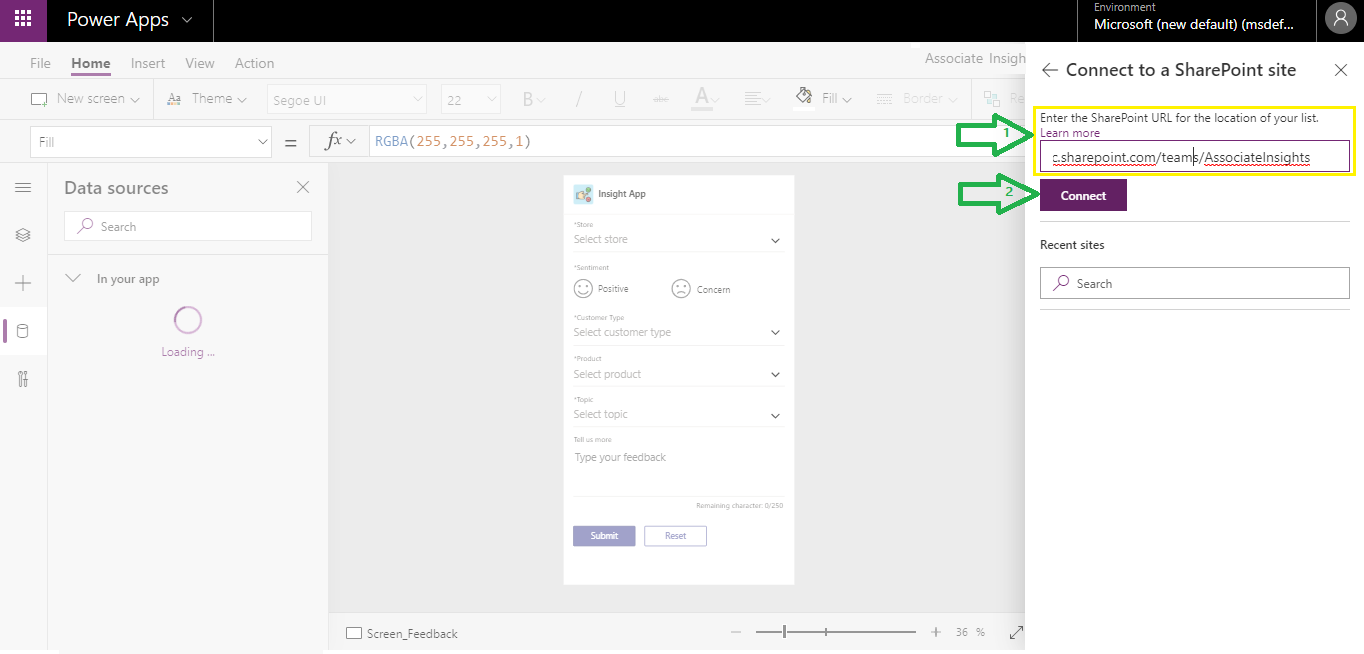
- Select the SharePoint lists created in Step 2 and click Connect.
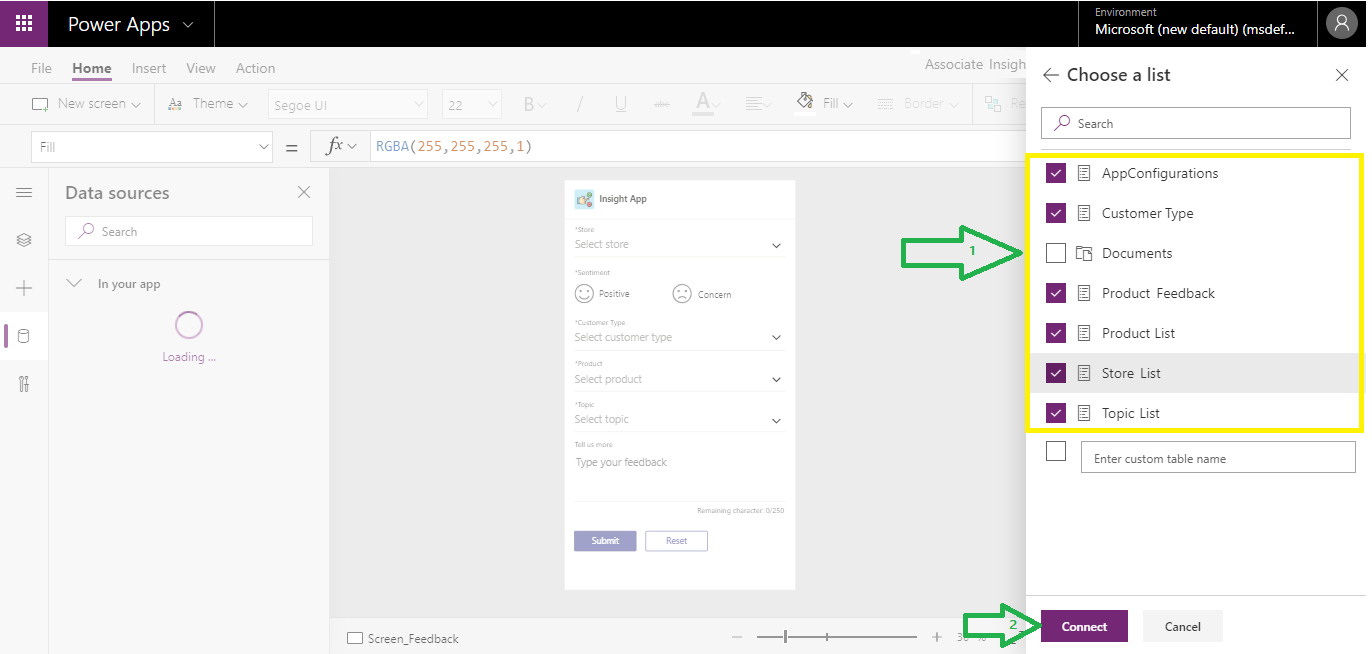
- Go to Tree View > App > Click on ... > Run OnStart
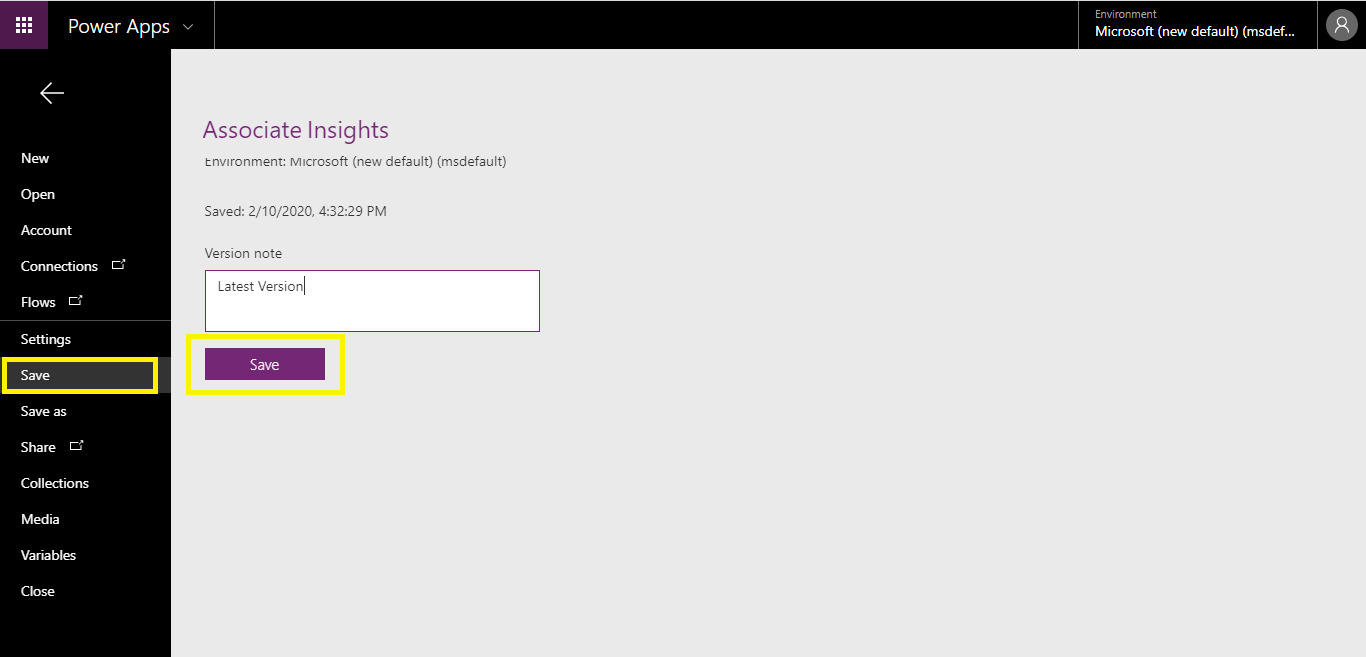
- Save the app by going to File > Save
- Publish the app and close the app.
Troubleshooting Guide: See Documentation
Conclusion: The Associate Insights application is customized and deployed to your Power Apps workspace. This can be further integrated in Microsoft Teams channel.
-
Share PowerApp: Admin needs to share the app to all individuals who will be using the app. Please follow the steps outlined below to share the Power App:
-
Go to Power Apps website. Click here
-
Click on Apps from left hand menu bar, select the app which you have imported in previous step (i.e. "Importing Power Apps package") and click on the three dots.
-
On click, you will see more option menu, click on the Share option.
-
Select a user by searching the name or typing email address. You can add multiple users at the same time. Check "Send an email invitation to new users" if you want the users to be notified with the App link.
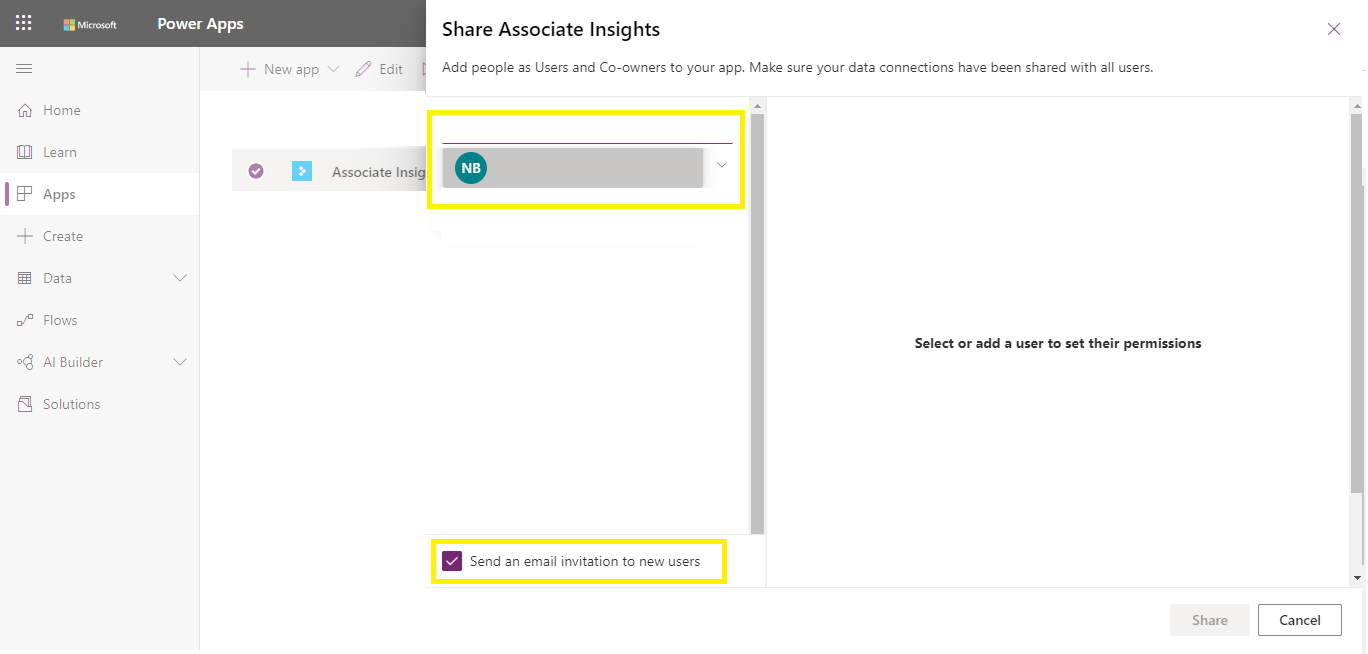
Here you will have two options i.e. you can make a user as end user of the App or make a user as Co-owner of the App(Optional).
Make End User:
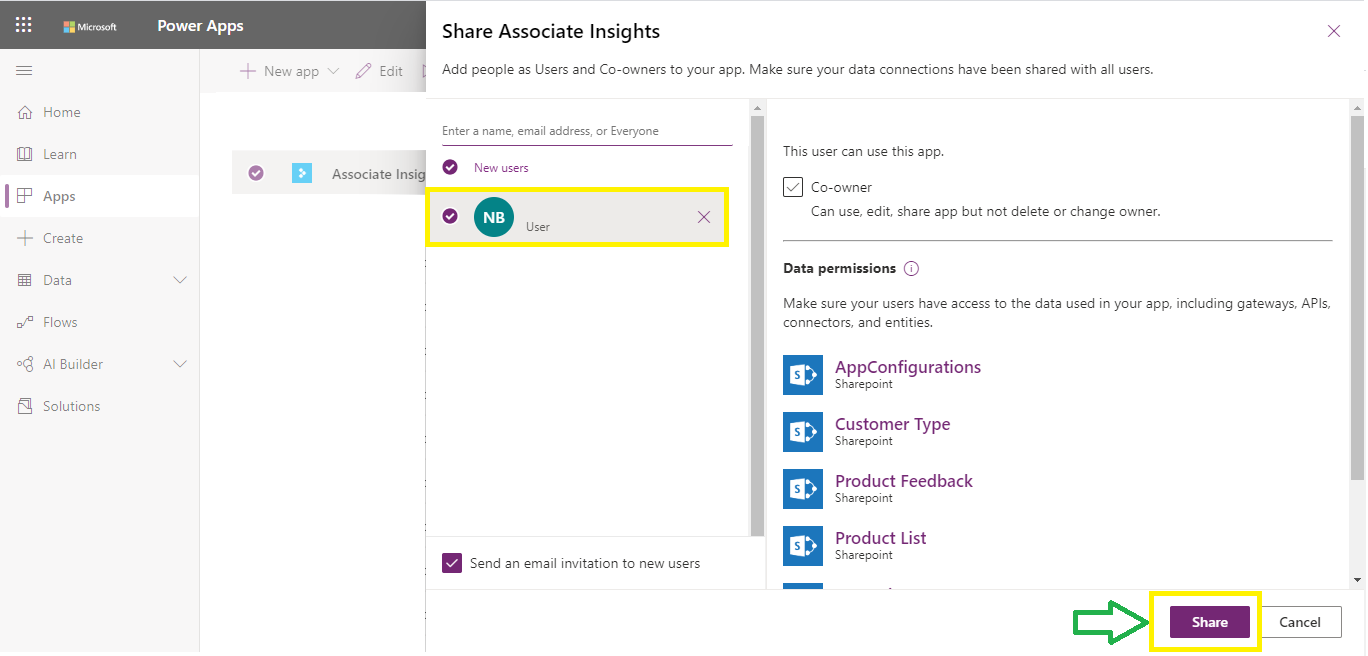
Make Co-owner:

-
-
Share SharePoint site: Admin also needs to share the SharePoint site to all individuals who will be using the app. For giving access of SharePoint site, please follow below steps:
-
Go to SharePoint site that is created above in the first point first heading first step (i.e. "Step 1: Create SharePoint site") and click on Settings icon at top right corner and click on the "Site permission":

-
Click on "Advanced Permissions settings".
-
Click on the Grant Permission option from top menu bar and search the user name or type the email address of the user to whom you want to share the site.

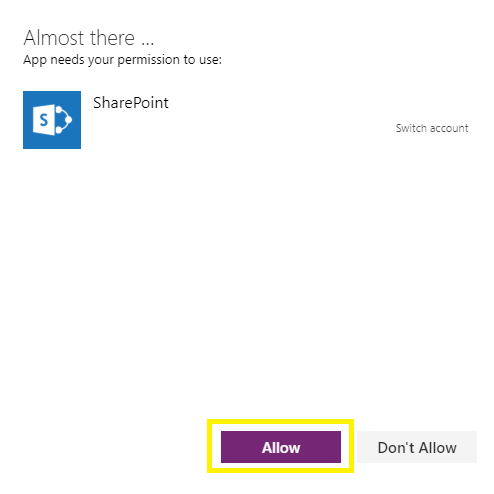
Note: Every user accessing the app for the first time will be prompted to provide permissions to the App to access the SharePoint source. User should click on 'Allow' to proceed ahead.
-
Please follow the steps outlined below to download the app package and add it as a channel tab:
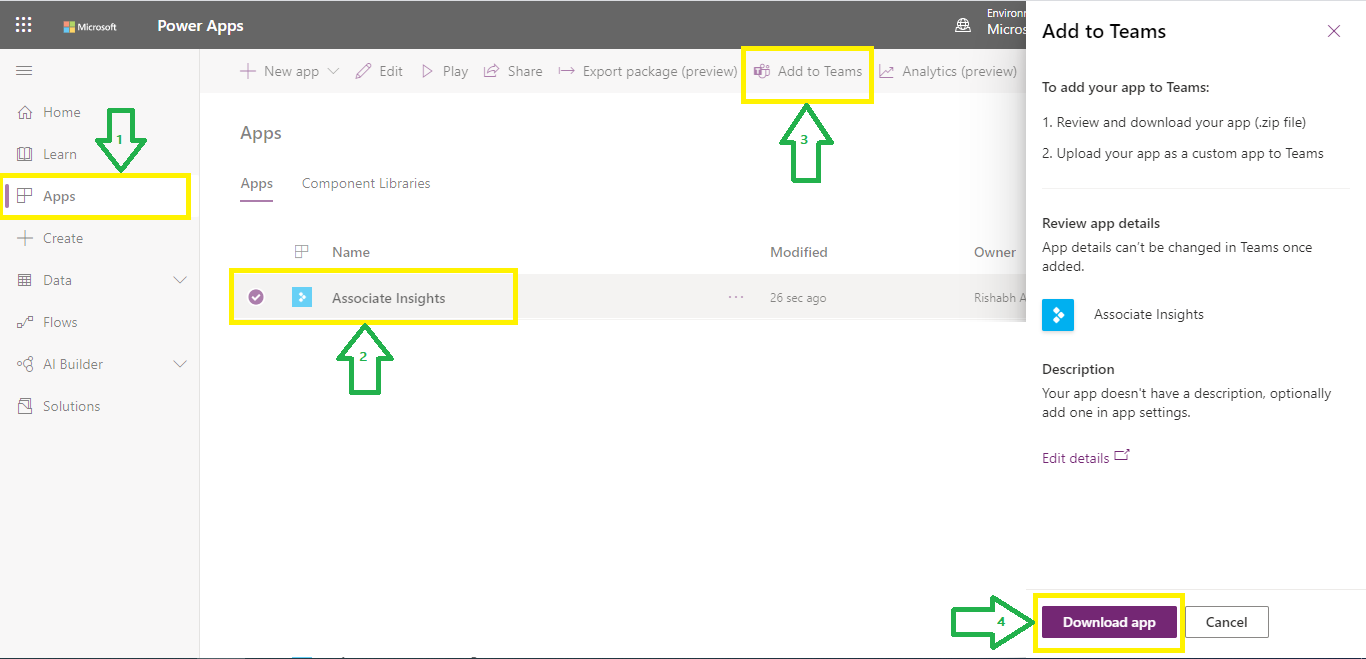
- Open Power Apps website Click here.
- Go to Apps menu in the left menu bar and you will be able to see the app you have imported.
- Select the imported app, click on Add to Teams and then click on "Download App" to download the app
- Go to Teams -> Apps (in the left menu) -> Upload a Custom App. Select the downloaded zip package from the previous step and click on "Open".

- Select 'Add to a team'. On click, Teams will prompt you to select the channel in which you want to add this app. Select the appropriate channel and then click on Add.


Note for using app in mobile Teams: By default, users will be redirected to the Power App website when accessing the tab through Teams mobile. Users on iOS will be able to change the default behavior by clicking on the three dots beside the channel tab name and click 'Open' to open the app in Teams.
Conclusion: Once the app is opened, all the configurable information will be read from AppConfigurations SharePoint list and other SharePoint lists namely Store List, Customer Type, Product List, Topic List will be the source of the drop-down fields.
If you wish to set up a Power BI report that can help to analyse and derive insights for decision making then proceed with the steps outlined below:
1. Pre-requisites
- Download Power BI desktop from Microsoft Store or PowerBI.com.
- Ensure the Power App is deployed
2. Configuring Power BI
- Download the Power BI package which contains the sample report to your local folder. Click here and then click on "Download" button.
- Open the Power BI file in Power BI desktop and click on “Edit Queries” from the “Home” menu at the top and click on the “Data Source Settings”.
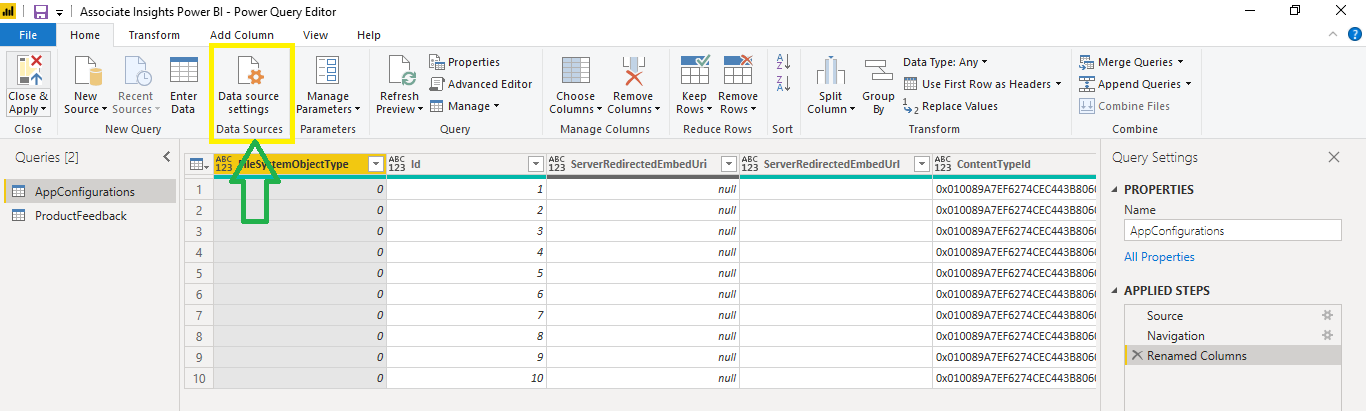
- Click on “Change Source” from the modal dialog box.
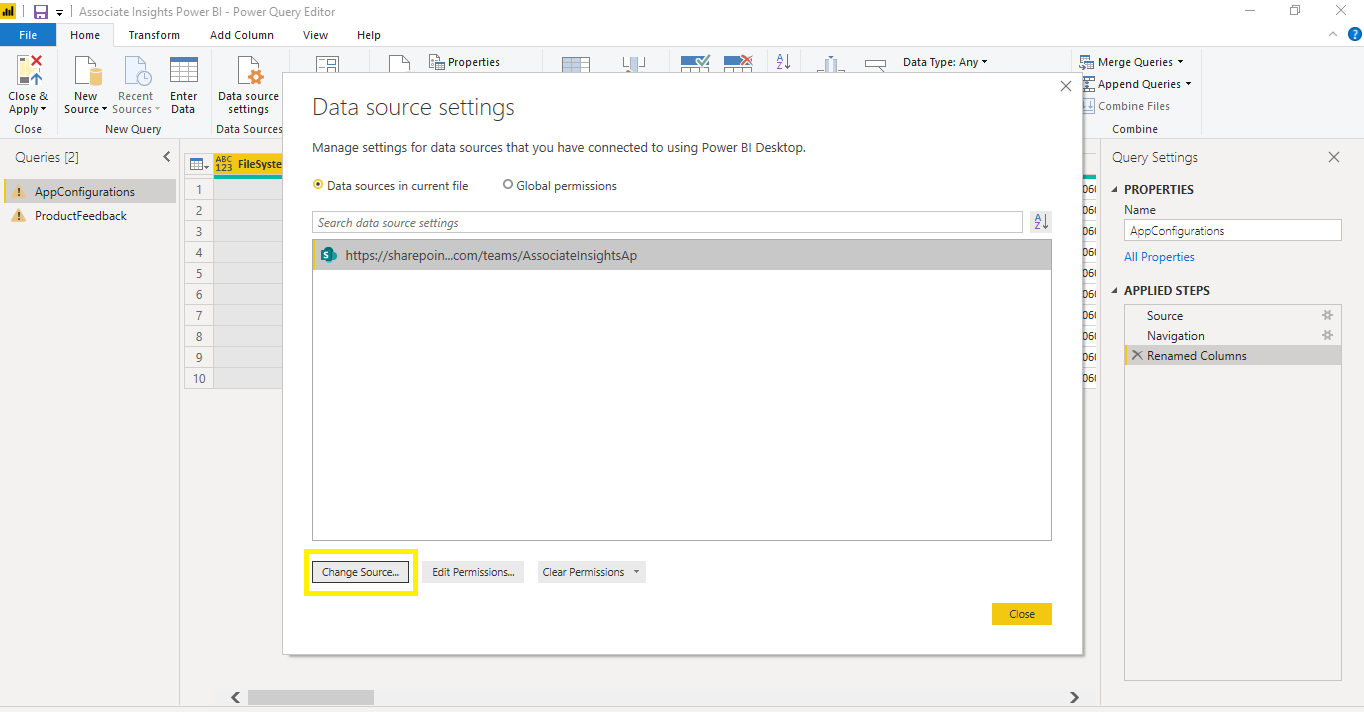
- Click on “Change Source” from the modal dialog box then update the SharePoint URL and click on OK and then click Close buttons.
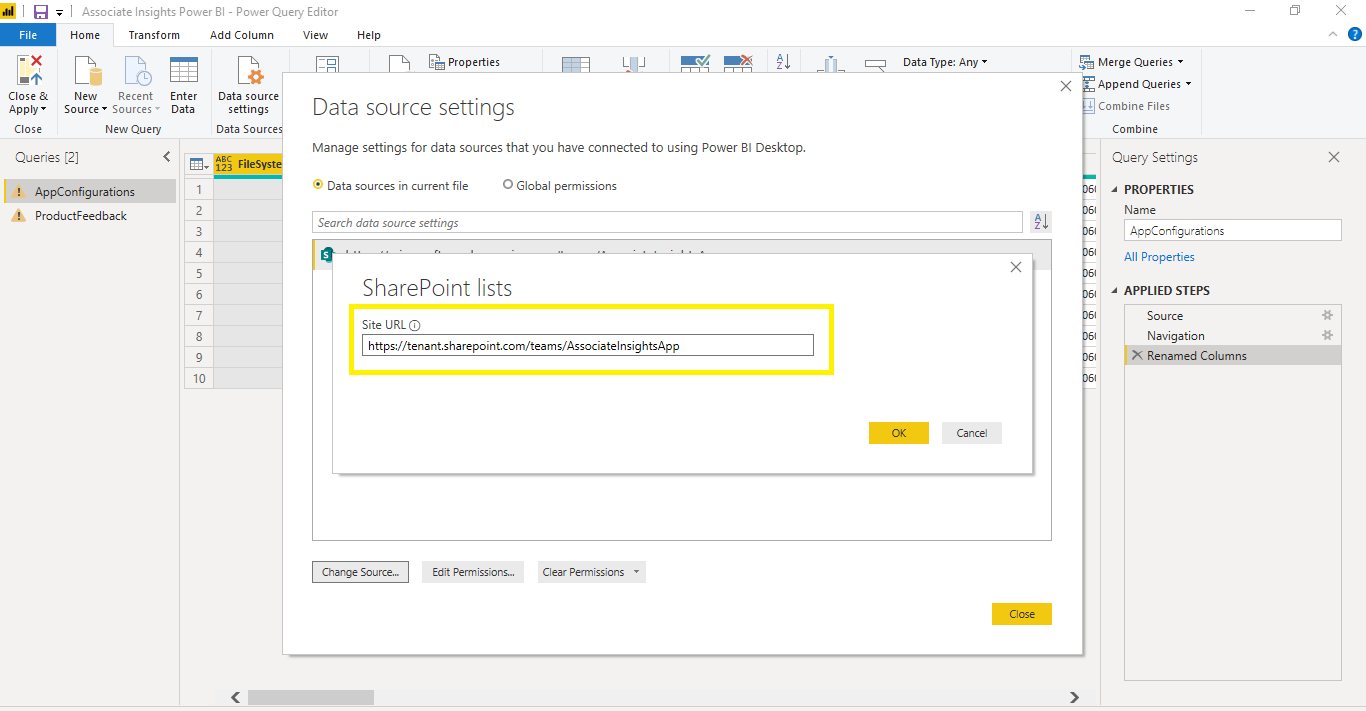
- After you update the SharePoint URL you will see an error for “Edit Credentials”, click on the “Edit Credentials” and choose “Microsoft Account” from the Authentication pop up, select the site from the drop-down “Select which level to apply these settings to” and click “Sign In”.

-
After clicking on "Sign In" it should ideally open up a modal window asking you to select your User ID or enter User ID. Select your User ID and click “Connect”.
-
After clicking connect, you will ideally see an error. This is normal. Select the Queries on the left hand side where there is an error. Under the “Query Settings” pane on the right hand side, delete the steps “Navigation” and “Renamed Columns” (ideally except the source).

- Now the source should populate with all the lists from the SharePoint site.

- Select the correct list. If you are fixing the error from “ProductFeedback” query on the left hand Queries window, select “ProductFeedback” list. If you are fixing the error on “AppConfigurations” query, select the “AppConfigurations” list. Click on the “Table” against the correct list for the each of the queries.
- This should bring the “Navigation” and “Renamed Columns” step back and the error should go away and you should see the data in the tables.

- Once you eliminate errors from both the queries, click “Close and Apply” under the Home menu up at the top. You should see the query change being applied and the report should point to the SharePoint list you created.

- If app title shows error icon at top then click on "Edit Queries" again and select the AppConfigurations table and rename the Title column as "Label Name" and click on "Close and Apply" from top menu bar.

- In a similar way if detail table shows an error then click on "Edit Queries" again and select the "Product Feedback" data table and rename Title column as "Store".
3. Publish the report
- Click on Publish to publish your Power BI Dashboard to the Power BI service.

- On click, select the appropriate O365 group in which you want to publish the report.

Conclusion: The Associate Insights Power BI Dashboard is customized successfully. This can be further integrated in Microsoft Teams channel.
4. Share Power BI Report
- Go to Power BI portal. Click here
- Click on My workspace -> click on the report name that you have published in the previous step -> click on share icon.

- After clicking on share icon you will see a side window (i.e. Share report) where you can add users by using their names or email ids and click on Share.
5. Add Power BI report to a team channel
Please ensure you have published the Power BI report as explained in last step before going ahead with the next steps.
- Navigate to the Teams channel in which you want to add the Power BI Dashboard and click on "+" icon from top.

- On click of "+" icon it should open a pop-up. Search for Power BI in the pop-up and click on it.

- After you click on Power BI icon it should open the below pop-up. Search for the published Power BI Dashboard and click on it and Save.

- After saving the tab it will open the Power BI Dashboard in the Teams's channel like below.

6. Set auto refresh frequency of Power BI report
It is recommended to set auto refresh frequency of Power BI report to see the updated data published Power BI report in the Teams channel. Please follow the below steps:
- Navigate to the Power BI portal. Click here
- Now expand My workspace and select published report under Datasets section.
- Expand Data source credentials and click on "Edit credentials".

- After you click on Edit credentials, it should open a sign in window. After signing in successfully, expand the Scheduled refresh setting and enable it.
- Click on "Add another time" to set the refresh frequency as per your choice(Select the Refresh frequency and Time zone as appropriate).

This concludes the deployment of Associate Insights Power App and associated Power BI report.
