

Power Query is a data preparation and transformation tool that allows users to connect to data sources and clean, transform and prepare data using the Power Query Editor.
1. Steps to Open Power Query in Excel
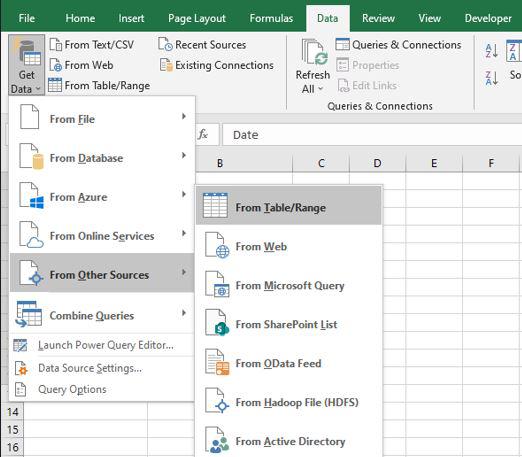
Step 1: Select any cell in the Excel table and go to Data to From Table/Range.
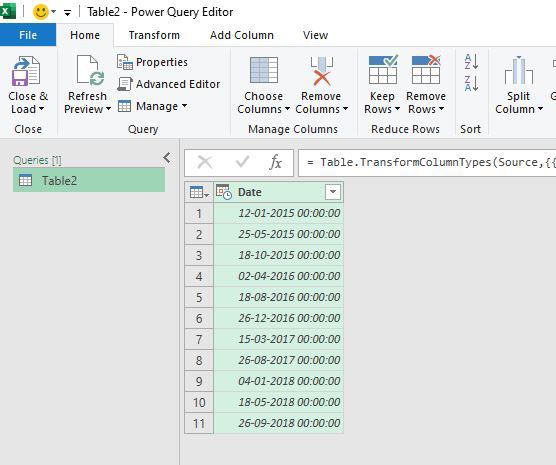
Step 2: Excel opens the table in Power Query Editor, where you can apply transformations.
2. Date modification with Power Query
1. Age
Age calculates the duration between the selected date and the current date. The result is returned in days, hours, minutes and seconds.
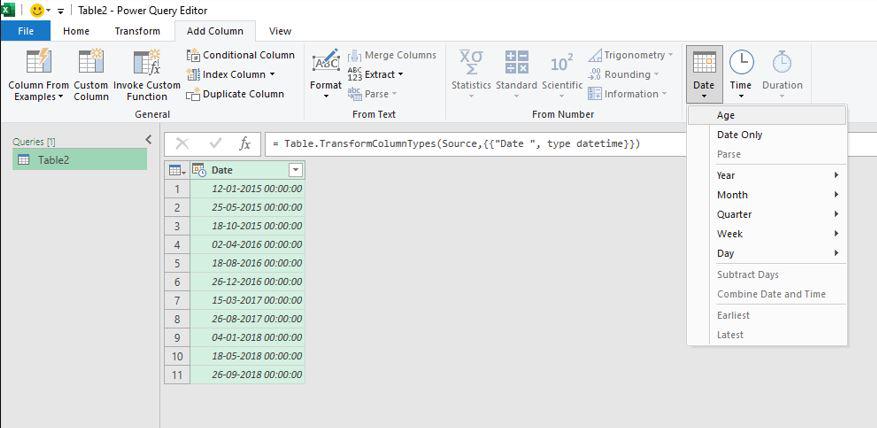
Step 1: Select the date column. Navigate to the add column tab on the top of the ribbon and then go to the Date and select Age.
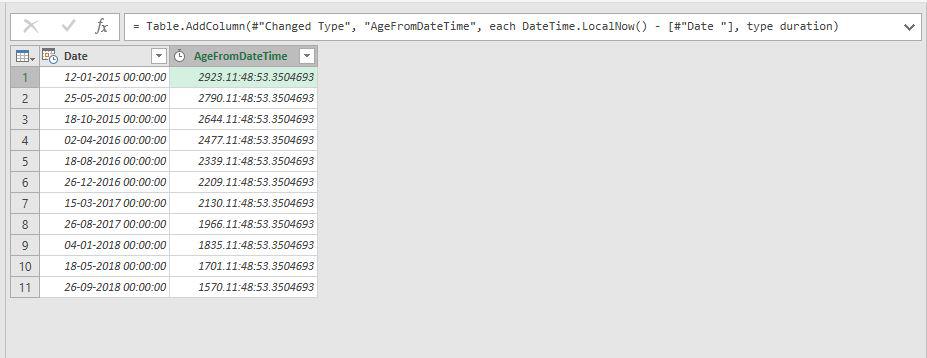
Step 2: Now as we can see with this command, the Date value is transformed into the AgeFromDateTime based time format: Days.Hours:Minutes: Seconds or 2923.11:48:53.3504693.
2. Date Only
When we choose the Date Only option and choose a date column, the time is removed from the display and only the date is displayed. It creates a new column with the date name and shows only the date.
Step 1: Select the date column. Navigate to the add column tab on the top of the ribbon and then go to the Date and select Date Only.
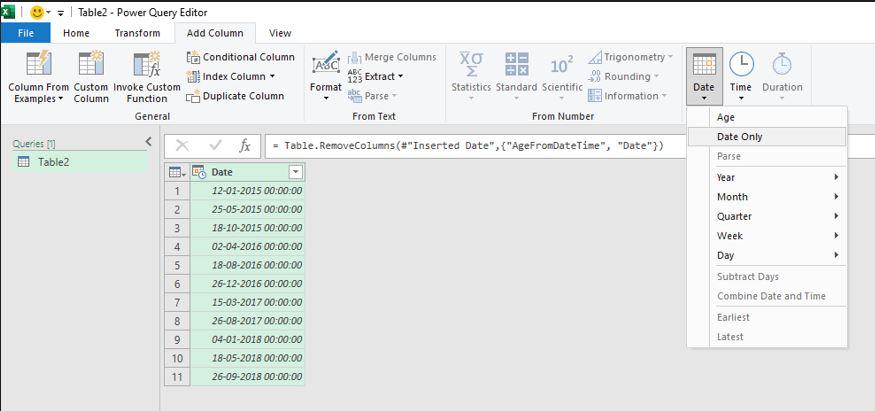
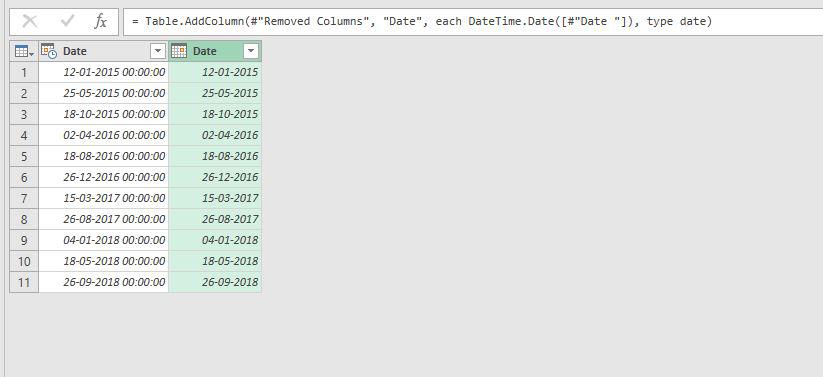
Step 2: Now as we can see with this command, the Date value is transformed into the Date-based format: Date or 12-01-2015.
3. Year
Extracts the year from a date. The available transformations include Year, Start of Year and End of Year.
Step 1: Select the date column. Navigate to the add column tab on the top of the ribbon and then go to the Date and select Year.

Step 2: Now as we can see with this command, the Date value is transformed into the Year: Year or 2015.

4. Month
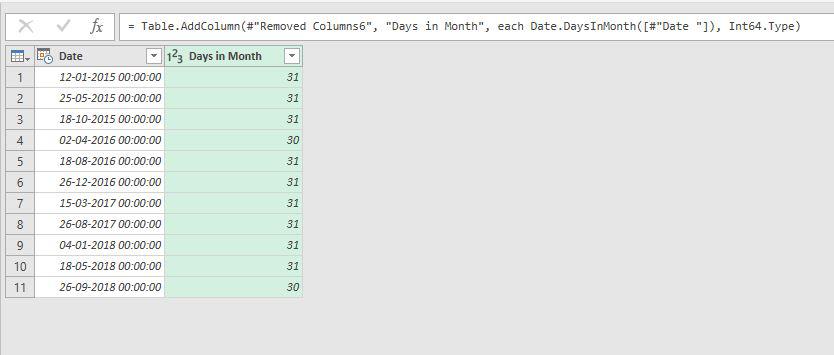
When we choose the month option while selecting a date column, just the month is displayed and the date and time are not displayed. It adds a new column with the name of the month and displays only the month. There are several choices available: month, the start of the month, the end of the month, the days in the month and the name of the month.
Step 1: Select the date column. Navigate to the add column tab on the top of the ribbon and then go to the Date and select the Month option here we are choosing Days in a month.

Step 2: Now as we can see with this command, the Date value is transformed into the Days in Month: Days in every month or 31/30.
5. Quarter
Extracts the quarter from a date. Options include Quarter of Year, Start of Quarter and End of Quarter.
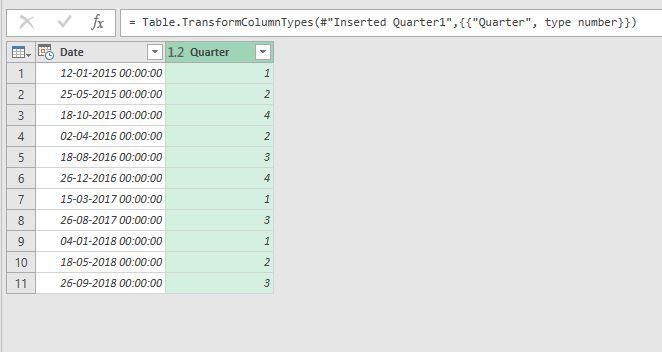
Step 1: Select the date column. Navigate to the add column tab on the top of the ribbon and then go to the Date and select the Quarter option here we are choosing Quarter of Year.
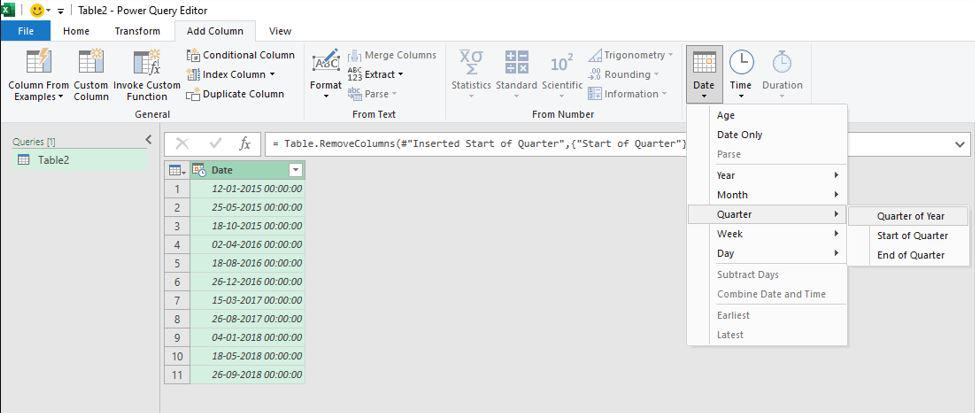
Step 2: Now as we can see with this command, the Date value is transformed into the Quarter of the year: Quarter or 1.
6. Week
Extracts week-related information from a date, including Week of Year, Week of Month, Start of Week and End of Week.
Step 1: Select the date column. Navigate to the add column tab on the top of the ribbon and then go to the Date and select the Week option here we are choosing Week of year.
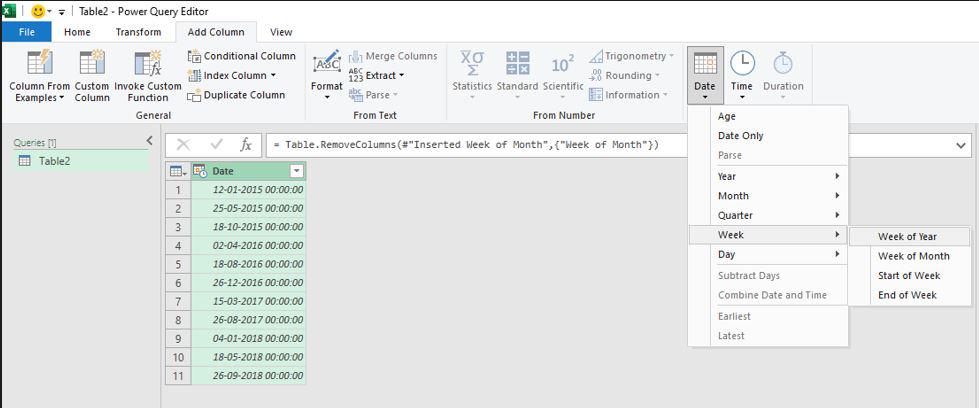
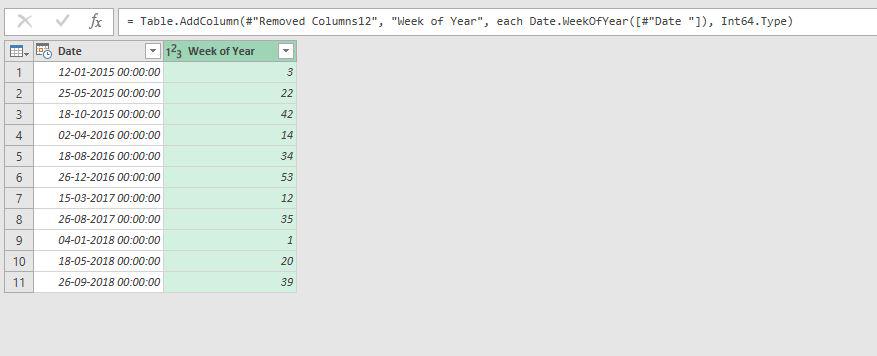
Step 2: Now as we can see with this command, the Date value is transformed into the Week of the Year: Week or 3.
7. Day
When we choose the day option while selecting a date column, then just the day is displayed. It adds a new column with the name of the day and displays only the day. There are several choices available: day, day of the week, day of the year, the start of the day, end of the day and name of the day.
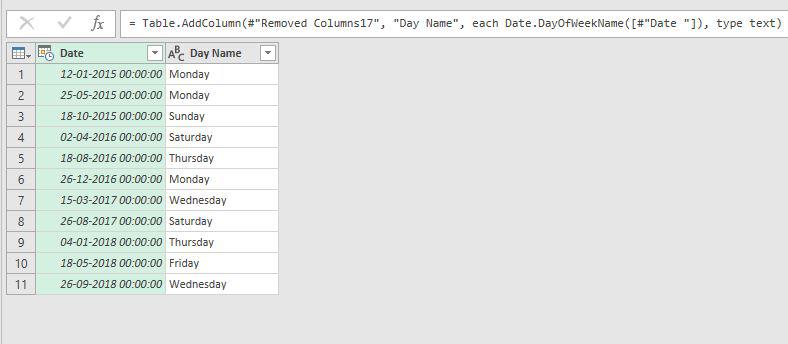
Step 1: Select the date column. Navigate to the add column tab on the top of the ribbon and then go to the Date and select the Day option here we are choosing Name of Day.

Step 2: Now as we can see with this command, the Date value is transformed into the Name of the Day: Day Name or Monday/Tuesday.
8. Parse
The Parse option converts text values into a date, time or date/time value that Power Query can recognize. It is useful when date information is stored as text and needs to be converted into a proper date type.
Step 1: Select the text column containing the date values, then go to Add Column to Date to Parse.
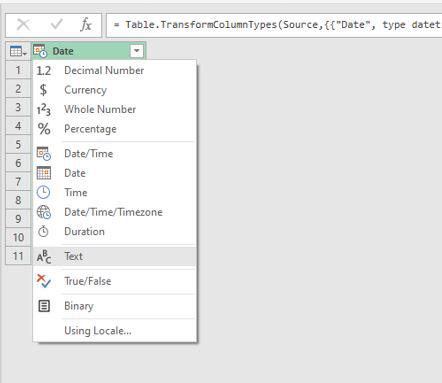
Step 2: Power Query creates a new column containing the parsed date values. For example, a text value such as 12-01-2015 can be converted into a date value.

9. Subtract Days
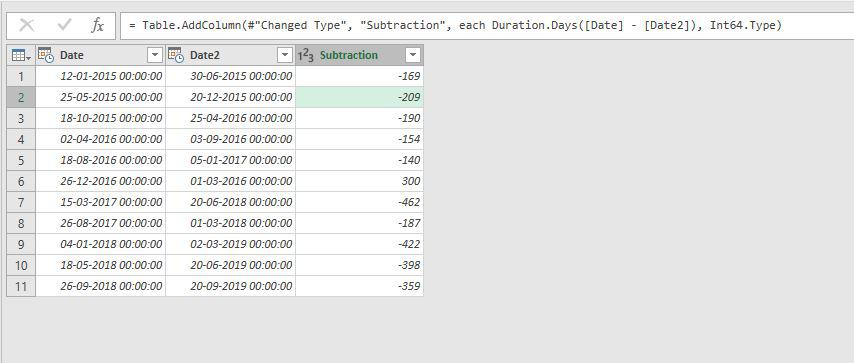
Calculates the difference between two selected date columns. The result is a duration and the sign depends on the order of the selected columns.
Step 1: First select the two columns. Navigate to the add column tab on the top of the ribbon and then go to the Date and select the Subtract Days.
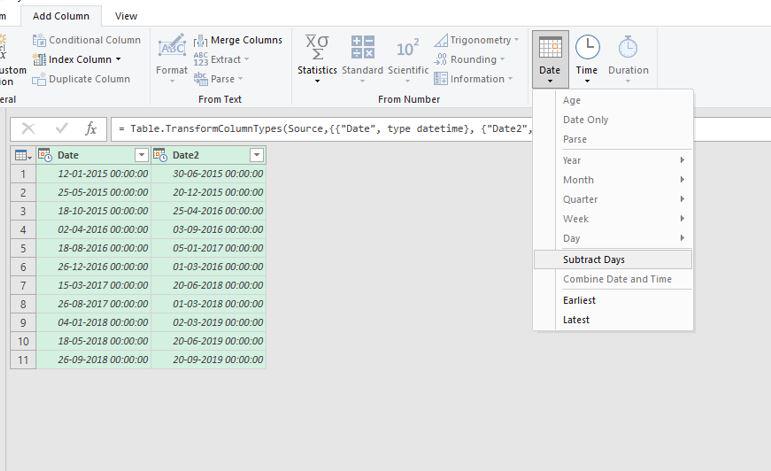
Step 2: Now as we can see with this command, subtract the two dates: Subtract Days or -169.
10. Combine Date and Time
Combines a date column and a time column into a single Date/Time value.
Step 1: First select the two columns. Navigate to the add column tab on the top of the ribbon and then go to the Date and select the Combine Date and Time.
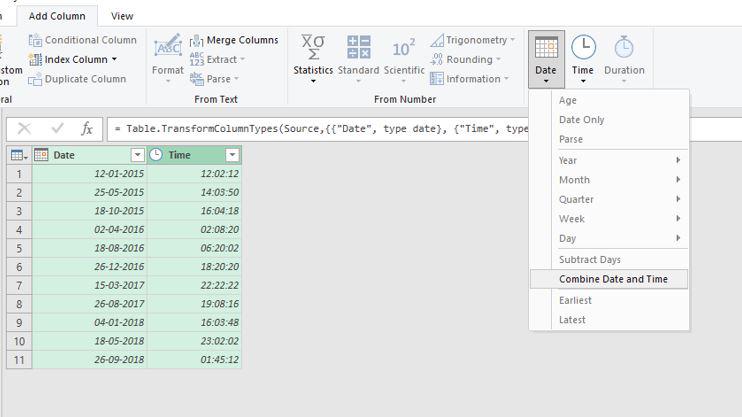
Step 2: Now as we can see with this command, Combines the date and time column: Combine Date and Time or 12-01-2015 12:02:12.

11. Earliest and Latest Days
The Earliest and Latest options identify the earliest or latest date from the selected values. Their behavior depends on whether you use Add Column or Transform.
- Add Column: Creates a new column containing the earliest or latest date among the selected date columns for each row.
- Transform: Replaces the selected column values with the overall earliest or latest date found in that column.
