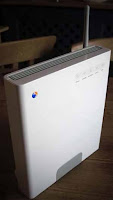
This post is a practical introductory primer / tutorial, with pitfalls to avoid and troubleshooting tips, on how to set up a
home network via the most common type of
wireless networking,
wi fi, using a
wireless router - such as the box provided by your internet service provider (like the
BT Home Hub pictured above). Typically this box can serve as a
wireless access point for your home's
"local area network" (LAN) as well as a
gateway from your home network to the Internet, to enable all computers in your home to connect through the router to the internet as well as to each other.
I cover just
Windows computers (
XP service pack 2 or
Vista only) - Windows XP SP2 and above comes with a
wireless zero configuration (WZC) utility which makes it much easier to get everything working. (Getting the
Asus Eee, which runs its own version of
Linux, to access other computers on a Windows network consistently, and
maintain that access, is a whole different kettle of fish - and if I figure it out I'll post separately about it.)
I'm writing this tutorial because most of the articles I found online mostly either gave too little info to be of much practical use to me, or were too technical for non-geeks to figure out. My focus is on fundamental practical concepts that non-techies need to know in order to set things up properly and do some basic troubleshooting, as with my
practical guide to connecting audiovisual equipment to your TV (set top boxes etc) - so there'll be no detailed explanations (except on security, because it's important).
The basic principles will be the same for all, although my examples use
BT Broadband (which is via an
ADSL connection) and the BT Home Hub as that's what I've used the most, and also illustrations using XP Pro.
The wireless feature of the BT Home Hub and other
routers can provide you with a
wi-fi wireless local area network or WLAN, which is certainly very convenient: via the router, different computers in your home and even devices like
smartphones and the
iPod touch, situated in different parts of your home, even different floors, can connect to the
internet and to
each other, i.e. a
wireless network, all at the same time - without needing any cables or wires.
The basic principle is that you connect each computer to your router, and thereby connect them to each other in a single network. The router is the "hub" of it all, at the center of a "star".The router itself connects to the Internet through your phone line (phone socket connected via cable to router) or cable modem. So, the computers
connect to the Internet through their connection to the router.
Wired connection. If your router has a networking
Ethernet port and your
desktop computer also does, then you could if you prefer connect them together with an Ethernet RJ45 cable instead of wirelessly - the cable's cheap, or might even have been supplied by your ISP. No setting up is needed for that except to plug one end of the cable into the router and the other end into the computer's ethernet port, while both are switched off of course. Indeed, personally I think it's best that
at least one of your home computers should be connected to your router via a wired network connection.
Wireless connection. A wifi
WLAN is pretty straightforward to set up these days. For notebooks / laptops, wireless networking via wi fi
wireless radio signals is much easier, unless perhaps it's a laptop that stays just in one location as a
desktop replacement. Line of sight strictly isn't necessary for wi fi to work, though it's better if possible. The range of the wi fi signals is variable and depends on the environment (wall thickness, distance, interference from digital cordless phones, metal etc) - could be 10 feet, could be 300 feet. With my BTHomeHub in my own home "reception" is fine on a different floor, about 20 feet away.
2. Equipment - router and all computers to be networked wirelessly must be wi fi enabled
Before you can connect a PC to a router via wifi:
- Both bits of kit must support wi-fi - not all computers come with built-in wi fi capabilities (though most modern PCs especially laptops or notebooks / UMPCs will). Nor do all routers, though again many newer ones do.
- If a computer doesn't have a wi fi chip, it's easy to add wifi by buying a wireless USB adapter e.g. a wifi dongle that plugs into a spare USB port on the computer, or a wireless laptop card that plugs into the PC card slot of a laptop - you'll generally need to make sure that you install the drivers for the adapter, usually from a CD, before plugging it in; just follow the instructions that came with the adapter. Obviously, make sure the adapter is compatible with your computer's operating system - most will provide Windows drivers.
- They must both support the same type of wi fi. There are different standards. 802.11b is oldest and slowest. 802.11g (wireless G) is newer and faster. And there's even faster whizzier 802.11n (aka wireless N or 11n) now, with 802.11r on the horizon. Some equipment can support several standards, e.g. the BTHomeHub does.
- Wi fi has to be enabled on both of them (it usually will be on the router by default; some computers have physical switches e.g. on the side of the PC to turn wi fi on or off e.g. some notebook computers; some computers have a key combo e.g. holding Fn then pressing a particular key on the keyboard to toggle wi fi on and off, e.g. some notebooks again).
- Furthermore, both of them must be able to use the same standard i.e. the same type of wi fi - e.g. if the router has been set to 802.11b and the computer uses 802.11g, then they won't be able to communicate. My Home Hub, like many newer routers, can support both standards, and is set to 802.11b/g (http://bthomehub.home/ to access the settings, for version 1.0 click Advanced, enter password etc, click Configuration, Wireless, it's the Interface Type dropdown.)
That's just the capabilities of the gear, and checking the initial set up. (If you're not using your ISP's router or the stingy sods didn't provide one and you have to buy your own wireless router, the above should also help as a buying guide - make sure it has WPA, 802.11n with support for older if your computers only do 802.11g etc, and oh a hardware firewall too; and of course very importantly ensure that the router is compatible with your ISP's flavour of internet connection e.g. cable or ADSL, is it ADSL2+ etc.)
Now, how do you actually get them to talk to each other?
3. The router - basic concepts
First, it's helpful to know some very basic points about the router and how it works.
A. Positioning the router
It's best to place the router as high up as possible (e.g. on a shelf), with as little stuff as possible between it and the computers you want to network (or more correctly between it and the wirelesss adapters you're using). Walls and ceilings can't be helped of course. About 150 feet is usually the max distance a computer can be from the router for a wireless connection to work.
Avoid having it near possible sources of interference like the computers themselves, cordless phones/mice, video senders, baby monitors, microwave ovens, metal like radiators or pipes, lots of water like fishtanks.
The shorter the distance betwen the router and the computer, the better, so try to have it equidistant from your various computers if possible, e.g. in the center of your home. And have the antenna vertical.
B. Router configuration /settings
Normally you'd access the router's settings controls via the Web browser of a computer that's connected to the router (whether via a wired or wireless connection).
The address of the router varies, but usually
http://192.168.1.254/ works (e.g. for the BT Home Hub and
Be's
ADSL2+ box). Some boxes have friendlier alternatives e.g.
http://bthomehub.home/ also works to get to the Home Hub main settings page.
C. Network name or SSID
The wireless network set up by each router has its own identifying
network name or SSID e.g. "BTHomeHub-1A00" (the original SSID is often printed on a label at the back or bottom of the router). Each router will ideally have a different network name.
Basically the router will sit there, broadcasting its own SSID to the world: "I'm BTHomeHub-1A00, here I am, ready & waiting for a request to connect to me".
You can
change the router's SSID to a more personalised one via its router configuration page (BT Home Hub: Advanced, Configuration, Wireless, Configure, change contents of Network Name box (NB make sure you have a note of the new name!), Apply.)
It's also possible to tell the router
not to broadcast its network name, for added security (BT Home Hub: Advanced, Configuration, Wireless, Security, untick Broadcast Network Name, Apply). I found I couldn't connect at all after I did that, even via computers on my network which had the right (though now invisible) SSID, so I ticked it again. You may fare better.
D. Channel
The router can broadcast its network name generally, or you can set it to broadcast
only on a particular numbered "
channel" (a bit like TV channels). You might want to do that for better security or to improve the connection e.g. to try to deal with interference from other equipment (such as cordless phones), or interference from neighbours' wifi systems.
Normally channel selection is automatic, but if you decide to set it to a specific channel try
channel 11 or below first as some gear has trouble coping with channel 12 and up, and usually try to transmit on a channel that's at least 4 channels away from the channels your neighbours are using.
Again, you set the channel via whatever web page you use to configure your model of router (BT Home Hub: Advanced, Configuration, Wireless, Security, change Channel Selection to Manual, in Channel choose the number).
E. Security
Wi fi connections can be either
public or
secure (i.e. encrypted, requiring the correct
passphrase (wireless
key) to connect). Free public
wi-fi hotspots in cafes etc are usually open and unsecured with no encryption at all, though some public wi-fi
access points have encryption.
- Why a secured connection is best. You'd probably want your home network to be secure for all sorts of reasons. With an unsecured wifi connection, other people could p0tentially use your broadband internet service for free ("wifi leeching"), and you might not even know it because it's done wirelessly - they could be sitting out in your street in a car with a laptop, having driven round in search of an unsecured wi-fi wireless network ("war driving"). They could even be your neighbours.
That would of course have consequences for your broadband costs (as their usage will eat into your download/upload allowance with your ISP, and thus potentially cost you money), as well as other risks - e.g. if they download illegal material it could be blamed on you, the network owner, and you could be accused of being the person who accessed that material.
True, it's illegal for people to freeride using others' wifi internet connection and they could be fined for it. Plus, in Germany recently, in a lawsuit against the owner of an unsecured home wireless network for alleged illegal file sharing, Frankfurt's Higher Regional Court ruled that the owner was not responsible for the activity of other people on that network - the owner said it was someone else using the owner's network who had downloaded the files, and the court decided that the owner wasn't liable.
But still, an open wi fi connection was considered an insufficient defence in a child porn case in the USA, and we don't yet know if the UK would take the same view as Germany or not - so it's best practice to secure your wireless connection (don't forget the finances angle too).
Routers generally come with security already enabled on them. One important point to note is that there are
different types of encryption. Older routers use
WEP (Wired Equivalent Privacy) for wireless encryption - but that's now
very insecure. Using WEP is almost as bad as having no encryption at all - as Wikipedia
puts it, " today a WEP connection can be cracked with readily available software within minutes". Newer gear uses
WPA (wi-fi protected access) security protocol, which is
much more secure.
However, surprise surprise, the two standards are different - and
both router and computer need to use the same encryption standard. If your notebook computer only uses WEP and your router uses WPA, they won't be able to talk to each other. In that case you may have no choice but to set your router to use WEP - unlike with wi fi standards, where some kit can support different standards at the same time, with wi-fi encryption it seems to be a case of
lowest common denominator only. (BT Home Hub: change security via Advanced, Configuration, Wireless, Security, in the Encryption section choose "Use WPA-PSK" or, if absolutely necessary but don't say I didn't warn you, "Use WEP Encryption". I'll provide more detail on wifi networking and the BT Home Hub in a separate post). In such a situation it really would be best if possible to upgrade your WEP notebook or other computer to one that uses WPA - or else buy a compatible wifi USB adapter or wireless card for it that supports WPA.
So to sum up on the security / encryption front: the router and all computers you plan to network must use the
same encryption standard (ideally WPA); and furthermore the
"key" (a password or passphrase, i.e. series of letters and numbers) which you use for each computer when trying to connect to the router must match the key that has been set up for the router (BT Home Hub: Advanced, Configuration, Wireless, Security, the password is the string of characters in the Wireless Key box; click Apply if you change it, again make sure you have a note of the new key).
The above is just the
basic minimum security measures you ought to take. There are others you should consider, but I won't cover them in detail here - e.g. turn off broadcasting of your router's SSID name (so only people who know the name can connect - you'll then need to tweak your connection settings on each computer if you do that to ensure it connects even when the network isn't broadcasting); change the default administrator password on the hub, and the default WPA password / key; and use
MAC address filtering to limit access to your router only to particular specified hardware devices, each of which has a unique hardware address known as a MAC address - not the same as IP address
(access MAC address filtering on BT Home Hub). Also generally see
BT Home Hub suggestions and their general
security help.
Most routers will have a built-in
hardware firewall for added security, which is a good thing - this is to help protect the computers on your network
from attacks over the Internet generally (whereas the WEP / WPA security is intended to protect unauthorised devices / people from using your wireless network to access the Net etc).
4. Connecting computers to router
Next, how do you get a computer to connect to the router?
A. Basic principles
These general steps apply to all computers, not just Windows ones (I'll cover the specifics of how to do them in Windows XP and Vista in B. below):
- Make sure the computer's wi-fi is set up, turned on and working - see 2.1 and 2.3 above.
- Launch what I think of as the "wifi network detector", which scans the airwaves for wireless networks that you can try to connect to, and then shows you a list of names (i.e. SSIDs) of the available networks.
- Select the network you want from the list (it should be yours, of course! unless of course you're at a public hotspot etc), usually by clicking on its name e.g. BTHomeHub-1A00.
- Try to connect, usually by rightclicking on the name or clicking the name and choosing whatever option there is to "Connect" or doubleclicking the name.
- If you've set your router to broadcast only on channel X, make sure that that connection is set to detect all channels or channel X too; it won't detect your network if it's only looking on, or "tuned to", channel Y.
- It'll ask for the network key, security key or passphrase (unless it's an open unsecured network which doesn't need one). Enter exactly the same key as you set up for the router, matching upper or lower case etc.
- Before you connect, if there are any options to automatically try to connect to this network as the preferred one on startup, you might want to tick those first (though you should be able to set that up manually later) e.g. on a computer you always use only at home.
- Hit Connect.
- Give it a while to do its thang, then test it by trying to visit a page on your browser (I usually try http://news.bbc.co.uk/). (Your browser Connections or Network settings by the way should normally be set up, in its Options or Preferences, to connect to the internet direct (Never dial a connection) and not through any proxy servers etc - unless of course you know what you're doing.)
Now for some specifics. The
Windows networking wizard to set up a home or small office network will walk you through the key steps - I'd run it on your main computer first, then the secondary ones. (You can find the wizard via
Network Connections, accessed through your Start Menu or Control Panel, or in My Network Places - the Wireless Network Setup Wizard is obviously more appropriate).
But, I'm still going to go through some of the manual steps because knowing them will help with troubleshooting if (or rather when!) you get issues with connecting in future.
B. Name each computer
You should give each computer a different
name so you'll recognise it on the network, and add it to a "
workgroup":
- Go to the Properties for your computer.
- XP. On the desktop, rightclick My Computer, Properties, Computer Name tab, click Change.
- Vista. Start menu, rightclick on Computer, choose Properties, then Advanced System Settings. Click the Computer Name tab and Change
- In "Computer description" give the computer a name e.g. "Desktop", "Laptop 1", or probably something more imaginative than that!
- In "Workgroup", enter the name of its workgroup e.g. MySpiffyWorkgroup - if you've already done this for another computer in your network, make sure it's the same name exactly, upper and lower case etc, just in case (you can use any name you like for the workgroup, make one up, just as long as it's the same name for all the computers you want to network). Don't skip this step if you want your network to work. You " join" the computer to a workgroup just by inserting the name of the workgroup here.
- Then OK.
C. Connecting wirelessly
- You should already have installed and plugged in your wireless adapter hardware (including all drivers from the installation CD), if it wasn't built in to the PC. Also, make sure it's turned on /enabled, see 2.1 and 2.3 above.
- To connect, open Wireless Connections from the computer's Network Connections page:
- XP. Start menu, Connect to (or Start menu, Network Connections), then click or doubleclick Wireless Network Connection. Or you can get to it via the Control Panel, Network Connections then doubleclick Wireless Network Connection.
- Vista. Network (from Start menu or desktop), then Network and Sharing Center; from the Tasks on the left click "Connect to a network". Or just Start menu and Connect to, etc.
- A list of of available wireless networks will come up; to connect, click or rightclick on the name of your network and choose Connect (or doubleclick the name of your network) - I've scrubbed out the SSIDs in the screenshot below, and in other screenshots in this post:

- Type in the key (passphrase) for your network, as used by your router (you may have to do this twice to confirm it); tick any options to automatically connect to the network in future, if that option is available and that's what you want.
- Thereafter, the easiest way to connect is to use the networking icon in the system tray / notification area, at the bottom right of your taskbar. It looks like a monitor with radio waves:
 - with a happy buzzy beam when it's connected
  (or in Vista
  ) and a sad red X when disconnected:
  . Just doubleclick the icon (or rightclick it and choose "View Available Wireless Networks", depending) and pick the network to connect to. These icons are very useful to check the status of your connection, connect, disconnect, view available networks, change connection properties etc.
- Vista annoyance. Irritatingly, sometimes in Vista the networking icon disappears from the system tray and is greyed out from the notification area section of the Taskbar Properties. Here's how to get it back. It'll probably vanish again so get used to doing this regularly. If it's gone, you can connect using step 2 above or the quick launch bar icon if you've added it (see below).
- You can hover over the icon to see the status of your connection: connection strength, speed etc (there's more info in XP than Vista; to get the detailed info in Vista you have to click on the icon, then Network and Sharing Center), for details on that see 5.A below.
D. How to disconnect the wifi (and reconnect)
There are different ways, depending. Try rightclicking or clicking on the networking icon in system tray and choosing Disconnect.
Here are the rightclick options in Vista:
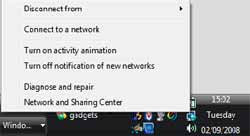
Or in XP rightclick the icon and choose View Available Wireless Networks, then in the list either doubleclick on the name of the network or click on the name of the network and click Disconnect (and say Yes to disconnect if necessary). (If you rightclick on the networking icon and choose Disable, that disables wi-fi
completely on that computer until you re-enable it - not just for this particular network but all wireless networks).
Provided wi fi is enabled, thereafter it'll be easy to re-connect by clicking, doubleclicking or rightclicking the networking icon:
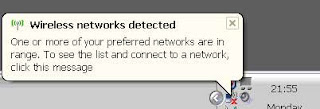
If you find that other nearby networks have the same name as yours (e.g. Be seem to give
all their routers the same SSID of "Bebox" without any unique ID after the name, unlike BT), you can still find your own network because it's likely to be the one with the strongest signal, i.e. the most green bars in the list of network names.
5. Tips and troubleshooting problems
A. Connection status and properties
The first step for troubleshooting is to be able to check what's going on. As I mentioned in 4.C.5 above, the networking icons in your system tray / notification area are very handy to let you connect or disconnect quickly, check and change settings etc.
XP. Hover over the icon to see speed and connection info:
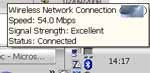
Or rightclick the icon:
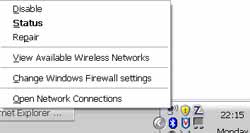
- and choose Status to see general info on the connection (you could also doubleclick the icon to get to Status):
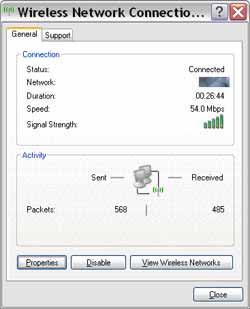
- and the
Support tab shows the
IP address of that connection,
subnet mask and
default gateway etc (which you may need for 5.C below):
 "IP address" is just a unique numerical identifier assigned to a device (e.g. computer) to distinguish it from other devices on a network - whether a home network or indeed the Internet. On your home network, normally when a computer connects to the router the router will automatically give it an IP address for that session i.e. a dynamic IP address: when another computer connects, it gets assigned a different IP address, and so on (so the same computer could be given a different IP address the next time it connects).
You can also click the Properties button from the Status tab. Note the
Wireless Networks tab of Properties:
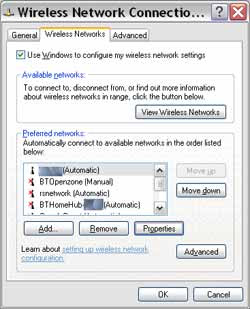
From this
Wireless Networks tab you can click on the name of a connection (in the Preferred networks section), then click Properties
again (the button
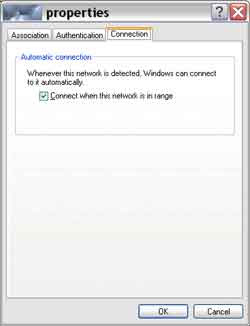
below the networks list), to get to the specific properties of that connection - notably the "
Association" tab (which I'll come to below) and "
Connection" tab. The "Connection" tab is where you can tick to get that
particular connection (i.e. to your router) to be made automatically, if you want that computer to connect to your home network where possible whenever you turn it on:
 Vista.
 Rightclick the icon, Network and Sharing Center (or get to the Center from the Start menu, Network):
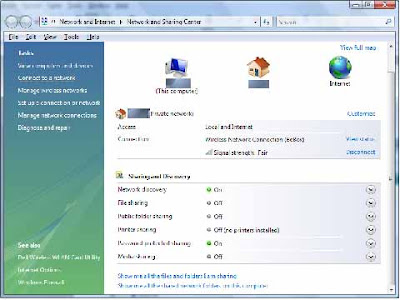
- then click "View status" to get the status:
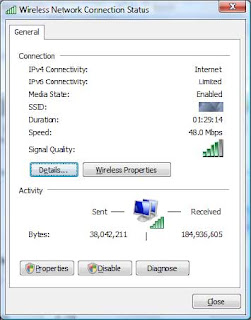
- and from that tab click
Details to get the IP address, subnet mask etc:
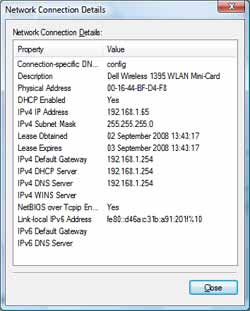
- or the
Wireless Properties button (
not Properties) to get connection and security info (the
Connection tab is where you can set that computer to connect automatically to your home network, if you didn't tick that option previously):
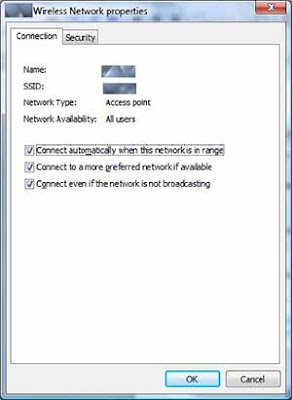
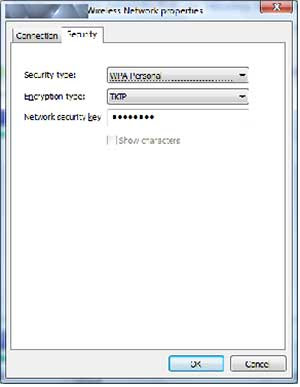
- the
Security tab shows the type of security and encryption in use, and as mentioned it has to be compatible with what the router uses. You can also update your security key passphrase here if you changed it in your router:
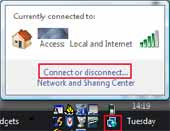
Alternatively, call up the list of available networks (SSID list), e.g. by
leftclicking on the network icon and choosing "Connect or disconnect":
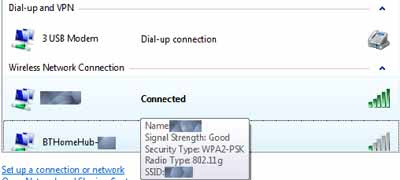
Then you can hover over the network name in the SSID list to get speed etc. info:
- and you can rightclick the network name and choose Status to get to the same status tab:
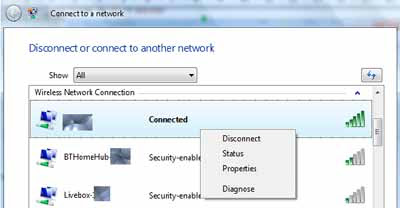
(note that, confusingly, if you choose Properties from here, it brings up the Connection and Security tabs i.e. the
Wireless Network Properties mentioned above).
B. Add the network connection icon to your quick launch bar for quick access
In Network Connections:
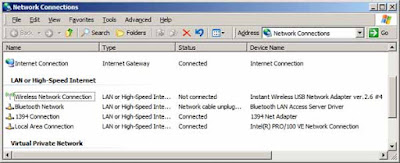
- rightclick on the icon for Wireless Network Connection, choose Create Shortcut, then drag the shortcut to your Quicklaunch bar in order to access the
connection (connect/disconnect), its status and properties quickly in future, just by clicking or rightclicking on it.
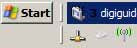
It also works for a
wired network connection (where a network cable has been used), see the first icon, the upside down T, in the screenshot above. The wireless network icon is the 3rd one along, wouldja believe.
This is very useful for
Vista if your computer suffers from the disappearing networking icon syndrome mentioned above.
C. The firewall trap
One gotcha to watch. If one or more of your to-be-networked computers has a software firewall like the free ZoneAlarm, the firewall may also block other computers on the network. That's another reason why home networking may not seem to work sometimes and you can't see the other computers on the network.
The solution - configure the firewall to allow your home network / home computers through i.e. add them to your trusted zone, in ZoneAlarm parlance:
- Open or restore ZoneAlarm Control Centre.
- On the left click Firewall.
- Bottom right click Add, IP Range, fill in the lowest and highest IP address that the computers on your network use, add a description for your home network (screenshot of example below), then OK.
- The IP addresses available for assignment on a private home network are within a set range, usually from 192.168.0.0 to 192.168.255.255, which is why entering IPs encompassing that range or the main part of that range should work in ZoneAlarm. The router also has an IP address of its own - usually 192.168.1.254, which you'll recognise from earlier.
- Tip: for the first address, use 192.168.1.64; for the second address you could try what I show below or if that doesn't work try upping it, e.g. to 192.168.1.237 or even 192.168.255.255

- Static IPs. If entering an IP range doesn't work and your computers still can't see each other on the network, then try giving each computer a fixed, static IP address e.g. 192.168.1.65 for the first PC, 192.168.1.66 for the next one, etc; they must be different for each computer. Next, in ZoneAlarm, instead of adding an IP Range add an IP Address for the individual computer concerned, and rinse and repeat for each of the other IP addresses you give the other computers on your network.
- How to assign a static IP address to a computer: on XP; in Vista - but ignore the bits about the DNS server, and the subnet mask will probably be 255.255.255.0 and default gateway 192.168.1.254 - just check what the subnet mask etc are in your existing connection before you try setting a static IP address, and then use the same IP addresses and subnet mask etc when setting a static IP. You can also check the IP address via the properties, see A above.
- IP address, subnet mask, default gateway: tip. To check what IP address is used by a particular connection, what is the subnet mask or default gateway, see 5.A above (if you don't want to use the ipconfig method described in the previous links). You don't actually need to know what a subnet mask is, just make sure when you assign a static IP address that the subnet mask figure (e.g. 255.255.255.0) matches what it was in the existing connection, and similarly for default gateway.
- Note: if you assign a static IP to a computer, and then want to use it outside your home network e.g. on a public wifi network, you may have to change it back to use a dynamic IP address or it may not work; then change it back to the original static IP when you get home.
D. Trouble reconnecting? Try tweaking the network connection properties
Windows XP SP2 upwards is supposed to make network configuration pretty much automatic. However I've had issues with being able to connect once, but not again, or not at all, etc. There's a particular problem after you put the computer to sleep (standby, hibernate) - when it resumes or wakes up again, it doesn't always automatically reconnect to your home wifi network and it can be hard to get it to get it to connect again even when you try to connect manually. Similarly if you've taken a laptop out of the house and used it on another wi fi network; when you bring it home it doesn't always re connect properly. And if you manually disconnect a computer from your wi-fi network at any time, then later try to get it to connect again, it may stubbornly refuse to.
In those situations, what's worked for me (and might work for you, but I can't guarantee it) was to tweak the detailed settings for the security. To change the security settings for your connection properties - for
XP go to the Association tab for the problem connection (see 5.A above on how to get there):
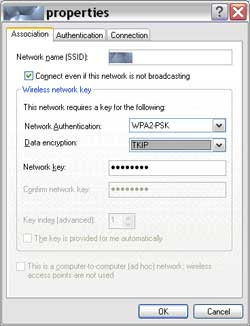
- for
Vista, go to the Security tab, again see 5.A on how to get to that tab.
In both cases, I've found that if I change the security (Network Authentication) from WPA2-PSK or WPA2-Personal to just
WPA-PSK or WPA-Personal, and the Data encryption from AES to
TKIP, and then OK it, then try to reconnect on that connection again, it will connect (even though after connecting it then may then flip itself to AES and WPA2-PSK or WPA2-Personal!). I haven't learned enough to figure out why this happens, I just know that it works for me, so maybe it'll work for you if you have problems. (The network key must of course stay the same, whatever you set for your router.)
No connected networking icon? If the computer is disconnected and the problem is that you can't connect, then you may have to get to the properties for that computer's connection to the router another way - try going in via the
Network Connections (Control Panel or Start menu) instead.
In
XP rightclick the Wireless Network Connection icon in the computer's Network Connections, then Properties.
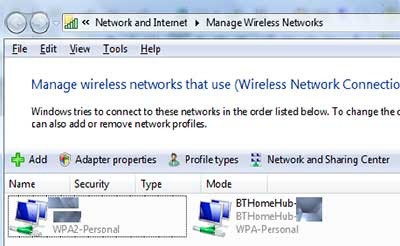
In
Vista, try the Manage wireless networks task link in the Network and Sharing Center, which brings up a list of your wireless connections, even those which are not currently connected. Doubleclick on the icon for a connection to see its Security tab and change the security settings there.
If you can call up a list of available networks e.g. via the Start menu (Connect to or Network), or rightclicking the networking icon to View Available Wireless Networks, or rightclicking the Wireless Network Connection in Network Connections, then the
"Changed advanced settings" task to the left of the SSID list (see the last pic in A. above) should help you get to the Wireless Networks tab in
XP. Just rightclicking on the network name in the list and choosing Properties should do it in
Vista.
Just experiment as the setup may vary with your flavour of Windows. The point is to find the detailed security settings and try the changes I suggested above.
Other things to try if that doesn't work:
- Turn wireless off (by whatever method your computer uses - hardware switch or Fn key combo, rightclick the networking icon to Disable etc); then turn it on or enable it again, wait a bit for it to be enabled fully, then try connecting again.
- Rightclick the networking icon, then Repair. Reconnect; use any Diagnose options available from the networking pages or icons.
6. Sharing files, folders, CD-ROM drives, printers on your network
Now your computers are networked, what next? You should be able to access the Net via your router from all networked computers, obviously.
What else? Well the principles are essentially the same. Again I'll mainly use a Windows XP Pro computer for the examples.
First, how do you "see" one computer on the network while you're on another computer? (obviously you can only do this if both computers are switched on
and connected to the router at the same time.)
Answer: you can see the network via the
Network (Vista) or
My Network Places (XP) icon which you'll find on the desktop or in the file manager e.g.
My Computer or
Windows Explorer on the left (on an XP computer drill down through My Network Places, Entire Network, Microsoft Windows Network, then click on the name of your workgroup) - from which you can click on the name of the computer you want to access.
A. Workgroup
With
Windows computers you can only "see" a computer from another computer if they're both in the
same "
workgroup". Being on the same
network isn't enough. That's why you had to ensure that all Windows computers in your home network are in the same workgroup, in 4.B above.
This can be a bit of a pain for home users, and is the reason why some people have trouble setting up a full home network: they didn't add some computers to the right workgroup (or indeed to any workgroup).
If you've run through the network setup wizard you'll have already named your computer and workgroup and enabled file and printer sharing etc.
B. Sharing folders and files
Now, being able to see a computer on the network is not enough for you to be able to
access files on that computer from another computer on the same network.
To do that, a further step is necessary - you need to "share" the relevant folders on the computer first, for security reasons.
If you ran the Networking Setup wizard, Windows will have set up a shared folder on the computer called "Shared Documents" (not a sub-folder within "My Documents" but a new folder parallel to it, because it's not "
Your" Documents is it, it's shared!). You can save or move or copy into this folder any documents that you want to share with other computers on your network.
If however you want to share individual folders
within My Documents:
- In Windows Explorer, rightclick on the name of the folder you want to share.
- Choose Sharing and Security.
- In the Sharing tab, tick "Share this folder/file on the network" and, if you wish, tick "Allow network users to change my files" (otherwise they'll only be able to read them and save a duplicate etc.), then OK.
Shared folders look different in My Computer / Windows Explorer - the icons have what I think of as a little flame at the bottom (see the Blog folder icon below):
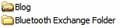 Note
Note: you can't share a document
unless you share the folder that contains it; sharing a folder will share all documents and sub-folders within that folder. And obviously, a shared folder on a particular computer will only be visible to other computers on the network if the computer holding that folder is turned on.
Tip: even if you don't want to use Shared Documents you can still create a
special folder within My Documents for the documents you want to share on the network, called e.g. "Shared", and share just that folder, moving the desired documents into that folder. That's obviously still going to be more secure than sharing
all the documents, photos / pictures or other files in the "My Documents" folder of the computer or user.
C. Sharing printers
You can share i.e. network printers in the same way.
In
XP open up the Printers folder of the computer that's directly connected to the printer (Start menu, Printers and Faxes), rightclick on the printer you want to share, choose Sharing, select Share this Printer (and give it a "Share name" to identify it on the network, consider clicking Additional Drivers to add more drivers for different flavours of Windows computers if you have them), then OK.
An extra step is needed - on each
other computer on your network which is to print to the networked printer, you have to go to its Printers folder, choose Add Printer, and then add the printer you shared previously, making sure you choose "A network printer", and browse to the correct printer. And it'll only work if the right printer drivers are installed for all the types of computer operating systems that you want to use.
If the shared printer is connected only to computer A, and you want to print from computer B to that networked printer, obviously you can only do that if computer A is switched on and connected to the network. To be able to use a networked printer while your other home computers are switched off, you can buy a
print server (for as little as under £30 even) which you connect to both your router and your printer. Then, as long as your router is switched on (which it normally will be always), you can print to that printer even if other computers are switched off. Again, make sure the printer server will support all the computers you want to use with it.
D. Sharing CD-ROM or DVD drives, external hard drives etc
Same thing with sharing
optical drives and the like.
Rightclick the name of the drive in Windows Explorer, Sharing and Security, then carry on exactly as with folders.
Very useful if your notebook computer or UMPC doesn't have an optical drive built in -
you can still access CDs and DVDs from the notebook, and run the software across the network. On the notebook, just find the computer on the network with the shared DVD or CD drive, and as long as it's been shared, you'll see the drive on the network and you can pop a disc into the drive and access it from the notebook. (Doesn't work to play music CDs though, haven't investigated tweaks for that.)
Similarly, if you have an
external hard drive attached to computer A you can share that drive (and folders within it) and then access that drive from another computer on the network, as long as computer A is switched on at the time.
If you want to have a shared dedicated hard drive accessible by all computers on your network even if not all computers are switched on at the time, you can get
network attached storage (NAS). There are 2 main ways to achieve this:
- buy a large hard drive that acts as a NAS server, e.g. the Western Digital MyBook World Edition (to which you can add another external USB hard drive, and which even lets you access files on that drive over the Net), or
- get a NAS device which lets you attach your existing USB hard drives to the network direct, like the Linksys NSLU2 (which has 2 USB ports for external hard disks and also lets you network USB flash drives).
You'd obviously need to have a free Ethernet port on your router to be able to connect the NAS server or device.
Tags:
networking, wireless networking, home networking, home network, wifi network, wi fi network, wi-fi network, Windows, XP, Vista, BT Home Hub, BTHomeHub, HomeHub, security, howto, tutorial, introduction, tricks, tips, Improbulus, A Consuming Experience


