Showing posts with label tutorial. Show all posts
Wednesday, October 5, 2011
Tutorial: Ms. Marvel / Carol Danvers
Costume Tutorial: Ms. Marvel / Carol Danvers (Marvel Avengers)
Date: Completed September 9, 2011.
Debut: October 1, 2011 at Superheroes for Hayley fundraiser
The steps on how I made this made this from leftovers and repurposed items is at AmberUnmasked.
Sunday, April 24, 2011
HUNTRESS work in progress Day 1
I'm working on a HUNTRESS: YEAR ONE variation costume for a friend. She's a completely different size than I am so I had to create a new pattern tracing over one of mine and adjusting it. We've looked at different fabric and decided to go with the Matte Metallic in Black for the main part of the suit. For the contrast color which is purple, we'd going with a great shade that's really vibrant in Milliskin Matte Tricot.
Luckily I happen to have the trade paperback of Year One so I compared those images to ones I had found on ComicVine. As it turns out there's a lot of subtle variations.No surprise there. Every artist put his own flare into a character. There are times when the purple looks like a "V" shape in the front but other times when it looks like a separate vest. I'm going with the vest look after consulting with my friend about how she didn't like the style where the purple actually looks like a bathing suit over the bodysuit. We've also decided to go with a black crepe for the cape rather than purple so that it can used for other characters; modifying designs this way is one of my essential tricks. Whether a wig, belt, boots or gloves aren't perfectly accurate don't mean as much to me personally as getting use out them because this stuff is not cheap. It's often labor-intensive if I've built the piece myself and/or expensive for the raw materials. Versatility is key!
Using the Kwik Sew 3052 figure skater pattern as a basis, I traced over the initial pattern onto muslin. I took some time to drape spandex over my dress form (again it's my size but I just needed an idea of the vest shape). Then I sketched on the muslin while referencing that panel above until I came up with lines that I hope will work. I highlighted the final lines in fabric marker. Traced that muslin with a different muslin so that I'd have the one original full-length suit pattern and then use the second to cut up into individual pattern pieces for color blocking.
Luckily I happen to have the trade paperback of Year One so I compared those images to ones I had found on ComicVine. As it turns out there's a lot of subtle variations.No surprise there. Every artist put his own flare into a character. There are times when the purple looks like a "V" shape in the front but other times when it looks like a separate vest. I'm going with the vest look after consulting with my friend about how she didn't like the style where the purple actually looks like a bathing suit over the bodysuit. We've also decided to go with a black crepe for the cape rather than purple so that it can used for other characters; modifying designs this way is one of my essential tricks. Whether a wig, belt, boots or gloves aren't perfectly accurate don't mean as much to me personally as getting use out them because this stuff is not cheap. It's often labor-intensive if I've built the piece myself and/or expensive for the raw materials. Versatility is key!
Using the Kwik Sew 3052 figure skater pattern as a basis, I traced over the initial pattern onto muslin. I took some time to drape spandex over my dress form (again it's my size but I just needed an idea of the vest shape). Then I sketched on the muslin while referencing that panel above until I came up with lines that I hope will work. I highlighted the final lines in fabric marker. Traced that muslin with a different muslin so that I'd have the one original full-length suit pattern and then use the second to cut up into individual pattern pieces for color blocking.
So far, it's about 3 hours into the project. Time for a nap.
I completed the rest of the documentation at AmberUnmasked.com
Saturday, November 20, 2010
Work in Progress - Alice in Wonderland
ALICE LIDDELL of Wonderland dress: The “sexy” babydoll dress in my photo gallery was actually the property of my photographer; the long traditional one in my Brooklyn shoot was one my mother made but is so worn and getting shredded. The construction of this Dark and Strange Alice dress is going much faster than I anticipated.
Of course I modified the design slightly from the Simplicity pattern (#4015) so that may have streamlined it a bit. There are so many parts of this that have been frustrating.
All the progress pics with my current notes of the process are at AmberUnmasked.com.
Friday, September 17, 2010
Monday, September 13, 2010
RAVAGER tutorial
I finally got around to making a bit of a tutorial for the RAVAGER costume I made for Jill "the Nerdy Bird" for the 2010 Comic Con in San Diego. Since I'm trying to migrate everything over to my new site, the whole article is there. I'd love to figure out how to get my old entries from blogger converted to wordpress but since nothing works as it should in wordpress, I will probably have to copy and paste each entry.
Saturday, July 24, 2010
Presenting The Nerdy Bird as Ravager
Although I have been terribly upset about missing Comic Con International in San Diego yet again, I have still managed to participate through my joint ventures with Jill the Nerdy Bird. Last year I helped her with creating the perfect Dexx Starr (Rage Kitty) which was brought up on stage by Dan DiDio. This year, Jill wanted to be Rose Wilson aka Ravager from the Titans. (I don't know who to credit for the photo but thank you person on twitter).
This suit was on par with the Big Barda as far as difficulty. It was also my first time working with sequins. Lesson learned: even though they are described as "stretch" sequins, they only stretch 2-way not 4-way like traditional spandex. Hence we had some fitting issues since Jill and I were over 6 hours apart when I had to construct it making it impossible to do a proper fitting; but as you know, she could wear a burlap sac and be smokin' hot so a little bit of improper fit isn't a devastating thing for someone like Jill. The part I designed and constructed is the bodysuit. Jill came up with the accessories and wig (which is so gorgeous!).
Jill did all the shopping for the fabric for which I am grateful. We couldn't find the properly spaced sequins in silver so here's where our experiment worked out. I know lots of people spray paint their utility belts and boots with Krylon Fusion so I suggested it to Jill. She painstakingly covered the beige sequins in an appropriate metallic silver. I said it wouldn't be necessary to have it perfectly coated because the original color would give the illusion of some battle wear and shading.
I also had to move back to New Jersey a week ago and my sewing equipment is in boxes. I hope that the rooms here can be set up soon so that I can get back to spandex. There is a certain character that I would like to create for NYCC in October but it would be challenging in different aspects and also cost quite a bit due to the amount of material and accessories. I'm not announcing it because I worry that I can't afford to do it.
Some work in progress images:
This suit was on par with the Big Barda as far as difficulty. It was also my first time working with sequins. Lesson learned: even though they are described as "stretch" sequins, they only stretch 2-way not 4-way like traditional spandex. Hence we had some fitting issues since Jill and I were over 6 hours apart when I had to construct it making it impossible to do a proper fitting; but as you know, she could wear a burlap sac and be smokin' hot so a little bit of improper fit isn't a devastating thing for someone like Jill. The part I designed and constructed is the bodysuit. Jill came up with the accessories and wig (which is so gorgeous!).
Jill did all the shopping for the fabric for which I am grateful. We couldn't find the properly spaced sequins in silver so here's where our experiment worked out. I know lots of people spray paint their utility belts and boots with Krylon Fusion so I suggested it to Jill. She painstakingly covered the beige sequins in an appropriate metallic silver. I said it wouldn't be necessary to have it perfectly coated because the original color would give the illusion of some battle wear and shading.
I also had to move back to New Jersey a week ago and my sewing equipment is in boxes. I hope that the rooms here can be set up soon so that I can get back to spandex. There is a certain character that I would like to create for NYCC in October but it would be challenging in different aspects and also cost quite a bit due to the amount of material and accessories. I'm not announcing it because I worry that I can't afford to do it.
Some work in progress images:
Tuesday, May 4, 2010
Margie's Wonder Woman tutorial
You've probably seen more pictures of Margie as Wonder Woman than any other costumer out there today. She practically runs Heroes Alliance which is a Florida troupe of costumers that do loads of community service. Recently, she posted a tutorial on making Wonder Woman armor over at Facebook, which may be friends only so I'm not sure if you'll be able to get through the link if you are not on her friends list. Please, if you send her a friend request, take a few seconds to attach a message; this makes a big difference to women who model and costume.
Saturday, June 27, 2009
Rage Kitty Dexx Starr!
This is by far the most fun I've had completing a commission. It wasn't easy but the result is just so funny that I can't help laughing about it.
RAGE KITTY:

Took left over spandex and began draping it over kitty and marking it for cut lines.


Cleaned up the design of the pattern pieces a bit. Laid out on red PVC and black 4-way stretch spandex.

Began the assembly with constant testing of the fitting.

Compared it to the original artwork. The only thing left off are the waist hash marks. The rest seems pretty good.
Last step was create the embroidered patch of the Red Lantern Corps and use some vinyl glue to affix it to the back (per customer's request since it's easier to see than Dexx's belly).

And we have the 99% finished Dexx Starr! He needs to be colored blue which might possibly be done with blue hairspray.
RAGE KITTY:
Took left over spandex and began draping it over kitty and marking it for cut lines.
Cleaned up the design of the pattern pieces a bit. Laid out on red PVC and black 4-way stretch spandex.
Began the assembly with constant testing of the fitting.
Compared it to the original artwork. The only thing left off are the waist hash marks. The rest seems pretty good.
Last step was create the embroidered patch of the Red Lantern Corps and use some vinyl glue to affix it to the back (per customer's request since it's easier to see than Dexx's belly).
And we have the 99% finished Dexx Starr! He needs to be colored blue which might possibly be done with blue hairspray.
Thursday, February 26, 2009
Photoshoot Preparations
Today I'm meeting with a photographer for the first time to discuss doing an entire series of superhero photos for him and I to share in our portfolios. If you aren't familiar, that's called a Trade For Print (TFP) usually; sometimes, Trade For something else like CD just to be specific. He's not paying me to model and I'm not paying him for the pictures. We can use the shots in our portfolios or whatever we discuss. For me, I have his permission to use them as part of my publicity for the charity work and store appearances that I do. I've contacted a make-up artist too for a similar trade on days when I have an event and hopefully her schedule will allow for it.
Since I honestly have no idea what I'm doing in regard to modeling, I'm looking to this photographer Rob Gardner (Boonton, NJ) to guide me throughout the process. For today's prep he asked me to bring fabric samples in because he's interested in doing more than just a stark white backdrop so he's going to examine the colors and come up with different backgrounds. We're going to plan out colors and even scenarios for action shots utilizing his friend as a stand-in street thug.
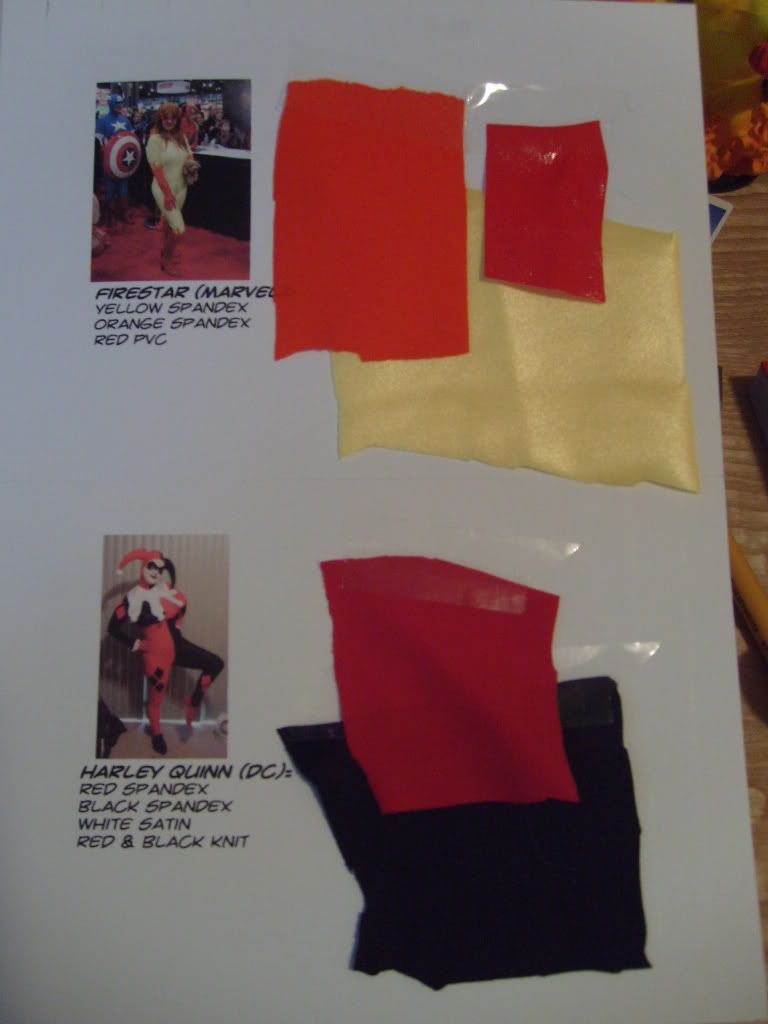
I remember my college days going through the Fine Arts building and seeing the fashion students' exhibits. They had cards with their sketches and swatches of fabric so I created my own version of that with any of the materials from my suits that I could get my from my bottomless pit of leftover fabric. I used Hallmark blank greeting cards to put through my printer; set my printer to "Best" quality in the properties; created a MS Publisher document with photo, name of suit, list of fabrics; taped the fabric to the card because staples would screw up the fact that I've double-sided these. Since I did double-side the cards, I could have fit up to 8 costumes but I only did my 6 favorites.
If you don't make your costumes yourself, ask the designer to send swatches either in advance or with your finished product; sometimes this is a nominal fee like $3-5 usually just to cover postage if it's in advance.
Here's an example of what the design cards look like:
Since I honestly have no idea what I'm doing in regard to modeling, I'm looking to this photographer Rob Gardner (Boonton, NJ) to guide me throughout the process. For today's prep he asked me to bring fabric samples in because he's interested in doing more than just a stark white backdrop so he's going to examine the colors and come up with different backgrounds. We're going to plan out colors and even scenarios for action shots utilizing his friend as a stand-in street thug.
I remember my college days going through the Fine Arts building and seeing the fashion students' exhibits. They had cards with their sketches and swatches of fabric so I created my own version of that with any of the materials from my suits that I could get my from my bottomless pit of leftover fabric. I used Hallmark blank greeting cards to put through my printer; set my printer to "Best" quality in the properties; created a MS Publisher document with photo, name of suit, list of fabrics; taped the fabric to the card because staples would screw up the fact that I've double-sided these. Since I did double-side the cards, I could have fit up to 8 costumes but I only did my 6 favorites.
If you don't make your costumes yourself, ask the designer to send swatches either in advance or with your finished product; sometimes this is a nominal fee like $3-5 usually just to cover postage if it's in advance.
Here's an example of what the design cards look like:
Subscribe to:
Posts (Atom)


.jpg)
