Showing posts with label PTU. Show all posts

Thursday, August 6, 2009

Perrrfection


This tutorial is going to be a bit different.
I am using ONLY the scrapkit

The kit I am using is a
PTU Scrapkit - Wench Design_WildAndFeisty
You can purchase it

Open a 500 x 500 canvas


Copy and paste Paper19


Copy and paste Tiger4
Image - resize - 75
Right click - properties - opacity - 50


Copy and paste Frame10
Image - resize - 50


Using your magic wand tool
Click INSIDE your frame


Selections - modify - expand - 4


Selections - invert


Highlight your paper layer - hit delete
Highlight your tiger layer - hit delete


Selections NONE


On your frame layer
Right click - duplicate


On the original frame
Adjust - Blur - Gaussian Blur
Radius - 10


Copy and paste Tiger6
Image - resize - 75
Repeat resize
Place at bottom of frame


Copy and paste ribbon4
Image - resize - 50
Place at the top of frame
Effects - 3D effects - drop shaddow
Use these settings
-1, 1, 100, 0 Black

Copy and paste Flowers3
Image - resize - 50
Repeat resize


At this point add any copyright and licensing information
This tutorial was written by Rose Foster on 08/6/09
Any similarity to any other tutorial is purely coincidental
Any creations you make following this tutorial is yours to do with as you please
as long as there is no profit made.This tutorial is not to be copied or passed around.



Wednesday, August 5, 2009

Summer Beauty


Tube of choice


I have used

Michael Landefeld
You can purchase his awesome work at CILM

PTU Scrapkit - Wench Design_SummerFruitsTagger

Mura's Meister - Copies


Open a 500x500 canvas

Copy and paste Flower2

Copy and paste Tree4
Image - resize - 50
Repeat resize

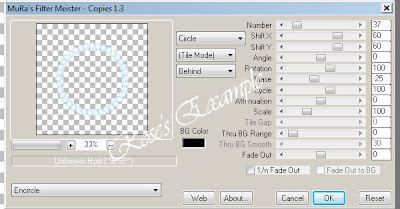
Apply MuRa's Meister - Copies with the following settings:


Right click - rename -Trees


Copy and paste Lime1
Image - resize - 50

Copy and paste Watermelon1
Image - resize - 50
Place so that the straight edge is across the middle of the lime.
Merge these two layers together
Right click - rename BkFruits


Right click - duplicate
On the duplicate layer
Right click - rename - Fruit1


On the BkFruits layer
Adjust - Blur - Gaussian Blur
Radius - 10
Merge these two layers together
Position in the middle of the tree circle you made


Copy and paste Frame7
Image - resize - 60
Move frame right above your tree layer

Place your tube where you feel looks best


At this point add any copyright and licensing information
This tutorial was written by Rose Foster on 08/5/09
Any similarity to any other tutorial is purely coincidental
Any creations you make following this tutorial is yours to do with as you please
as long as there is no profit made.This tutorial is not to be copied or passed around.




Tuesday, August 4, 2009

All Tied Up


Tube of choice
I have used
Anthony Guerra
www.Guerrafineart.com
You can purchase his awesome work at CILM
PTU Scrapkit - Wench Design_PurpleLove


HERE
Mask of ChoiceI used WSL-Mask 251


You can get this HERE under downloads


Open a 500 x 500 canvas

Open your mask and tube and minimize them

Copy and paste paper6
Image - resize - 75

Right click on raster layer - new mask - from image -WSL_Mask251
Right click - merge group

Copy and paste frame4
Image - resize - 75

Copy and paste bow2
Image - resize - 50
Repeat

Effects - 3D Effects - Drop Shaddow
Use these settings
-1, 1, 100, 0, White

Effects - 3D Effects - Drop Shaddow
Use these settings
1, -1, 100, 0, White

Place the bow to one side of the frame
Add a drop shaddow if desired
Right click on the bow raster - duplicate
Image - mirror

Copy and paste staple
Place at the top of frame....or where you desire

Copy and paste HeartPendant
Image - resize - 50
Repeat

Using your eraser tool
Erase one side of the rope at the top of pendant
Making it look as if it is hanging from the staple

Add tube of choice and wording of choice

At this point add any copyright and licensing information
This tutorial was written by Rose Foster on 08/4/09
Any similarity to any other tutorial is purely coincidental
Any creations you make following this tutorial is yours to do with as you please
as long as there is no profit made.This tutorial is not to be copied or passed around.


Beary Irish


Tube of choice

I have used Angel's Bears
©Harriet Carmine
You can purchase them at CILM

PTU Scrapkit - Wench Design_ALittleBitOIrish

Mask of ChoiceI used WSL-Mask 55
You can get this HERE under downloads

Open a 500 x 500canvas

Open your mask and tube and minimize them

Copy and paste paper5

Right click on raster layer - new mask - from image -WSL_Mask55
Right click - merge group

Copy and paste BeadedClover1
Image - resize - 75
Place in middle of mask

Copy and paste Dangler5
Image - Resize - 75
Repeat resize
Place on one side

Copy and paste LadyBug1
Image - resize - 8

Place near the dangler you used

Effects - 3D Effects - Drop Shaddow
Use these settings
-2, 2, 100, 0, Black

Effects - 3D Effects - Drop Shaddow
Use these settings
2, -2, 100, 0, Black

Merge your dangler and ladybug layers together
Right click - Duplicate
Image - mirror

Copy and paste Bow5
Image - resize - 25

Effects - 3D Effects - Drop ShaddowUse these settings-2, 2, 100, 0, Black
Effects - 3D Effects - Drop ShaddowUse these settings2, -2, 100, 0, Black

Add tube of choice and wording of choice

At this point add any copyright and licensing information


This tutorial was written by Rose Foster on 08/4/09
Any similarity to any other tutorial is purely coincidental
Any creations you make following this tutorial is yours to do with as you please
as long as there is no profit made.This tutorial is not to be copied or passed around.


Tuesday, July 28, 2009

Wish Upon an Egg


Tube of choiceI have used Amanda Fontaine
She sells her adorable tubes athttp://www.artisticmindsinc.com/
PTU Scrapkit - Wench Design_HopToIt
HERE
Mask of ChoiceI used WSL-Mask 12
You can get this HERE under downloads

Mura's Meister - Copies

Open a new canvas 500x500
Open the mask and scrapkit supplies


Copy and paste paper3
Right click on raster layer - new mask - from image -WSL_Mask12

Right click - merge group

Effects - 3D Effects - Drop Shaddow
Use these settings
-1, 1, 21, 0, Black
Copy and paste Egg5
Image - resize - 10
Apply MuRa's Meister - Copies with the following settings:


Effects - 3D Effects - Drop Shaddow
Use these settings
-1, 1, 100, 0, Black

Copy and paste TulipFlower4

Image - Resize - 50

Effects - 3D Effects - Drop Shaddow

Use these settings

-1, 1, 100, 0, Black

Copy and paste Grass4

Image - resize - 50

Repeat resize

Place to one side of the egg frame

Right click on Raster and duplicate

Using your magic wand, click inside the egg frame
Selections - modify - expand - 2
Selections - invert
On the grass layers click on delete on your keyboard
Selections - none

Copy and paste Egg4

Image - resize - 50

Repeat resize

Place the egg to one side of the Tulip, duplicate and mirror


At this point add any copyright and licensing information
This tutorial was written by Rose Foster on 07/28/09
Any similarity to any other tutorial is purely coincidental
Any creations you make following this tutorial is yours to do with as you please
as long as there is no profit made.
This tutorial is not to be copied or passed around.


Loving Paradise


Tube of choiceI have used Amanda Fontaine

She sells her adorable tubes at
http://www.artisticmindsinc.com/

PTU Scrapkit - Wench Design_JustAStripeyDay


Mask of ChoiceI used WSL-Mask 46

You can get this HERE under downloads

Word Art by Blissfully Beth
You can get this HERE

Open a new canvas 500x500
Open the mask and scrapkit supplies

Copy and paste paper10

Right click on raster layer - new mask - from image -WSL_Mask46
Right click - merge group
Effects - 3D Effects - Drop ShaddowUse these settings
-1, 1, 100, 0, Black
Copy and paste Bunch3
Image - resize - 50
Move to one side
Right click on raster and duplicate
On duplicated raster layer
Image - mirror

Copy and paste Daisy1
Image - resize - 50

Place at bottom of canvas
Effects - 3D Effects - Drop Shaddow
Use these settings-1, 1, 100, 0, Black

Copy and paste RibbonPin2
Image - Resize - 50

Place at the top right corner

Copy and paste Butterfly3
Image - resize - 50

Repeat resize
Place at bottom
Duplicate and mirror

Copy and paste word art of choice
Place where desired


At this point add any copyright and licensing information


This tutorial was written by Rose Foster on 07/28/09
Any similarity to any other tutorial is purely coincidental
Any creations you make following this tutorial is yours to do with as you please
as long as there is no profit made.
This tutorial is not to be copied or passed around.


Monday, July 27, 2009

Rock Lightening


Tube of choice
I used the art Ted Hammond
You must have a license to use his work!
He sells through CILM
http://www.cilm.com/

PTU Scrapkit - Wench Design_RockItLikeAWench

Mask of Choice I used two masks
WSL-Mask 184 and WSL-Mask 185
You can get these HERE under downloads
Open a new canvas 500x500
Open the masks and scrapkit supplies
Copy and paste paper 1
Right click on raster layer - new mask - from image -WSL_Mask184
Right click - merge group

Copy and paste paper 23

Right click on raster layer - new mask - from image -WSL_Mask185
Right click - merge group
Image - resize - 75

Copy and paste Fence
Image - resize - 75
Repeat the resize
Effects - 3D Effects - Drop Shaddow
Use these settings
-1, 1, 100, 0, Black

Copy and paste Frame7
Image - resize - 25
Move to one side
Effects - Photo Effects - Black and White Film

Copy and paste tube of choice
Position part of the body inside the from
Move tube raster layer below the frame layer

Using your magic wand, click inside the frame
Selections - modify - expand - 2
Selections - invert
On the tube layer click on delete on your keyboard
Selections - none

On the tube layer
Right click - properties - Blend Mode - Screen
Merge your frame and tube layer together
Right click on merged layer - duplicate
Image - mirror

Copy and paste WordTag1
Place at the bottom

Copy and paste Charm1
Image - resize - 50

Move to the merged frame layers
Using your eraser tool
Erase the charm loop
Place charm right above the masks rasters
Image - duplicate
Image - Mirror

Apply copyright and any license information if needed

This tutorial was written by Rose Foster on 07/27/09
Any similarity to any other tutorial is purely coincidental
Any creations you make following this tutorial is yours to do with as you pleaseas long as there is no profit made.
This tutorial is not to be copied or passed around.


Saturday, July 25, 2009

Ice Cream Wonder


Tube of choiceI have used Amanda FontaineShe sells her adorable tubes at

http://www.artisticmindsinc.com/
PTU Scrapkit - Wench Design_SweetSundaeTreats
HERE
Mask of ChoiceI used WSL-Mask 233


You can get this HERE under downloads
Open a new canvas 500x500
Open the mask and scrapkit supplies
Copy and paste paper 4


Right click on raster layer - new mask - from image -WSL_Mask233


Right click - merge group


Effects - 3D Effects - Drop Shaddow
Use these settings
1, -1, 100, 0, Black

Copy and paste frame2

Image - resize - 50
Effects - 3D Effects - Drop Shaddow
Use these settings
1, -1, 100, 0, Black


Effects - 3D Effects - Drop Shaddow
Use these settings
-1, 1, 100, 0, Black


Copy and paste BowlofIcecream 1
Image - resize - 25

Place in middle of frame

Adjust - sharpness - sharpen


Copy and paste CurledRibbon3
Image - resize - 25
Adjust - sharpness - sharpen


Effects - 3D Effects - Drop Shaddow


Use these settings
-1, 1, 100, 0, Black

Right click on raster frame - duplicate
Image - Mirror

Copy and paste wordart3
Image - resize - 50

Place wordart at top of frame


Open tube of choice and resize so it fits on one side. Duplicate and mirror
At this point add any copyright and licensing information


This tutorial was written by Rose Foster on 07/24/09


Any similarity to any other tutorial is purely coincidental


Any creations you make following this tutorial is yours to do with as you pleaseas long as there is no profit made.


This tutorial is not to be copied or passed around.

Wednesday, July 22, 2009

Flying High


Tube of choice
I have used Amanda Fontaine
She sells her adorable tubes athttp://www.artisticmindsinc.com/


PTU Scrapkit - Wench Design_ADayAtTheBeach


Mask of ChoiceI used WSL-Mask 246

You can get this HERE under downloads


Open a new canvas 500x500

Open the mask and scrapkit supplies

Copy and paste paper 11


Right click on raster layer - new mask - from image -WSL_Mask246
Right click - merge group

Image - Resize - 80
Adjust - Blur _ Gaussian Blur
With radius set at 10


Copy and paste Sunflower2

Right click, properties

Change the opacity to 65


Copy and paste Sun1

Image - resize - 50

Place the sun to one side


Copy and Paste Kite3

Image - resize - 50

Repeat the resize


Effects - 3D Effects - Drop Shaddow

Use these settings

1, -1, 100, 0, Black

Place on the opposite side of the sun


Open tube of choice and place so that it looks like the kite is held by the tube


Place word art of choice. I just wrote something that popped in my head.


At this point add any copyright and licensing information
This tutorial was written by Rose Foster on 07/22/09
Any similarity to any other tutorial is purely coincidental
Any creations you make following this tutorial is yours to do with as you please
as long as there is no profit made. This tutorial is not to be copied or passed around.

Monday, July 20, 2009

Stitched Love


Supplies Needed


PTU Scrapkit - Wench Design_MyTreasuredLove
HERE
Tube of choiceI have used Barbara Jensen


Mask WSL_Mask 85


You can get this at Weescotslass


Open a new canvas 600x600
Open the mask and papers 14 & 27


Copy and paste paper 27


Right click on raster layer - new mask - from image -WSL_Mask85


Right click - merge group


Adjust - Blur _ Gaussian Blur


With radius set at 20


Copy and paste paper 14


Right click on raster layer - new mask - from image -WSL_Mask85
Right click - merge group


Open frame 7


Image - resize - 74


Press D on your keybord and move the sides of the heart


to your liking


Effects - 3D - Drop Shaddow


1. -1, 100, 0, Black


Copy and paste the Heart Charm with Gems


Image - resize - 50


Repeat this resize


Now place the heart where you desire


Right click on this layer and change


Opacity to 20


Copy and paste Needle 1


Image - resize - 50


Using your eraser tool,


erase parts of the needle so it appears stitched


Copy and paste Bow4


Image - resize - 50


Place the bow where you like it


Now open your tube and place where it looks best to you


At this point add any copyright and licensing information


This tutorial was written by Rose Foster on 07/01/09


Any similarity to any other tutorial is purely coincidental


Any creations you make following this tutorial is yours to do with as you please


as long as there is no profit made. This tutorial is not to be copied or passed around.

Wednesday, January 21, 2009

Angel Love - PTU

Supplies Needed
PTU Scrapkit - Wench Design_MyTreasuredLove
Tube of choiceI have used Steve Baier
He sells his tubes at

Font of choice - I used Freehand591 BT

Open a new canvas 600x500

Open all materials and minimize
Copy and paste paper51
Copy and paste frame7
Image - resize - 80
Using your magic wand click inside the frame
Selections - Modify - Expand - 4
Selections - Invert
On your paper layer - hit delete
Selections - None
On your frame layer apply this Inner Bevel
Effects - 3d - Inner Bevel - With the settings below
Still on your frame layer
Effects - Texture Effects - Blinds
Use these settings:
Color - 720000
Width - 20
Opacity - 44
Horizontal - checked
Light from left/top - checked
Copy and paste Rose1
Image - resize - 25
Copy and paste Rose6
Image - resize - 25
At this point I used my eraser brush and deleted some of the stems off both of the roses. This is up to you if you do this.
On the Rose1 layer
Right click - Duplicate
I now placed the roses in position on the left side of my heart
Hide all your layers except for the 3 rose layers
Right click - merge visible
Open up all your layers again and make sure your merged rose layer in on top
Right click - Duplicate
Image - Mirror
Copy and paste HeartCharm1
Image - resize - 50
Place the charm on one side of your heart at the top
Right click on charm layer - Duplicate
Image - Mirror
Add your tube and place to your liking

At this point add any copyright and licensing information.
This tutorial was written by Rose Foster on 01/21/2009
Any similarity to any other tutorial is purely coincidental
Any creations you make following this tutorial is yours to do with as you pleaseas long as there is no profit made. This tutorial is not to be copied or passed around.


Tuesday, November 25, 2008

Santa Baby - PTU

Supplies Needed
PTU Scrapkit - Wench Design_GrandOpeningXmasCollab
HERE
Tube of choiceI have used Keith Garvey
He sells his tubes at
http://www.mypsptubes.com/
Font of choice - I used Freehand591 BT
Open a new canvas 500x500
Open all materials and minimize
Copy and paste paper12
Image - resize - 70
Copy and paste snowglobe
On your paper layer
Use your eraser tool and
erase the paper around the globe
On your globe layer
Effects - 3D Effects -Drop Shadow
-1, 1 100, 0, Black
On paper layer
Adjust - Blue - Gaussian Blue - 15
Copy and paste tag2
Image - resize - 39
Repeat resize
Repeat this layer enough times to make a saying
I used "santa baby" so duplicated 8 times
Place the tags to your liking
For each tag put one letter
Apply drop shadow of choice to all letters when finished
Copy and paste charm1
Image - resize - 39
Duplicate the charm 5 times
Position around the globe top
Move all charm layers under the paper layer
Apply copyright and any license information if needed
This tutorial was written by Rose Foster on 11/25/2008
Any similarity to any other tutorial is purely coincidental
Any creations you make following this tutorial is yours to do
with as you please as long as there is no profit made.
This tutorial is not to be copied or passed around.
©Keith Garvey
MPT7976

Sunday, November 23, 2008

Wings of Love - PTU


Supplies Needed
PTU Scrapkit - Wench Design_CelebrateTheHarvest
HERE
Tube of choice
I have used Amanda Fontaine
She sells her adorable tubes at
http://www.artisticmindsinc.com/
Font of choice - I used Australian Sunrise
Open a new canvas 500x500
Open all materials and minimize
Copy and paste paper22
Image - resize - 90
Copy and paste paper20
Image - resize - 90
Copy and paste frame6
Image - resize - 80
Use your magic wand and click inside the frame
Selections - modify - expand - 6
Selections - invert
Click delete on the paper layers
Selections - none
On the paper20 layer
Image - resize - 90
Repeat resize
Effects - 3D effects - drop shadow
-2, 2, 100, 10 Black
Copy and paste Tag2
Image - Resize - 50
Position on one side of your frame
Using your eraser tool
Erase the part of the string that would be under the frame
Copy and paste Brad3
Image - Resize - 40
Duplicate this layer 3 times
Place brads across the top
there should be 4 total
Merge all 4 of the brads together
Apply the same drop shadow as before
Duplicate this layer
Image - flip
Apply copyright and any license information if needed
This tutorial was written by Rose Foster on 11/23/2008
Any similarity to any other tutorial is purely coincidental
Any creations you make following this tutorial is yours to do
with as you pleaseas long as there is no profit made.
This tutorial is not to be copied or passed around.
©Amanda Fontaine
http://afontaine.com
AMIROFO


Friday, November 21, 2008

Emerald Passion - PTU


Supplies Needed

PTU Scrapkit - Wench Design_Wintergreen
Mask of Choice
I used WSL-Mask 55
You can get this HERE under downloads
Tube of choice
I have used Jennifer Janesko
This tube is not for sale!
This was a bonus tube given by CILM
She sells other beautiful tubes at
Font of choice - I used French111 BT
Ok let's get started
Open a new canvas 600x600
Open all materials and minimize

Copy and paste paper17
Right click on paper layer, new mask layer, from image
Merge group
Image - resize - 95
Copy and paste Frame1
Effects - 3D effects - drop shaddow
Use these settings:
1, -1, 100, 0, black
Copy and paste Roses
Image - resize - 50
Image - free rotate - left - 90 degrees
Place at the bottom and move layer between
your mask and frame layers
Apply drop shaddow
Right click on Roses layer - Duplicate
Image - Mirror
Copy and paste tube of choice
Resize to your liking
Duplicate and hide that layer
On mask layer
Use your magic wand and click on the outter edge of
the first ring around it
Hit delete on your tube layer that is showing
Selections - none
Move this layer below your your frame
Unhide your duplicate tube
Using your eraser brush
Erase the extra off the bottom of your tube
Copy and paste Flower5
Move layer right above your mask
On the flower layer - right click
properties
change blend mode to - multiply
Copy and paste Charm2
Image - resize - 75
Repeat the resize
Effects - 3D effects - inner bevel
use the default settings
Place charm to one side of your frame
Duplicate
Image - mirror
Apply copyright and any license information if needed
This tutorial was written by Rose Foster on 11/21/2008
Any similarity to any other tutorial is purely coincidental
Any creations you make following this tutorial is yours to do with as you please
as long as there is no profit made. This tutorial is not to be copied or passed around.
©Jennifer Janesko
CI-4143LM


A Christmas Gesture - PTU


Supplies Needed

PTU Scrapkit - Wench Design_Have A Sexy Little Christmas


FTU Template - WenchDesigns_TagTemplate2


Bear of choice. The bear I am using was generously donated by Foxy for me to complete this tutorial.


Thank you both for allowing me to use your items!!!


1 tube of choice
I used the art Sue Miller

You must have a license to use herwork!
She sells through UYA


Font of Choice

I used Adorable


Ok let's get started


Open your Scrapkit
Open the templete in PSP

Shift + D to Duplicate

Close original

On Duplicated one Delete the following layers

1. Copyright

2. Both Snowflake layers

3. The word art layer


Once those are deleted do the following:

Image - resize - 75 - making sure the resize all layers box is checked

On new Raster copy and paste paper12
Right click on paper layer, new mask layer, from image
Merge group
Rename Background


Hightlight "Oval" layer

Copy and paste paper 16

Back on "oval" layer

Use your magic wand and click in the oval

Selections - modify - 2

Selections - invert

On paper layer - click delete

Selections none

Delete "Oval" layer

Rename your paper layer "Oval Back"


Highlight your "oval frame"

Copy and paste paper 15

Back to "oval frame"

Use your magic wand and click in the oval frame

Selections - modify - 2
Selections - invert
On paper layer - click delete
Selections none

Delete "oval frame" layer
Rename your paper layer "Oval front"

Effects - 3D Effects -

Inner Bevel Using default settings

Copy and paste your tube choice

Move layer before the "oval front"

resize to fit

Highlight "oval front"

Use your magic wand and click on the oval front
Selections - modify - 2

Selections - invert

On tube layer - click delete

Selections none

Now merge your Oval front, Oval back and tube layers together

Rename Oval tube

Hide this layer
Highlight the "middle rectangle"

Copy and paste paper 13

Back on "middle rectangle " layer
Use your magic wand and click it

Selections - modify - 2
Selections - invert
On paper layer - click delete
Selections none

Delete "middle rectangle " layer
Rename your paper layer "Large back"

Highlight the "middle frame"
Copy and paste paper 15

Back on "middle frame " layer

Use your magic wand and click it
Selections - modify - 2

Selections - invert

On paper layer - click delete

Selections none

Delete "middle frame " layer

Rename your paper layer "Large top"


Apply inner bevel as before


Now that we have done these steps a few times using papers of your choice


Do the steps on the:

- Back rectangel

- Right rectangle

- Left Rectangle


I applied inner bevel to all of them


At this point there are numerous ways to make this tag your very own


Apply your elements of choice from the kit


Apply copyright and any license information if needed


This tutorial was written by Rose Foster on 11/20/2008
Any similarity to any other tutorial is purely coincidental
Any creations you make following this tutorial is yours to do with as you please
as long as there is no profit made. This tutorial is not to be copied or passed around.
©Sue Miller
UYA2761


Saturday, November 8, 2008

Dark Thoughts - PTU


Supplies Needed

PTU Scrapkit DarkSecrets_FD_Taggersize by ImperFoxtionDesign
Follow her blog to get to where she sells them

HERE

Masks HERE
Montiblindmask1
Montiblindmask


Thank you both for allowing me to use your items!!!


Tube of choice
I used the art Ted Hammond
You must have a license to use his work!
He sells through CILM
http://www.cilm.com/

Font of choice
I used Lucida Handwriting


Ok let's get started

Open a new canvas 600x600
Open all materials and minimize

Copy and paste paper1
Right click - new mask layer - from image
Montiblindmask1
Invert checked
Merge group
rename Mask 1

Copy and paste paper2
Right click - new mask layer - from image
Montiblindmask
Invert checked
Merge group
rename Mask 2

Copy and paste frame5
Position this in the middle of the masks

Copy and paste wrap1
Image - resize - 90
Duplicate this twice
Place 2 of these on the left side
and one on the right side beside the one that came with frame

Copy and paste wingheart1
Image - resize - 60
Repeat resize
Place this at the top of your frame

Copy and paste tube of choice
Move layer below your frame layer
Using your eraser tool - erase all extra outside the frame

Highlight your top layer

Copy and paste rose1
Image - resize - 25
repeat resize


Copy and paste rose2
Image - resize - 25
repeat resize

Duplicate each rose as many times to your liking
I used 4 blue and 3 red
positioned them all on one curtain
merged all roses together
duplicate
image - mirror
Apply Elements of Choice

Apply copyright and any license information if needed

This tutorial was written by Rose Foster on 10/06/2008
Any similarity to any other tutorial is purely coincidental
Any creations you make following this tutorial is yours to do with as you please
as long as there is no profit made. This tutorial is not to be copied or passed around.


© Ted Hammond CI-4143LM
http://www.tedhammond.com/
Do not remove credits


Dear Santa - PTU


Supplies Needed

PTU Scrapkit
I Envy You FD - Tagger
You can purchase kit
HERE

Tubes of choice
I used the art Zephir d'Elph
You must have a license to use her work
You can find her tubes at UpYourArt
http://www.upyourart.com/

Font of choice
I used Moontype Corsiva

Mask of Choice
I used WSL-Mask 83
You can get this HERE under downloads


Ok let's get started

Open a new canvas 600x600
Transparent

Copy and Paste paper10
Right click - New Mask Layer- From Image
Merge group
Copy and paste Bergamotte(one of the tubes)
Image - Mirror
Image - resize - 85
Repeast Resize

Copy and paste Christmas tree of choice
I used Zephir d'Elph - Les Cadeaux and misted to my liking

Copy and paste doodle1 from kit
Effects - photo effects - black and white
Image - resize - 85
Repeat resize
Move to left side

Right click on layer - Duplicate
Image - Mirror
Merge together these two layers
Right click - properties
Opacity - 80

Move this layer to the very bottom

Highlight your top layer

Copy and paste tag1
Image - resize 50
Repeat resize

Place near Bear
I erased the ribbon


Add wording of choice

Add copyright and license if needed


This tutorial was written by Rose Foster on 10/4/2008
Any similarity to any other tutorial is purely coincidental
Any creations you make following this tutorial is yours to do with as you please
as long as there is no profit made. This tutorial is not to be copied or passed around.



© Sephir d'Elph
http://www.zedelph.com/
UpYourArt2761
Do not remove credits Do not Snag Tiles

Praying For A Cure - PTU

Supplies Needed

PTU Scrapkit - Wench Design_BreastCancerAwareness
HERE

WSL_MASK208
Here
You can find the masks in the download section

Thank you both for allowing me to use your items!!!


1 tube of choice
I used the art Steve Baier
You must have a license to use his work!
He sells through UYA


Font of choice
MisterEarlBT


Ok let's get started

Open a new canvas 600x600
Open all materials and minimize

On new Raster copy and paste paper12
Right click on paper layer, new mask layer, from image
Merge group
Rename Background


Copy and paste BCAWordart2
Resize - 150
Rename WordArt

Effects - 3D Effects - Inner Bevel
with these settings


Apply the following drop shaddow
-2, 2, 100, 7 color 822466

On Background Layer
Copy and paste Frame 9
Resize 85
Repeast resize twice
Apply same inner bevel effect
Rename Frame

Copy and paste BCA PerfumeBottle1
Resize 50
Repeat resize
Place to bottom left
Rename Large Bottle

Duplicate
Resize 80
Duplicate and mirror
move two smaller bottles so they are touching (see tag above as example)
Merge these two together and rename small bottles
Move large bottle above small bottles

Copy and paste BCA charm7
Resize to 25
Place on top of large bottle like it is hanging from bottle

Merge Large bottle, small bottles and charm together
Duplicate merged layer
Image mirror

Copy and paste your tube
Move below your frame layer
Resize if needed

Highlight frame layer
Using magic wand click inside your frame
Selections - Invert
On tube layer hit delete
Selections - none

At this point I used my eraser tool and erased the wordart between the two sets of bottles
This was to put a name there.


Apply copyright and any license information if needed


This tutorial was written by Rose Foster on 09/23/2008
Any similarity to any other tutorial is purely coincidental
Any creations you make following this tutorial is yours to do with as you please
as long as there is no profit made. This tutorial is not to be copied or passed around.


© Steve Baier UpYourArt2761
http://www.scbartworks.com/
Do not remove credits


Ropin' and Ridin" - PTU

Supplies Needed

PTU Scrapkit
Western Wonder - by LisaW
HERE

Masks of choice...
I am using Template B
Designed by WindyWoo
HERE

Tube of choice
I used the art Suzanne Richards
You must have a license to use her work
You can find her tubes at CILM
http://www.cilm.com/

Fonts of choice
I used Impress BT


Ok let's get started

Open all supplies and minimize

Open a new canvas 600x600
Transparent

Copy and Paste BG2
Right click on layer - New Mask Layer
From Image

Merge Group

Rename BK1

Copy and Paste BG3
Right click on layer - New Mask Layer
From Image

Merge Group

Resize - 75
Rename BK2

Copy and Paste Raster5 from Template
Position this layer between BK1 and BK2

With BK2 highlighted
Copy and Paste Raster 3 from Template
Image - resize - 75
Duplicate resize twice

Position these three circles at the bottom
Close off all layers but the 3 circles
Right click - properties - merge visible

Copy and Paste Horseshoe 2
Image - resize - 65
Position in one of the circles

Copy and Paste Hat 2
Image - resize - 45
Position in one of the circles

Copy and Paste Boot 2
Image - resize - 45
Position in one of the circles

Copy and paste BK6

Highlight the 3 circle layer
Using your magic wand
Click inside all 3 circles

Selections - Invert
Hit delete on BK6 layer
Selections none

The BK6 layer should be position above the
3 circle layer and below your horseshoe, hat and boot

On BK6 layer apply the following drop shaddow

3, -3, 100, 21, black
and
-3, 3, 100, 21, black

Effects - Texture Effects, Polished Stone
with these settings
7, 58, 10, 45, white

Highlight BK2 layer
Copy and Paste RopeFrame2
Position where desired
using your deform tool if need be

Copy and Paste tube
Place tube inside the circle


Add copyright and license if needed


This tutorial was written by Rose Foster on 08/22/2008
Any similarity to any other tutorial is purely coincidental
Any creations you make following this tutorial is yours to do with as you please
as long as there is no profit made. This tutorial is not to be copied or passed around.


© Suzanne Richards CI-4143LM
http://www.mojo.com.au/
Do not remove credits


Carols Around The World - PTU


Supplies Needed

PTU Scrapkit
BD-Christmas by Bluey
You can purchase kit
HERE

Tube of choice
I used the art Zephir d'Elph
You must have a license to use her work
You can find her tubes at http://www.upyourart.com/


Font of choice
I used Lucida Handwritiing

EyeCandy 3.1 Fur


Ok let's get started

Open a new canvas 600x600
Transparent

Open Paper1 an minimize

Change your foreground and stroke properties to paper1
Close out Background and Fill

Using your preset Circle - Width 10
Draw out a large circle

Convert to Raster - Duplicate

On original circle
Effects - Texture Effects - Mosaic Glass
Using these settings

On the dupilcate cirlce
Adjust - Blur - Gaussian Blur - Radius - 4

Copy and paste your tube
Move inbetween the two circles
Resize if needed

On duplicate circle
Using your magic wand click inside the circle
Selections - modify- expand - 10
On tube layer hit delete
Selection - none

Copy and paste paper6
Image - resize - 85%

On duplicate circle
Using your magic wand click inside the circle
Selections - modify- expand - 10
On paper6 layer hit delete
Selection - none

On paper6 layer
Eyecandy 3.1 - Fur
With these settings:
999, 51, 29, 52

Effects - Texture - Effects - Weave
Gap - 3
Width - 6
Opacity - 100
Weave and Gap Color - 86745f
Fill Gap - Unchecked

Merge all visible
Resize - 70%

Copy and paste Christmas Tree
Resize - 50%
Drop Shaddow of choice
Move to left side
Duplicate
Image - Mirror
Add wording of choice
Add copyright and license if needed

This tutorial was written by Rose Foster on 09/12/2008
Any similarity to any other tutorial is purely coincidental
Any creations you make following this tutorial is yours to do with as you please
as long as there is no profit made. This tutorial is not to be copied or passed around.
© Sephir d'Elph http://www.zedelph.com/
UpYourArt2761
Do not remove credits