Showing posts with label Tutorials. Show all posts

Wednesday, January 11, 2012

Tutorial of the Week

Welcome to Part 2 of getting your photos organized for the new year! Last week I showed everyone how I organize my photos, hopefully that inspired you to start sorting through your digital photos. Remember that it really doesn't matter what system you use as long as it works for you & that you are consistent with the sorting. This week is going to be a little short as the hard work will be next week.

Now that you've gotten a few folders set up & sorted, we need to talk about what you need to get rid of. Yup, we're going to get rid of pictures. I know that is a little nerve-wracking but really, how many copies of the same shot of Fido do you need? One feature I love to use on my camera is the rapid fire & I'll sometimes end up with a few hundred photos at the end of the day. Taking the time now to sort photos will really help you out in the future.

Chuck all those photos that are beyond hopelessly blurry, any that you really didn't mean to take & those ones that have a close of up your kid's nose. Unless that's what you were going for! Got ten shorts from that recent family photo session? Tossing all but the best one will prevent you from doing a mad search during a speed scrap. Go through that miscellaneous folder & get those photos culled & into the right folder.

One extra step I like to do when I've been given photos taken by other people ['cause I'm a total organizational nut] is to put all the photos in chronological order by renaming a those bonus photos. For example, at the boys' birthday party I got photos from the grandparents & cousins that didn't conform to the naming convention of my camera. Once I got all the photos culled, I took the grandparent pictures & renamed them to match my files so when the photos were dropped into the folder, they would be in a close to chronological order as possible.

If you take a look at my file below, in the third row you'll see that the file names go from IMG_9923 which was taken by me to IMG_9924_01 which is where the grandparents & cousins took over the taking of pictures. I figured out what the rough order was & then renamed them so that when I sorted by name, everything would be in the correct order. You'll also see in the second row of photos how the image names get higher very quickly, that's a time I took about 30 pictures & only kept the best ones of my cousin spinning the kids around on their backs. Don't ask why they found that so much fun, I don't get it either but they loved it.


I know this method is not for everyone but I love doing it to keep things in the right order. I'm a little too organized sometimes.

Once you've gotten the pictures culled, it will be time to rename everything so that you'll be able to find the pictures easily in the future. But that's going to take a little more work so come back next week & I'll tell you how to rename several hundred pictures at once!

Wednesday, January 4, 2012

Tutorial of the Week

It's the new year & many of us find our thoughts turning to organization, especially if you didn't reach the goals set last year that would get your life organized. Not that I'd know anything about that ... say where did that huge pile of receipts under the desk needing to be shredded come from?

One part of your life that you may not think about re-organizing are your photo files but trust me, it can come in handy to take a look back at all your files & do a little sorting. After all in the age of digital cameras we take more pictures & videos than ever before, filling up our hard drives to capacity. Sure you can get a bigger hard drive but when you're trying to find a picture quickly organization is key.

As with my tutorial a few months ago about organizing your scrapping stash, these are just things that I have found useful. The Stephanie MethodTM is not for everyone but if you discover something useful from my ramblings, then I've done my job! This is going to be a multi-part tutorial as it'll be about three miles long if I didn't break it up. To start out we're going to talk about getting photos sorted, then next week about how to get those 1,500 pictures you took one month down to a more reasonable number [yes, I have taken that many in a month darn that rapid fire feature!], then how to rename the files to finish off the process.

To start off, find an sorting method that fits you best. You could sort by events like holidays, vacations, etc or just by date. Whatever sorting method you chose make sure that you like it & you stay consistent as you get everything sorted; after all, if you change your method half way through it'll just make your life more frustrating & we're trying to lessen the frustration. I like to sort photos by year rather than event, it fits my way of thinking better. This is what my Picture folder looks like, as you can guess the year 2000 is when we got a digital camera so the years before 2000 are grouped by decade & after 2000 are grouped by year.


If we go into my folder for the years 1940-1949 you'll see how I organize the older photos. Each photo is labeled with the year [& month/day if known] along with who's in the picture & where it was taken.


Labeling pictures this way does make for some long file names which can make your computer grumpy. An alternate way of labeling the pictures would be to assign each photo a unique code & then keep a separate document where you list all the important details. Another way is to right-click on the photo & in the window that pops up you can put all the information you'd like in the comments section. That's my Papa on his & Grandma's honeymoon, wasn't he handsome?


These methods will help not only you remember who's in all those pictures but are a great way to not lose your family history for future generations. I can't tell you how many old pictures are at my parents house that we have no idea who the people are, it's quite frustrating!

Taking a look in my 2011 folder, you can see how I sort things out for more recent pictures. When I download pictures off my camera or phone, I dump them into a folder for the month they were taken. I also put all the pictures I get from grandparents & other people in the correct month's folder; if I've got a bunch of pictures from several months at once & I don't have time to sort, I drop them into the Misc folder until I've got time for sorting.


Next week we'll cover how to sort through all those pictures to get rid of the duds, it'll take some work but it's worth it!

Wednesday, December 28, 2011

Tutorial of the Week

I admit it. I got nothing up my sleeve for today, with the holidays I haven't even had time to think much less come up with a cool tutorial. But I'll be back with something fun next week, promise!

Until then I just wanted to mention a few important things. Many of you have noticed some changes going on around the Stuff to Scrap world. Nicole is revamping the store, forum, gallery & blog with a new look & features to shake things up for 2012. I think everyone is going to like the changes, head over to the store where you can get a look at the great new theme!

While the changes are taking place, you may find broken links or features missing; don't worry they'll come back online as soon as updates are implemented. Of course Stuff to Scrap would be nothing without all of you & Nicole would love to hear your ideas! Head on over to the You Matter! thread in the forum & share some of your ideas for new challenges, store features, & anything else you think might be a great addition to the store, forum or blog.

One new feature is that the Stuff to Scrap forum has now been enabled to be used with the Tapatalk application! What is Tapatalk? Well, it's a forum application that can be used with the iPhone, iPad, Android devices, BlackBerry devices, & any device that runs Chrome which allows forum members to view the forum on the go. I've been using it for a few days now & it's great for keeping up with all the goings on it forum while out & about. Please note that this is a paid application but I'd have to say that it's totally worth the few bucks & if any other forums you participate in are activated for it, you can add them all! Check out the Tapatalk thread for more information on this great new feature.

That's all for today, I've got a couple of preschoolers begging to decorate cookies; everyone have a great day!

Wednesday, December 21, 2011

Tutorial of the Week

Today's tutorial comes via a question in the Tips, Techniques, & Questions section of the forum. A while back I had posted a link to a great tutorial on how to make a siggy that could be linked to multiple websites. However, that tutorial has gone away so I've whipped up one for the Stuff to Scrap blog!

To start, you'll need to make your siggy. When making the siggy, be sure to put text in it to direct people where to go, in my siggy I'm going to direct people to the blogs of my CT bosses. In addition, you'll need to have a background that is not transparent, white is a good solid choice. If you need to add a background layer go to Layer --> New Fill Layer --> Solid Color & place it at the bottom of your layers.


Once your siggy is how you like it, you'll need to merge all the layers together; do this by going to Layer --> Merge Visible. I'm kind of a picky person so I would then rename the merged image Layer 1.


Now comes the fun part, slicing up the siggy. You'll need to select the Marquee Tool which is similar to the Crop Tool but allows you to make layers. Using the Marquee Tool, select the area which will make up the first website link. As you can see in the example, I have selected an area to just past the end of "Scraps." Marching ants will appear to show you what the layer will look like when it's cut.


Next you need to go to Layer --> New --> Layer via Cut which will turn the selected area into a new layer. As you can see in the example on the right, there are now two layers & if you turn off the visibility on the new layer/Layer 2 you can see the rest of the siggy that needs to be sliced up. Continue using the Marquee Tool to slice up your siggy but make sure that before you select a new area you have your bottom layer/Layer 1 selected! Don't worry about making your selection perfect, the Marquee Tool will only cut visible images so if there's some transparent pixels in your selection, it'll just ignore those.


Once you've got the siggy sliced up, you'll want to save each layer as a separate JPG file. Starting with the left side of the siggy, turn off the visibility on all the other layers. Go to Image --> Trim to get rid of all the transparent pixels. Save the trimmed file as a JPG. Now backtrack two steps by either using Ctrl + Z or Edit --> Step Backwards to get those transparent pixels back. Turn off the far left section & turn on the visibility of the next section. Trim, save & repeat for each layer until you've got JPGs of each layer.


Upload your siggy files to your preferred image hosting site, then head into the Settings section of the forum. You'll see a link called Edit Signature, clicking on that will bring up the area to upload your signature to. Click on the Insert Image icon & paste in the links to the siggy images one at a time, starting with your far left image. When you highlight one of the images you can see that it's not connected to the other images. With each image selected, click on the Insert Link icon & paste in the website you want that section of the siggy to link to.


You can tell the link has been accepted by clicking on the Preview Signature button & then hovering your pointer over a section of the siggy. You should then be able to right-click & open the link up in a new tab or window to make sure the link is working. Once all the images in your sigggy have been linked, hit Save Signature & you're done!


A quick note about siggys. You are welcome to link your siggy to your personal blog/Facebook/Twitter, any Stuff to Scrap Designer blogs or your Stuff to Scrap Gallery but please do not link them to other stores or non Stuff to Scrap designer blogs. Have fun!

Disclaimer for Tutorials: I use Photoshop CS 8 for Mac so I can't speak to how things may work in a different program. However, I've posted this tutorial in the forum & if you have any other general tips or tips for different programs, please post them in the thread for everyone to see!

Wednesday, December 14, 2011

Tutorial of the Week

A happy Wednesday to everyone, anyone else got a head cold? No? Well, I've got a wicked one going on today so if anything in the tutorial doesn't make sense or you see pink elephants let me know & I'll get it fixed. Heehee.

Today I'm going to show you how to make a paper title which will be most useful if you'd like to do the Challenge of the Week where we need to make a layout with a paper title to earn the points. A paper title is pretty simple, basically it's where you clip a paper to a font, alpha, or word art to make it much more cool. Clipping a paper to an alpha or word art is pretty simple, just position your paper above the title layer, use Ctrl + G to clip the paper to the layer & Ctrl +E to merge them together.

But what if you want to clip a paper to a font? It's also simple to do but there are a few tricks you should know about. First, if you're going to clip a paper to a font, it's usually best to use a cardstock or paper with a light pattern. You can use a paper with a busy pattern if it's just the title but if you're going to use the paper on journaling, you really want something that not to busy. That's why if a kit has a cardstock add-on it's good to grab it so you've got some nice solid papers to use with your journaling.

To get started pick your font & type up your title/journaling. I always find it best to do the title/journaling last & get everything positioned/sized before I clip a paper.

Now you can either leave your text layer as is or rasterize the layer. Personally, I always leave the text unrasterized 'cause I'm a horrible speller; it also makes it easier to make changes to the text later. Pick the paper you want to use, position it above the text layer & then clip it using Ctrl +G. If you've left the text layer unrasterized, you won't be able to merge them together but that's OK.
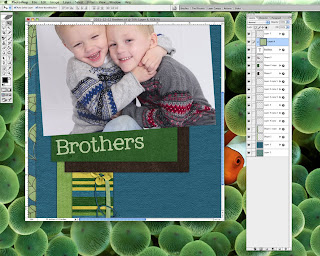

If that's all you want to do, add drop shadows to your text layer & you're done! But what if you want to add a little border to your text? It takes a few more steps but once you get the hang of it, it won't take long.

First, double click on the text layer to bring up the Layer Style box. I always like to make sure there are no drop shadows when doing this. Now select the Stroke option. You'll see that there is now a thin red outline around your text. You can change the size of the stroke as well as it's position; for the purposes of this example, I'm going to change the position to the Inside option. Don't worry about changing the color as that doesn't matter since we'll be clipping a paper to the stroke.


Next, let's get that stroke on its own layer as you can't clip a paper to it when it's just a layer option. Right click on the layer, making sure that your pointer is over the far right side of the box. If you right click but don't get the full menu, just move your pointer over a little bit, it's just a Photoshop quirk.

In the pop-up menu, click on the Create Layer option. This will take all the different layer styles & put each one on into it's own layer. That's why I wait on drop shadows as if you had them on the text layer, it would turn the drop shadows into their own layer. But you'll notice a small problem, if you've got a paper clipped to text layer your stroke layer might seem to disappear. Don't worry, it's still there just hidden under the paper layer.


Quick side note: If you choose the Inside option back in the Layer Style box, the new layer will be above & clipped to the text layer. Choosing the Outside option will create the stroke on a layer below the text layer. Choosing the Center option will create the stroke on a layer above the text layer but not clipped to it. As there are so many different options, you'll need to have some fun playing around to find the one you like!

Back to the Inside option. Now you might be tempted to just drag the stroke above the paper layer so it's still clipped to everything & then clip the new paper to your stroke. Nope, won't work as you'll get the same problem where the paper covers up everything under it.


Instead, drag the stroke under the text layer where it's not clipped to anything. You'll notice that there's a huge red box now but that's OK as it's just what the stroke looks like when it's not clipped to anything. Position your paper above the stroke layer, use Ctrl + G to clip it to the stroke layer & Ctrl + E to merge them together; they need to be merged for this to work!


Drag your merged stroke layer up above both the text layer & the paper layer. Use Ctrl + G to clip your stroke back to the text & volia! A lovely paper stroke around your paper text!


If you want to add a drop shadow to your text, make sure to add it to your text layer & not the stroke layer or else it'll look really funky.
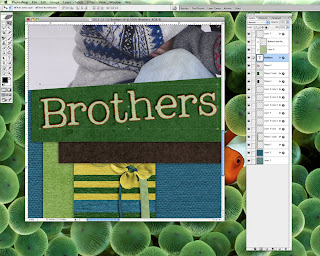

Keep in mind that if you want to edit your text, you need to do it before making the stroke. If you do the stroke & then find that something spelled wrong or missing a word [why yes I have done this!] you'll need to delete the stroke layer & start all over again. So make sure things are A-OK before doing the stroke! Now go have some fun & submit a layout using a paper title for the Challenge of the Week by Saturday night!

Disclaimer for Tutorials: I use Photoshop CS 8 for Mac so I can't speak to how things may work in a different program. However, I've posted this tutorial in the forum & if you have any other general tips or tips for different programs, please post them in the thread for everyone to see!

Wednesday, December 7, 2011

Tutorial of the Week

As digital scrapbookers we take lots of pictures & there's something about the holidays that brings out the camera even more often. And sometimes those shots just don't turn out like how you wanted which is such a bummer. Let's face it, we can all use some extra tips when using our camera as learning new things is what makes photography so much fun!

If you've been keeping an eye on the Photography Stuff section of the forum, you might have noticed that we now have someone giving us great tips on photography several times a month! Mom and Camera, that has amazing photographs & tons of great photography tips. I am in awe of Gayle's photos & have been trying to follow some of her tips but I'll need to talk my husband into getting me a nice camera so I can try some of them [a girl can dream!].

But even if you don't have that super cool camera, Gayle has lots of tips on how to improve your photography skills with your little point & shoot. In the Photography Lessons, Tips & Tutorials section, Gayle has posted several tutorials that cover getting great shots of your toddler [in part 1 & part 2 no less!], taking a great holiday card picture, & how to get pictures with bokeh lights in them. You know, those pictures that have little light circles in the background. Nope, I had no idea there was a name for them either!

I can't wait to see what other tutorials Gayle has up her sleeve for us & I've added her blog to my Google reader so I don't miss a tip or any of her fabulous photos. If you have any areas of your photography that you'd like to improve on, leave a comment in this thread or send Gayle a PM & she'll be happy to help you out. If you live in the Utah area, you might want to check out one of her classes, you can find information on the classes here.

Now I'm off to see how I can convince my husband into letting me buy a new camera. Might need to bring in some cookies to help out with this venture!

Wednesday, November 30, 2011

Tutorial of the Week

Today I've got the companion tutorial to last's week's tutorial about how to fill in fonts, we're going to trim a photo to fit into an irregularly shaped frame. I've got a helper for this tutorial so hopefully I won't forget any steps!

First, you'll want to open up the frame you want to use, I've opened a twisted wood frame from SAHM Scrapper's newest kit, Forget Me Not. It's very cute but very hard to fit a photo into with all the little openings. I've used a green background so you can see all the little openings a bit better.


Next open up a picture, here's one of the annoyance cute boy on my lap. Jake tells me that he's digging for treasure in this picture & wants flowers, lots of small flowers but he'll have to wait on those. Let's move the picture until it's how we want it. Then select the layer with the frame & turn on your Magic Wand tool.


Notice that the large open area in the frame is now selected with the marching ants but I'd like to have a few of the little openings included in the selection. While holding down the Shift key, use the Magic Wand to select all the other openings you'd like to include.


Next, you'll want to expand the selection but just a touch so that you don't have any white space between the trimmed photo & frame. With the ants still marching, go to Select --> Modify --> Expand. Expand your selection by not more than 5 pixels as you don't want to go past the outlines of the frame.

Now select the photo layer & go to Layer --> New, then select which option you'd like to use, the Layer via Copy or Layer via Cut options will both produce the new layer that we want.


Turn off your original picture layer & now you'll see a nicely trimmed photo within the frame! If you decide that you need to include more areas, just backtrack to the step where you are selecting areas & add in the additional ones you want.


Finally you can link & merge the frame & trimmed photo layers to put on your layout. You don't necessarily need to merge the two layers but if you don't, remember that you won't need to put a shadow on the picture layer, just the frame. If you have any other general tips or tips on how to do this tutorial with different programs, please post them in this thread for everyone to see!

Wednesday, November 23, 2011

Tutorial of the Week

Today's tutorial is going to very useful if you plan on doing the November Font Challenge as I'm going to show everyone how to fill in a font that has an outline with an empty center. A big shout out to Meagan of Meagan's Creations for originally posting this tutorial in the forum. There's actually another part of this tutorial but that's for next week unless you want to check out the thread before then! Go ahead, I won't mind!

OK, to fill in your font first get your title or journaling how you like it [don't forget to spell check!] & make sure that the font is closed.


Now use the Magic Wand Tool to select all the areas inside of your text with the marching ants. Make sure that the Contiguous Box is checked before you start or the wand will select all the empty areas & we don't want that! If you have more than one word, hold down the Shift key while you select different areas so they are all added to the same selection. And don't forget about the dots over the i's!


I'm now going to show you two different ways to fill in the text, clean & messy; let's start with the clean version. With the ants still marching, we need to expand the selection to make sure the fill is nice & clean so go to Select --> Modify --> Expand. Expand your selection by at least 3 pixels but not more than 5 or so as you don't want to go past the outline of the font.


Next you'll need to make a new fill layer so go to Layer --> New --> Fill Layer --> Solid Color. When the color section box pops up, pick a color other than black & click on OK. Move your new fill layer below your text if needed.


You can now clip a paper to this new layer, your text is now filled & is nice & neat!


But what if you want your font to look a little messy? After selecting the area inside of the text & with the ants still marching, go to Select --> Modify --> Expand. Expand your selection by as much as you would like to get the selection beyond the outline of the font. You may need to try out a couple of different sizes until you find what you like, I've gone with an expansion of 20 pixels. Follow the same steps as above to make a new fill layer. As you can see, the fill layer extends just a little bit past the outline.


Clip your paper to the fill layer & you've got a bit of a messy look to your font! I think this is how I'm going to keep it as my life is always messy with two little boys.


Go ahead & try this with the November Font Challenge, there are a few tricks to using this month's font so read the top post carefully. I'll be back next week with the second part of this tutorial, right now it's time to start the Thanksgiving cooking madness!

Wednesday, November 16, 2011

Tutorial of the Week

Last week I showed everyone how to add overlapping drop shadows to clusters & now I'm going to give a quick overview of how to trim the extra transparent space from your cluster to offer it as a freebie. This step only takes a few moments & it really appreciated by people using your cluster as it makes the file size smaller & the thumbnails easier to view. It is especially important to do if you plan on designing kits for sale!

First you'll need to merge all your cluster layers together, if you've added the overlapping drop shadows then this step is already done. For a cluster or element that still has layers you'll need to go to Layer --> Merge Visible.


Now let's trim your cluster, here's how to do it in several different programs.
  • Photoshop Elements: Hold down your control key & click into the thumbnail version of your element in the layer palette. The little marching ants will come up all around your element. Then, go to Image --> Crop. All the transparent pixels will be gone.
  • Paint Shop Pro: Copy & paste the cluster as a new image.
  • GIMP: Go to Image --> Autocrop Image & the program will do the work for you.
Since I use Photoshop, I go to Image --> Trim. Make sure that under the Trim Away section all the boxes are checked, click on OK & Photoshop will trim the cluster for you.


Once all the transparent space is gone you can save the cluster as a PNG file & package it up with a preview & your TOUs. I've left my cluster freebie up for everyone to snag, just go to last week's post to grab it!

Disclaimer for Tutorials: I use Photoshop CS 8 for Mac so I can't speak to how things may work in a different program. However, you can find this tutorial in the forum & if you have any other general tips or tips for different programs, please post them in the thread for everyone to see!