

Every serious network lab outgrows a simulator. Packet Tracer covers most certification topologies, but the moment you need real IOS output, third-party appliances, or a router image your study guide quotes, you need an emulator. GNS3 runs real Cisco, Juniper, and Arista images on your own hardware and wires them together with virtual cables, which is why it has been the default network lab platform for over a decade.
We install GNS3 on Ubuntu from the official PPA two ways here: as a headless server you drive from the bundled Web UI, and as the desktop GUI client with its own local server. You also get both emulator backends, the ubridge and Wireshark groups, and a first topology. Every command below was run on fresh Ubuntu 26.04 LTS and Ubuntu 24.04 LTS machines in November 2026 with GNS3 2.2.61 from the official PPA, the desktop path on both and the headless path on 26.04.
Why GNS3 on Ubuntu
GNS3 on Ubuntu runs emulated devices at near native speed because Dynamips, QEMU/KVM, and Docker all execute directly on the Linux kernel. On Windows and macOS, any QEMU or Docker based appliance forces you into the GNS3 VM, which adds a hypervisor layer between the lab and the host. Installing directly on Ubuntu skips that layer and gives the emulated routers every core and every gigabyte you can spare.
You also get to pick how you work. A desktop install gives you the Qt client and a private local server in one package set. A headless install turns a box in a rack, a Proxmox VM, or a cloud instance into a lab you drive from anywhere. You reach it through the bundled GNS3 Web UI on port 3080 in any browser, or from the Qt client on your laptop. The PPA tracks the stable 2.2 line (its own description says GNS3 v2.x), which is the version this guide targets. It also replaces our older GNS3 guide for Ubuntu 22.04, 20.04 and 18.04, whose desktop wizard, IOU and group permission steps were retested and folded in below.
Prerequisites
The host needs three things before you start:
- Ubuntu 26.04 LTS or 24.04 LTS, server or desktop
- A user with
sudoprivileges and network access to Launchpad PPAs - CPU with VT-x or AMD-V if you plan to run QEMU-based appliances
Size the host from the images you intend to boot, not from the GNS3 packages. The server itself idles under 100 MB of RAM, and VPCS endpoints are nearly free. Dynamips routers take 256 to 512 MB each, while QEMU appliances are the real cost: IOSv wants 512 MB, IOSvL2 768 MB, and a Cat8000v or vMX eats 4 GB or more per node. A 6-router Dynamips topology fits in 4 GB total; a mixed lab with three or four QEMU appliances wants 16 GB. Our test machines ran 4 vCPUs and 16 GB, which is a comfortable floor for CCNA-scale labs, not a recommendation for heavy multivendor topologies. Disk follows the same logic: 20 GB covers the install plus a few appliance images.
Verify hardware virtualization is exposed before you start:
grep -c -E 'vmx|svm' /proc/cpuinfoAny number above zero means KVM acceleration will work. Zero on a VM means nested virtualization is disabled on the hypervisor, which the troubleshooting section covers.
Update the system and enable universe
GNS3’s dependencies pull from Ubuntu’s universe repository. It is enabled by default on both LTS releases, but confirming costs one command.
sudo apt update && sudo apt upgrade -y
sudo add-apt-repository -y universe
Install the tooling that lets add-apt-repository handle external PPAs:
sudo apt install -y software-properties-common curlWith that in place, the GNS3 PPA is one command away.
Add the official GNS3 PPA
The GNS3 team publishes ppa:gns3/ppa with builds for every current Ubuntu release, including a dedicated suite for each codename. Add it and refresh the index:
sudo add-apt-repository -y ppa:gns3/ppa
sudo apt update
The confirmation names the suite matching your release. On Ubuntu 26.04 that is resolute:
Repository: 'Types: deb
URIs: https://ppa.launchpadcontent.net/gns3/ppa/ubuntu/
Suites: resolute
Components: main
'
Description:
PPA for GNS3 v2.x and supporting packages. Please see http://www.gns3.com for more details.
More info: https://launchpad.net/~gns3/+archive/ubuntu/ppa
Adding repository.
On 24.04 the suite reads noble instead. Confirm apt now sees the package and which build it will install:
apt-cache policy gns3-serverThe candidate should come from the PPA, tagged with your codename. This is the 24.04 result.
gns3-server:
  Installed: (none)
  Candidate: 2.2.61~noble1
  Version table:
     2.2.61~noble1 500
        500 https://ppa.launchpadcontent.net/gns3/ppa/ubuntu noble/main amd64 Packages
Debian users cannot add this PPA cleanly because it ships no Debian suites. On Debian 13 or 12, follow the dedicated GNS3 on Debian install guide instead, and on Fedora the GNS3 Fedora packages come straight from the distro repos.
Ubuntu 26.04 cloud images: Unable to locate package gns3-server
If apt-cache policy prints nothing for gns3-server on 26.04, your system has the amd64v3 architecture variant turned on. Canonical’s cloud image documentation says the official 26.04 images on public clouds are v3-enabled, so instances launched from the official 26.04 images on any public cloud hit this. Apt then reads the PPA’s binary-amd64v3 index, which is empty because the GNS3 team only builds plain amd64 packages, and the install fails even though the PPA added cleanly. Check for the variant first:
apt-config dump | grep Architecture-VariantsA v3-enabled system prints the variant line.
APT::Architecture-Variants "amd64v3";On such a system, sudo apt install -y gns3-gui gns3-server aborts before downloading anything, with two errors.
E: Unable to locate package gns3-gui
E: Unable to locate package gns3-server
The fix is to pin the PPA source to plain amd64, so apt fetches the index that actually holds the packages. Your Ubuntu packages keep coming from the v3 archive:
echo "Architectures: amd64" | sudo tee -a /etc/apt/sources.list.d/gns3-ubuntu-ppa-resolute.sources
sudo apt update
This time apt downloads the PPA’s amd64 index and the candidate appears:

The same failure hits any 26.04 host where someone opted into amd64v3 through APT::Architecture-Variants. If the dump prints nothing, apt is on plain amd64 and needs no change. Canonical has no plans to build variants for 24.04, so the noble suite is unaffected.
Install GNS3 on Ubuntu (server or desktop)
Pick the package set by how you will use the machine. A headless lab box needs only the server; a workstation where you sit in front of the screen gets the desktop client too.
For a headless server, skip the GUI and its recommends:
sudo apt install -y --no-install-recommends gns3-serverFor an Ubuntu desktop, install the pair:
sudo apt install -y gns3-gui gns3-serverEither way you get more than the orchestrator. The PPA package hard-depends on vpcs, ubridge, qemu-system-x86, qemu-utils, and libvirt-daemon-system, so the QEMU/KVM backend and the VPCS endpoint simulator arrive even with recommends disabled.
Answer the ubridge and Wireshark prompts
The desktop install stops on two blue debconf screens, and the answers decide whether GNS3 works for a normal user. The headless install shows only the first one, because gns3-server does not depend on Wireshark at all. That first screen, Configuring ubridge, asks “Should non-superusers be able to run GNS3?” and defaults to Yes. Keep it: ubridge is the helper that moves packets between nodes, and Yes installs it so members of the ubridge group can use it without root.
The second comes from wireshark-common, which gns3-gui pulls in, and it is the one people get wrong because its default is No:

Move to Yes with the left arrow key before you press Enter. Yes restricts dumpcap to the wireshark group and gives it capture capabilities, so you can sniff host interfaces such as a GNS3 Cloud node’s bridge without running Wireshark as root. Both answers end up in the debconf database, which is the quickest way to check what you chose:
sudo apt install -y debconf-utils
sudo debconf-get-selections | grep -E "ubridge|wireshark-common/install-setuid"
Two true values mean both helpers were installed for group use. A headless box prints only the ubridge line.
ubridge	ubridge/install-setuid	boolean	true
wireshark-common	wireshark-common/install-setuid	boolean	true
The desktop path needs no separate Wireshark install. gns3-gui depends on the wireshark package, which on Ubuntu is the graphical analyzer itself (apt-cache show wireshark describes it as the graphical interface of the network traffic analyzer), so the viewer GNS3 launches for a link capture is already on the machine. On a headless server you read the capture files from a workstation instead; our Wireshark install guide covers that machine.
Confirm the server version on either path. We got the same number on both releases because the PPA builds one GNS3 release for every suite, so a 26.04 host and a 24.04 host in the same lab stay on matching versions:
gns3server --versionThe current PPA build prints this on both:
2.2.61The desktop client then starts from the Activities menu or with gns3 in a terminal, and the desktop client section below walks through its first start.
Add Dynamips and check the backends
Dynamips, the classic Cisco IOS emulator, is only a recommended package, so the headless install above skips it. Add it explicitly; on the desktop path the command just confirms it is there:
sudo apt install -y dynamipsCheck the build. The number matters because Ubuntu’s multiverse carries its own, much older Dynamips, so the version tells you which repository apt actually used:
dynamips --version | head -1Both LTS releases got the same PPA build, which is well ahead of the 0.2.14 in multiverse.
Cisco Router Simulation Platform (version 0.2.25-amd64/Linux stable)The rest of the stack still differs between releases, because QEMU, Python, and Wireshark come from the Ubuntu archive rather than the PPA. That matters when you compare appliance behaviour between hosts. The same install commands produced these versions on each release in November 2026.
| Component | Ubuntu 26.04 | Ubuntu 24.04 |
|---|---|---|
| gns3-server, gns3-gui (PPA) | 2.2.61~resolute1 | 2.2.61~noble1 |
| ubridge (PPA) | 1.0.1-1~resolute1 | 1.0.1-1~noble1 |
| dynamips (PPA) | 0.2.25 | 0.2.25 |
| QEMU (archive) | 10.2.1 | 8.2.2 |
| wireshark-common (archive) | 4.6.4 | 4.2.2 |
| Python runtime | 3.14.4 | 3.12.3 |
One trap to avoid: older guides tell you to apt install qemu-kvm. On Ubuntu 26.04 that name is only a virtual package with two providers, so apt refuses with Error: Package 'qemu-kvm' has no installation candidate. You do not need it. QEMU already landed as qemu-system-x86 through the gns3-server dependencies, which the version check proves:
qemu-system-x86_64 --version | head -1For container-based appliances such as FRRouting, VyOS, or Open vSwitch, GNS3 needs Docker, which is optional; everything else in this article works without it. The Ubuntu archive’s docker.io package is enough for a lab, and the Docker CE install guide covers the upstream build if you prefer it.
sudo apt install -y docker.io
sudo usermod -aG docker $USER
The docker group matters because the GNS3 server talks to the Docker socket as your user. Like every group change, it only applies after you log out and back in (or open a fresh SSH session), so do that before testing with docker run --rm hello-world. Without the group, Docker templates fail to start; with it, the server lists your local images, which the systemd section checks.
Optional: add IOU support
IOU (IOS on Unix) images are 32-bit binaries, so the gns3-iou helper needs the i386 architecture enabled first. Both releases installed it cleanly from the PPA:
sudo dpkg --add-architecture i386
sudo apt update
sudo apt install -y gns3-iou
Apt pulls a small set of i386 libraries (libc6:i386, libssl3t64:i386, lib32z1 and a few more) and finishes with:
Setting up gns3-iou (0.0.3~resolute1) ...The package only provides the runtime support. GNS3 does not ship IOU images or the licence file they need, so skip this unless you already have both.
Fix user permissions for KVM, libvirt, ubridge, and Wireshark
GNS3 launches emulators as whatever user runs gns3server, and that user needs group access to the KVM device, libvirt, ubridge, and dumpcap. The installer is less helpful here than it looks. The ubridge prompt says members of the sudo or admin group are added automatically, and in our lab only the image’s default user landed in ubridge and libvirt. The wireshark group was created empty and kvm had no regular users on either release. On the desktop path, a fresh user hits a wall straight away:
dumpcap -DWithout the group, the binary will not even execute, because the package sets it to mode 754 owned by root:wireshark, which leaves everyone else read access but no execute bit:
bash: line 1: /usr/bin/dumpcap: Permission deniedOn a headless server, add the three groups the server needs. The command is safe to repeat:
sudo usermod -aG ubridge,libvirt,kvm $USEROn a desktop with gns3-gui, run this four-group version instead of the command above, so wireshark is added too. Never run it on a headless server: the wireshark group only exists once wireshark-common is installed, and on our headless 26.04 box it failed with usermod: group 'wireshark' does not exist (exit code 6) without adding the other three groups either.
sudo usermod -aG ubridge,libvirt,kvm,wireshark $USERLog out and back in so the memberships apply, because group changes only reach new login sessions. An open terminal keeps the old list, so we opened a fresh SSH session in the lab before checking. Then verify:
id -nG | tr ' ' '\n' | grep -xE 'kvm|libvirt|ubridge|wireshark'A headless server prints ubridge, libvirt and kvm. On the desktop all four names print, and dumpcap -D now lists the host interfaces instead of failing:

Each group fails differently when it is missing. Without kvm, QEMU falls back to software emulation and every appliance crawls. Without ubridge, links between nodes pass no traffic, and without wireshark you cannot capture on host interfaces. Captures on GNS3 links are a separate path: ubridge writes them into the project’s captures folder, and on 24.04 a three-ping capture between two VPCS nodes produced a 1,348-byte pcap there.
While you are here, confirm the ubridge binary carries its file capabilities. The PPA package sets them during install, and so does the Wireshark prompt for dumpcap.
getcap /usr/bin/ubridge /usr/bin/dumpcapThe desktop install shows both lines on either release. A headless server has no dumpcap, so getcap reports that file missing and only the ubridge line matters:
/usr/bin/ubridge cap_net_admin,cap_net_raw=eip
/usr/bin/dumpcap cap_net_admin,cap_net_raw=eip
An empty result for ubridge is the classic cause of devices that refuse to start; the fix is in the troubleshooting section.
Run GNS3 server as a systemd service
On a headless box, the server has to outlive your SSH session, so run it under systemd rather than in a terminal. Skip this step on a desktop where you will use the GNS3 client’s own local server, because both bind port 3080 (the desktop client section explains why). Create the unit file.
sudo vim /etc/systemd/system/gns3server.servicePaste the following, substituting your own username for josphat on the User and Group lines. This is the exact unit we ran in the lab.
[Unit]
Description=GNS3 server
After=network-online.target
Wants=network-online.target

[Service]
Type=simple
User=josphat
Group=josphat
ExecStart=/usr/bin/gns3server --host 0.0.0.0
Restart=on-failure
RestartSec=5
LimitNOFILE=16384

[Install]
WantedBy=multi-user.target
Binding to 0.0.0.0 accepts connections from any interface, which is what a remote lab needs. Drop the flag if you will only ever drive the server from localhost. Reload systemd and start the unit at boot:
sudo systemctl daemon-reload
sudo systemctl enable --now gns3server
The journal names the version, the Python runtime, and the listen address. The “No configuration file” line is expected on a first start, because the server runs on defaults until you save settings:
sudo journalctl -u gns3server --no-pager -o cat | head -8On Ubuntu 26.04 the start-up reads:
Started gns3server.service - GNS3 server.
No configuration file could be found or read
2026-11-11 09:26:24 INFO run.py:218 GNS3 server version 2.2.61
2026-11-11 09:26:24 INFO run.py:220 Copyright (c) 2007-2026 GNS3 Technologies Inc.
2026-11-11 09:26:24 INFO run.py:242 Running with Python 3.14.4 and has PID 14844
2026-11-11 09:26:24 INFO run.py:248 Using system certificate store for SSL connections
2026-11-11 09:26:24 INFO run.py:78 Current locale is C.UTF-8
2026-11-11 09:26:24 INFO web_server.py:349 Starting server on 0.0.0.0:3080
Confirm the unit is active with a listener on 3080, and ask the API for its version.
systemctl status gns3server --no-pager | head -6
ss -tlnp | grep 3080
curl -s http://localhost:3080/v2/version
A healthy server shows active (running), a listener owned by gns3server, and a JSON version answer:

If you added Docker earlier, this is also the moment to prove the server can reach it as your user.
curl -s http://localhost:3080/v2/compute/docker/imagesAfter a docker run --rm hello-world test, the image shows up in the list the GNS3 template dialog uses:
[
    {
        "image": "hello-world:latest"
    }
]
With the service surviving reboots, the browser side is next.
Build a first topology in the GNS3 Web UI
From any machine on the same network, point a browser at the server IP on port 3080. The root URL redirects to the bundled client at /static/web-ui/bundled:
http://10.0.1.50:3080/The Projects page loads first, with buttons for system status, preferences, blank projects, and imports. The footer names the Web UI bundle version, which can trail the server version by a release; that mismatch is normal.
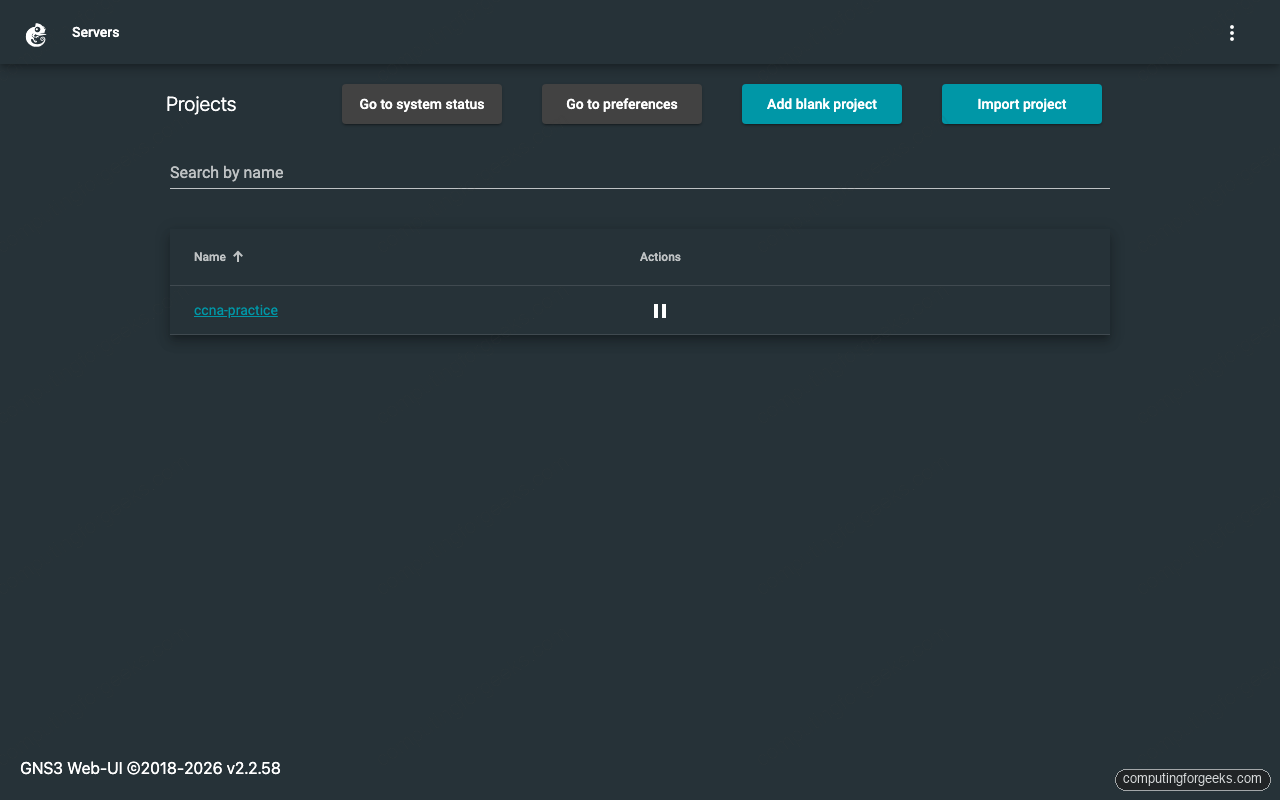
Click Add blank project and name it. On the canvas, the plus button opens the node palette. Even before uploading any Cisco images, the built-in templates are enough to prove the install works. Drag in an Ethernet switch and two VPCS nodes, then click the link tool and cable each PC to a switch port. Press the green start button in the toolbar. Every node indicator turns green and the port labels appear on the links:
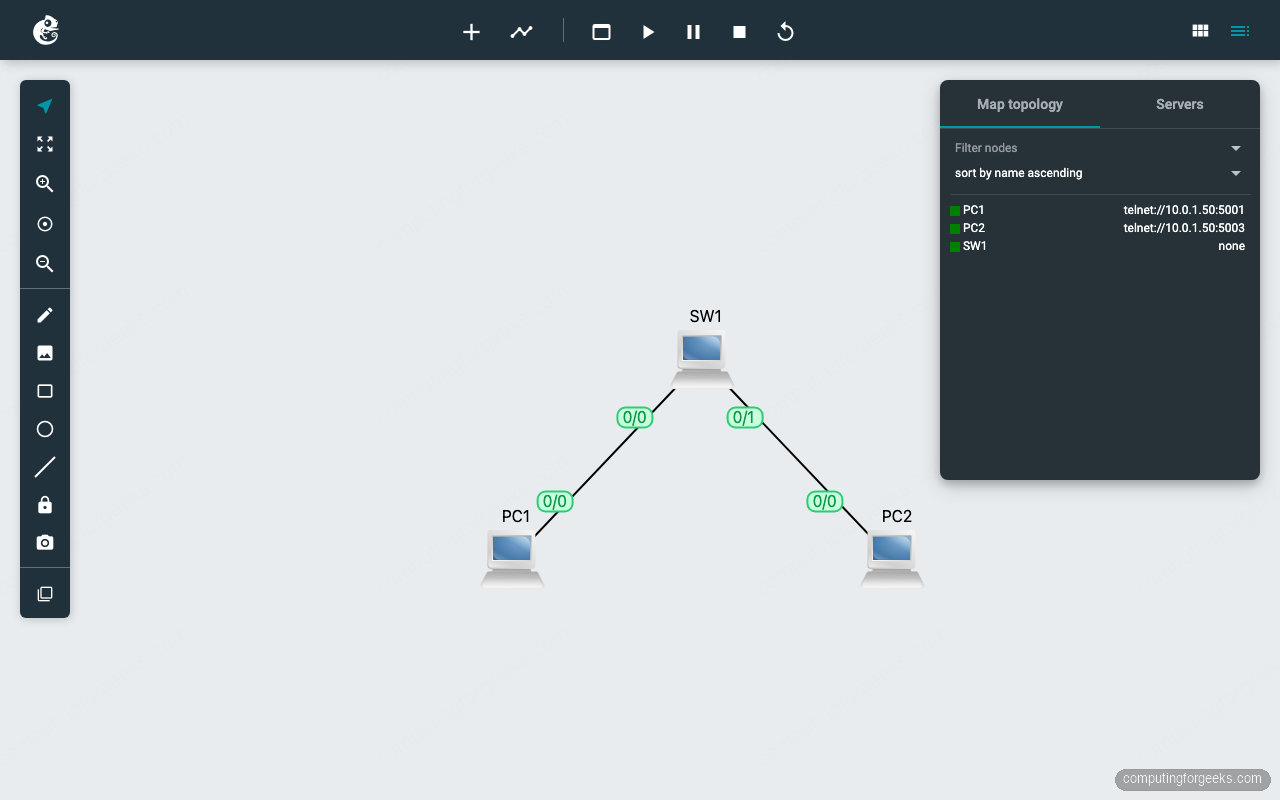
The Map topology panel on the right lists a telnet console for each running node. Connect to PC1 from your workstation on the port that panel shows (5001 in this run) and give both endpoints an address:
telnet 10.0.1.50 5001Inside the VPCS prompt, assign an IP and ping the other node through the switch.
VPCS> ip 192.168.1.11/24
Checking for duplicate address...
VPCS : 192.168.1.11 255.255.255.0

VPCS> ping 192.168.1.12

84 bytes from 192.168.1.12 icmp_seq=1 ttl=64 time=0.214 ms
84 bytes from 192.168.1.12 icmp_seq=2 ttl=64 time=0.364 ms
Sub-millisecond replies through an emulated switch confirm ubridge, the compute backend, and the console plumbing all work. From here, real router images slot into the same canvas: open the preferences, add an IOS or QEMU template, and build. If your goal is Cisco certification practice, the free CCNA lab collection has 19 ready-made exercises with solutions that run on exactly this setup.
Set up the GNS3 desktop client on Ubuntu
On an Ubuntu desktop with gns3-gui installed, the Qt client manages its own local server, so you do not need the systemd unit above. Running both breaks the client: they want the same port 3080, and the client expects to start and stop its server itself. If you already enabled the unit on this machine, turn it off first:
sudo systemctl disable --now gns3serverLaunch GNS3 from the Activities menu, or run gns3 in a terminal. The first start opens the Setup Wizard, and the server choice on its first page is the decision that matters:

- 1Run appliances on my local computer
- 2Next
- Select Run appliances on my local computer. On Linux the wizard pre-selects it, because Dynamips and QEMU run natively and the GNS3 VM option only makes sense on Windows and macOS.
- Click Next.
The local server page fills in /usr/bin/gns3server as the server path. Check the two fields below it before you move on:

- 1Host binding
- 2Port
- 3Next
- Host binding defaults to
localhost. Leave it there unless other machines should reach this server; a desktop lab has no reason to listen on the LAN. - Port is
3080 TCP. If the wizard complains here, something else (usually a leftover systemd unit) already holds the port. - Click Next.
The wizard then starts the server and connects to it. This confirmation is the proof that the ubridge and group work earlier paid off, because a failure here usually reads as a permission error:

Click Next once more for the summary, which repeats the server type, path, host, and port. Click Finish here.

The wizard writes its choices to ~/.config/GNS3/2.2/gns3_server.conf, and it quietly turns on authentication for the local server. That differs from the systemd service, which runs with no auth at all:
grep -E "^(host|port|auth|user|password|auto_start) " ~/.config/GNS3/2.2/gns3_server.confThe password is a random string generated per install, shown here as a placeholder.
host = localhost
port = 3080
auto_start = True
auth = True
user = admin
password = <random string generated by the wizard>
Keep that in mind if you script against the desktop’s server: curl http://localhost:3080/v2/projects gets nothing back until you pass those credentials with -u admin:<password>. The client itself handles it for you.
Create a project with File > New blank project (Ctrl+N), then build the same smoke test as in the Web UI. Take an Ethernet switch from the switches group and two VPCS hosts from the end devices group, cable them with the link tool, and start them with the green play button. The Topology Summary shows each node’s console port and the Servers Summary shows the local server in green:

Double-click PC1 to open its console, or connect with telnet localhost 5001. After giving the two PCs 192.168.1.11 and 192.168.1.12, a ping crosses the switch:
VPCS> ping 192.168.1.12 -c 3
84 bytes from 192.168.1.12 icmp_seq=1 ttl=64 time=0.601 ms
84 bytes from 192.168.1.12 icmp_seq=2 ttl=64 time=0.722 ms
84 bytes from 192.168.1.12 icmp_seq=3 ttl=64 time=0.895 ms
That is a working desktop install. PC1 got console port 5001 and PC2 got 5003, and both listen on localhost only, since the wizard left allow_console_from_anywhere off.
Connect the GNS3 Qt client to a remote server
The Qt client on your laptop can also drive the headless systemd server instead of running local compute. This is the standard pattern for shared labs: one well-resourced Ubuntu host runs the emulators, every engineer connects a lightweight GUI to it.
Install gns3-gui on the laptop (same PPA on Ubuntu, installers for Windows and macOS from gns3.com), then open Edit → Preferences → Server → Main server. Uncheck Enable local server first; that unlocks the Remote main server fields below it:
- Host set to the LAN IP of your Ubuntu server
- Port set to
3080 - Protocol left on HTTP
Click Apply. The server version appears in the status bar once the GUI reconnects. Keep the client and server on the same 2.2 release; the PPA updates both together, so an apt upgrade on each side keeps them matched.
Restrict port 3080 with ufw
The headless 2.2 server ships with authentication disabled by default. Optional HTTP basic auth exists (the auth, user, and password settings in gns3_server.conf, with the password stored in cleartext, exactly as the desktop wizard writes them). On a default install, though, port 3080 open to the internet means anyone can run code on your lab host. We see two sane options. For a LAN lab, allow SSH first, then only your local subnet on 3080, because enabling ufw without an SSH rule drops your session and locks you out of a remote box.
sudo ufw allow OpenSSH
sudo ufw allow from 10.0.1.0/24 to any port 3080 proto tcp
sudo ufw allow from 10.0.1.0/24 to any port 5000:10000 proto tcp
sudo ufw enable
The third rule is easy to forget. The service binds node consoles to 0.0.0.0 in the 5000 to 10000 range (our first VPCS node got port 5000 from the API), and without that rule ufw’s default policy drops the console connections your workstation makes, such as telnet 10.0.1.50 5001. Substitute your own CIDR, then check the rule table:
sudo ufw status numberedOn the lab server the table read:
Status: active

     To                         Action      From
     --                         ------      ----
[ 1] OpenSSH                    ALLOW IN    Anywhere
[ 2] 3080/tcp                   ALLOW IN    10.0.1.0/24
[ 3] 5000:10000/tcp             ALLOW IN    10.0.1.0/24
[ 4] OpenSSH (v6)               ALLOW IN    Anywhere (v6)
The 10.0.1.0/24 source in that table is the example subnet, so your own CIDR shows there instead. For anything reachable from outside, keep GNS3 bound to localhost and put Nginx with TLS and basic auth in front of it, proxying 443 to 127.0.0.1:3080.
Troubleshooting
Error: Package ‘qemu-kvm’ has no installation candidate
You are on Ubuntu 26.04 following an older guide. There, qemu-kvm is a virtual package provided by both qemu-system-x86 and qemu-system-x86-hwe, so apt will not pick one for you, and the GNS3 server package already pulled in qemu-system-x86 as a dependency. Remove qemu-kvm from your apt command and re-run it. On 24.04 the same command succeeds because the name maps to the single provider, which is already installed.
Routers and devices fail to start: ubridge permission error
Group membership alone is not enough; the ubridge binary itself needs file capabilities to open raw sockets. The PPA package sets them, but a pip or source install, or an upgrade that replaced the binary, leaves them missing. Check with getcap /usr/bin/ubridge. If the output is empty, apply them and restart:
sudo setcap cap_net_admin,cap_net_raw=ep /usr/bin/ubridge
sudo systemctl restart gns3server
Re-run getcap and start a node again. The manual command prints =ep where the package sets =eip; the inheritable flag makes no difference here, so both forms work. Thanks to André in the comments for flagging this one.
KVM acceleration missing inside a VM
On a Proxmox or libvirt host, the guest needs CPU type host and nested virtualization enabled on the hypervisor. Verify inside the Ubuntu guest with kvm-ok from the cpu-checker package. QEMU still runs without it, but every appliance drops to software emulation speed.
Cannot connect to compute ‘local’ in the startup log
A single Connect call failed 127.0.0.1:3080 line during startup is cosmetic; the controller tried to self-register before the HTTP listener finished binding, and the retry a second later succeeds. Only investigate if it repeats continuously, in which case something else holds port 3080, most often a systemd unit fighting the desktop client’s own server. Check with ss -tlnp | grep 3080.
Where this lab goes next
An empty canvas teaches nothing, so give the server real work. The CCNA labs collection indexes 19 topology exercises with device configs you can paste straight into this install, and the 90-day CCNA study plan schedules them week by week alongside the reading. If you are earlier in the journey, start with the CCNA 200-301 study guide and roadmap.
Beyond certification work, two host-side upgrades pay off quickly: a Linux bridge via Netplan bridged networking lets GNS3 Cloud nodes reach your physical LAN, and the wireshark group you added earlier lets you sniff that bridge directly. Budget disk before pulling appliance images; a couple of vendor VMs will fill a 20 GB root volume faster than you expect.




did not work
Hi. What’s the issue?, any errors?
I am having issues with the network devices
I have installed vJunos Switch and VJunos router and neither stay up when I turn them on.
vJunos devices require significant memory to boot fully. Make sure you have allocated at least 4 GB RAM per vJunos instance in the GNS3 template settings. Also check that KVM/QEMU is properly configured (not running in TCG mode) by verifying
kvm-okoutput. If the device powers on but drops after a few seconds, the console log (right-click > Console) will show the specific failure, usually a memory or CPU check error.Thank you. It works fine for me.
I have to set some permissions:
setcap cap_net_admin,cap_net_raw=ep /usr/bin/ubridge
Than Router and other devices start to boot.
Good catch. The gns3-server PPA package normally sets those caps via its postinst, so this fix is usually needed after a pip/source install or an upgrade that replaced the binary without re-applying caps. Verify with getcap /usr/bin/ubridge.