Showing posts with label progress. Show all posts

Jun 26, 2007

Into the yoke

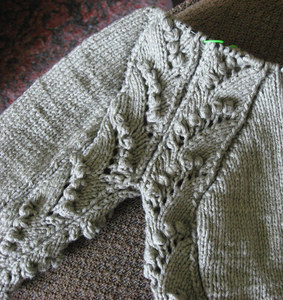
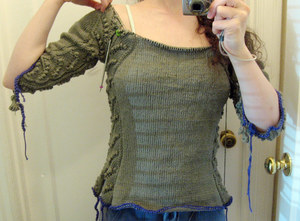
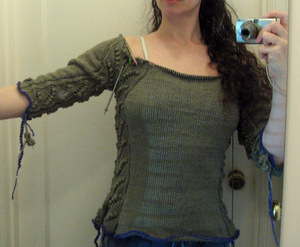
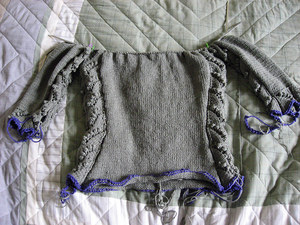
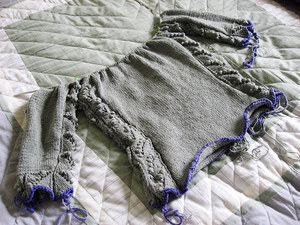
I've been working on the cardigan a lot lately and am well into the yoke and have the cables established. I'm delighted with the transition between patterns.
2006_0829grey0004

I don't know why the color of the yoke looks different from the body in these photos. It doesn't in person. I switched the direction of the cables at the center back:
2006_0829grey0001
Tonight I should be able to get to the first decrease. I'm going to decrease both within the cables and within the garter sections. And I'm getting antsy to sew the seams and close up the armholes. That always makes such a big difference. Like I'm working on a sweater, not constantly adding to an amorphous lump.

Jun 6, 2007

And Then There Were Two

Also posted at A Little Loopy.

Well, I committed myself to working solely on the Peanut Dresses, and much as I'm itching to knit something for myself, like a summery cami or tank, it seems that my one (project) track mind is paying off. PD2 is done! Well, mostly done. Both dresses still remain sans straps at the top and embroidery. Knitting PD2 was so much easier, since I already had the pattern instructions written down from the trial and error stages of the PD1 process.

And let me tell you, there were repeated attempts, various trials, and numerous errors. I lost count of how many times I ripped back poor PD1. But, PD2 is all the better for it. Yay for copious note-taking! I must admit-they look pretty cute together!

Next, I need to figure out what I want to do about the spaghetti strap ties for the top. Initially, I thought of attaching crochet chains, but on second thought, I fear those wouldn't be sturdy enough. I'm going to have to sit down and play around, methinks, and see what I can come up with.

My biggest concern at this point, aside from how to handle the ties, oh- and how the embroidered details will turn out (my embroidery skills are rather rusty), is how they will fit on real life Peanut bodies. But, after spending some time with the real life Peanuts at a picnic over the weekend, my estimation is that I think they should fit just fine. *fingers crossed*

Then again, maybe if I just give them enough paper napkins to hold their attention, they won't care how the dresses fit...

Jun 4, 2007

Sunflower Cami - back to work!

Hey there, remember me? :) My most recent CAL post was two months ago - I didn't realize it had been so long! But in between, I wrote my Masters thesis, and I hardly knit at all during that time period.

I've picked up the sunflower cami again though, and I'm really excited about it! Before my hiatus, I made a swatch and found that I really liked the fabric created by Calmer knit at 5.5 stitches per inch. (Just a little reminder - always write down what size needle you swatch with! Otherwise you might think you knit your swatch on 8s when you actually used 7s and then you will wonder why the 3" that you've knit so far look gigantic.) I decided to knit the front first and use it as a general template to find the optimal placement of the flower on the back -- which meant that I had to figure out the neckline.

My first thought was to give the sweater a really deep V, where the point would hit around the bra band. This neckline seems trendy right now and I think it would be flattering to a variety of body types. However, such a low V requires a plain camisole underneath, and Calmer is so soft that I wanted to be able to wear it right next to my skin. I considered a higher V but it struck me as a little boring - been there, done that! The back of the shirt will provide a strong visual impact and the front should be just as striking without taking over the spotlight.

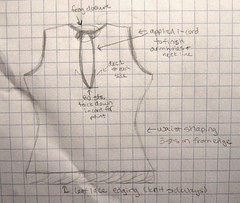
After a few more sketches and swatches, I decided on a deep keyhole neckline with a frog closure at the top.

sketch for front of sunflower cami

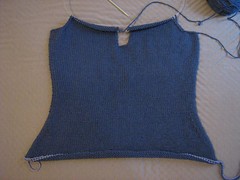
I think that this will work really well with the back - it's clean but it's interesting. (And sexy!) I'm going to finish the neckline and armholes with applied i-cord, and I'll probably reinforce the sides of the keyhole somehow so the fabric doesn't stretch too much at the closure point. I am still up in the air about the bottom edge, so I borrowed Marnie's technique of starting with a provisional cast-on, as you can see here:

front of sunflower cami

I sort of want to put a leafy lace edging along the bottom to go with the flower but I'm worried it might be too busy. When I get to that point, I will probably swatch and see. Otherwise, I could finish the bottom with more applied i-cord or a little ribbing.

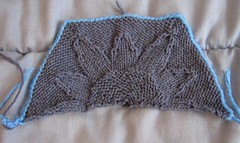
As for the back, I think I've finalized my sunflower design! Here is half of it (again with a provisional cast-on):

half-sunflower swatch

It's a circle inside, a hexagon outside, and the proportions resemble a sunflower. Perfect!

Mishka Progress


It feels like it's been so long since I spent a morning propped up on my pillows, talking to the blog about knitting. Since the last time, I've been slowly plugging away on Mishka - just a row here and a row there - finally over the weekend, I was able to finish and block the first piece.

I always build my designs around a yarn. When I first see a yarn I usually have a fairly clear conception of what I want it to be, at least in the sense that I know if it will be a tank or a cowl-neck sweater or some knee socks. I usually cannot "see" anything other than the type of piece that I first envision for a yarn until it has been made into that initial vision. Later, I can use that starting concept as a building block and move off into other directions, but at first it just has to be what it is in my head. I buy approximately the amount of yarn that I think I will need to create that vision. If I were smart I would buy that amount plus one skein, but usually I cannot manage to make myself do that. I abhor leftovers, and can go to fairly extreme lengths to make sure that I buy exactly the right amount of yarn and not a bit more.

This was how it went when designing Mishka. I bought the yarn for the piece about two years ago, and envisioned it as a sleeveless shell. As I worked on it, it morphed from sleeveless shell into a draping, flowing top, with shoulder and hem ties woven through casings. The body is worked without shaping, with about four inches of ease built into the width, so that it will blouse and drape. The armscyes are shorter than on a sweater so that undergarments will stay hidden, yet a bit looser than on a fitted tank so that the flow won't be interrupted.

I was very lucky to find that Premiere yarn goes a bit further than expected. I bought exactly what I thought I would need for a fitted shell - five skeins - but with a little ingenuity and advanced planning, I have been able to stretch that amount to work for a blousy top. I worked a slip-stitch edging that I borrowed from one of Annie Modesitt's designs along the armscyes so that they are self-finishing, and also employed a little trick I picked up years ago to avoid the stair-step effect of an armscye bind-off (it also works for necklines and shoulders) to accomplish the same. I worked the reverse side of the shoulder casings in a coordinating yarn that is lighter and of a substantially smaller gauge so as to use less Premiere, but also to make it less obvious that there is a casing present at all. As a consequence, I think I managed to get enough extra fabric in the piece to make it blouse effectively. In addition to giving it four inches of ease, I made it twenty-three and a half inches in length from the shoulder, which should give it a total length of at least twenty-four inches with the ties at the top. Standard length for me on a fitted shell would be somewhere in the neighborhood of twenty inches, twenty-four should provide plenty of blousing space.


I still haven't decided how to handle the hemline of the piece. I could seam the sides all the way down to the hem and just let it as is, swinging free. Or I could leave it unseamed for the last three and a half to four inches and run a casing along the bottom edge where I can weave ties through so that it gathers in and sits gently on the hip. I think I prefer the second option, but it will all depend on the length when worn. I may be just short enough on fabric that the effect wouldn't quite work without an additional half-inch to gather and blouse.

I'll just have to see when I get there. There is always a little interplay of idea and chance, no matter what the initial concept. Even if it turns out very close to the way I envisioned, there will doubtless be some element of surprise. I think this is my favorite part of designing - reaching the point when I feel certain that what I have done so far will work and that I will enjoy it, but still having some improvisation left on the horizon - a little bit of uncertainty that makes it all exciting.

May 16, 2007

Peanut Dresses - knitting has commenced!

It's hard to believe that I actually wanted to be a fashion designer at one point in time. In no way had (have) I the creativity needed for this profession, but fashion interested me, and I was into it for a while there in my early teens. Judging from my very simple, rudimentary sketch for my Create Along project, it's clear to all why it's just as well I let that dream die. (If I had any sense at all, I would have turned to shoe designing, but that's another lost dream for another day.)

Peanut Dresses on paper

I've improvised, tweaked, and winged several projects before, but this is by far the biggest designing project I've undertaken- on purpose. Somehow, I need to not only come up with an idea (or ideas, as the case may be), find yarn I like, and then turn that into dresses for a certain pair of twin peanuts.

Peanuts, in dresses

What's that, you say? Good luck? Thank you, I will need it! Because although I at least had the foresight to chose a very simple shape and line for the dresses, there's a lot that goes into designing! (Duh) Translating the picture and idea in your head to paper and then to an actual piece, is far more involved and labor intensive than you might think. I've always respected designers for their talent and ability, and this process has only intensified my admiration.

It took a while for me to settle on a design, but I've got it now, and after swatching and profuse mathematical planning (and readjusting), I'm finally on my way! I played around a little and came up with this little design-whatever (highly technical design term) for the non-hemline. I think it adds some visual interest, as well as (hopefully) some stability, so we might avoid the whole rolling up thing. Here's a glimpse of the bottom of PD1.

No, it's not a watermelon dress. You'll see.

"Do you think Aunty knows what the heck she's doing? Hmm..."

Create-Along: Back At It!

Cross-posted from MindofWinter


Mishka (named after Mames' beautiful GSD), lounging next to the meager notes I have taken.


I kicked off the Create-Along with a bang, swatching up a beautiful Barbara Walker lace pattern that I intended to use for a very simple shell. I was going to do a boatneck sheath style and run a single panel of lace down the left side. At the time I was very enthused about it, but the weeks wore on and it just never got knit.

I finally realized that the reason the shell wasn't happening, was that it wasn't happening in my head - I was truly bored with my own conception. I think the original idea was a good one, very classic, and something that I would get a lot of use from. But it just didn't grab me. I had been flipping through fashion magazines and pouring over runway knits, and I wanted something more current. Not trendy, necessarily, as I like clothing to stand the test of time, but more in the moment that what I had originally conceived. (I will probably design the sheath eventually, as well, when it is more what I am looking for.)

Marnie and I talked about my ideas pretty extensively one night, and discussed how we felt obligated to stick with the designs that we presented to the knitters in the CAL. She had been struggling with her design, Lily, as well, yet felt that for some reason she needed to stick with the conception she had started with. I realized about half-way through the conversation how silly we were. Why would we do this for the CALers, of all people? The whole point of the CAL was to show process, and almost nothing is more part of the process than scrapping design ideas, re-working and ripping! If you are afraid to do that, you are often left with a piece that you don't like, and which does not really represent your full creative process and personal perspective.

That is a long way of saying that I decided to scrap the original idea, and instead work out a new plan. Here it is: I am going to make a loosely-fitting hip-length top that will have hemmed casings at the top which I will run corded ties through to close. The motif will repeat with sections of large "rib" in between on both the front and the back. I would also like to do casings about three inches from the bottom edge with corded ties to create a blousing effect, but that is going to depend on whether I have enough yarn to manage it. I may have to re-work a bit to accommodate the minimal yardage I have going on here.

I was going to sketch it out for you, but I didn't do that yet in my *real* design process, so it's kind of silly to pretend that I did it for the CAL or the blog! I will probably sketch it soon, and I'll include the sketch here when I do. The thing that I have done already is a rough yardage estimation. I find that really useful, so I'll try to share a post on it soon. In the meantime, I will back at it and knitting away on Mishka - yay! It's about time.

May 9, 2007

A series of unfortunate knitting events

When last we left "Dayflower Lace," it had just been ripped back to the top of the lace. My original sketch (see here) had featured a single repeat of the lace up the upper center front, and an interesting cross between a V and a square neck. I had discarded this idea because I wasn't sure how I would finish the edge, wasn't sure how the wavy lace would look in a single repeat with stockinette on each side, etc.

But then I thought, what the heck, I'll give it a shot...but I had already decreased within each lace repeat, so to continue the single lace panel up the front, I didn't see any option but to rip back below the decreases (luckily just a couple of rows) and then redo the decreases, EXCEPT for the one center front panel. I had decided to go back to the eyelet holes and twisted cord belt to create a close underbust fit, but then, as shown above, I thought I would also try some columns of openwork within the underbust band.

Well. I completely forgot about the effect that nearby YOs and decreases have on the accent ridge, and in this case, it's not even a nice regular wave, but a lumpy-bumpy mess. Plus I don't like that additional openwork.

Lest you think I'm the Lemony Snicket of the CAL, I'll leave you with this photo: yes, there is a light at the end of the tunnel.

May 4, 2007

Progress on the Diamond Bag


Hi. I'm Dawn. And I'm an addict. I just can't get over mitered squares.


No, really. I think it's my sewing background. Every knitting project I undertake, I first see something woven and instinctively see it knit. Then I puzzle out the translation and I'm on my way. Anyone who quilts and completed the Schlep Bag understands. For those who don't quilt, the bag is quite a thing. You start out with squares, make strips, twist the strips, add straps, and voila. Once I mastered mitered squares, I turned my work sideways and decided I like the effect of the diamond with the miter as the focal point. What do you think?
Don't look at the yarn tails. They won't be seen when I'm done because this will be lined. It'll be our secret. Right now, the only challenge is making sure that the color pattern is random and the colors are separated.


I'm still here!

Even though I haven't been posting, I *have* been knitting.

The back and both fronts are done to the underarm. I stalled on doing the calculations for the sleeves for a while because the measurements I need don't fit neatly with repeats of the lace pattern. I considered scaling the lace down, so that each motif would be six stitches instead of eight, but I thought it might get muddy when I joined all of the pieces. I wanted an odd number of repeats so the lace would be centered over my hands, but three was too small and, while five will work for the upper arm, it would be much too wide at the wrists. So I'll keep the extra stitches at the sides in garter stitch and start additional repeats when I have enough stitches. I'm working on both at the same time so I can be pretty sure everything will match up.

I'm still enjoying the lace pattern, but I'm getting antsy to start on the yoke and see if it's going to work out the way I'm hoping.

May 1, 2007

Sleeve Options

Ok soooo I bound off the top of my shirt and I'm already going to have to frog a few rows because I forgot to do the seed stitch edging at the top of the back edge and it rolls down a bit from being just stockinette. I tried this on and I think that it's basically just what I was going for. I like the seed stitch but I do wish that I had been able to get it to cling a little more under the bust. Also because of the increasing, the short rows would have been completely unnecessary and would have looked silly. I'm glad I frogged those.


Here are my sleeve sketches. Got cut off a bit by the scanner I see. Anyways I will reattach and do one of these three ideas. I like the ruffle because it coordinates with the ruffle I plan for the bottom edge, but I'm beginning to think I might not want the ruffle now. I might reattach and work a few more rows and then bind off. I don't really know about the cap sleeves... I just like cap sleeves but not for this top I don't think. My favorite is the drapey sleeve. It's loose and comfortable, and it's different. It looks more fitting to me just from the sketch. I think it would look cute off the shoulder as well, either way one wanted to wear it. I'm welcome to comments and suggestions even if it's something different. Or about the top in general. This isn't the first thing I've designed but it is the most complicated and I need all the help I can get!

Apr 30, 2007

One knit, Purl too

Knitting has nearly slowed to a screeching halt now that there's a new pup in the house, but what knitting there has been has been good.

I've worked up to where I'm starting some neckline shaping on Lily


The fit seems fine, though it's always hard to tell before the neckline is done.


I will probably work a simple 2 or 3 stitch i-cord edging for the hem and sleeves. I think that will be the least disruptive treatment and will be OK both on the busy sleeve and the simpler hem.


As for the new member of the family, I think we finally have a name that everyone can agree on. The name is now, Theano Purl, Thea for short.
Theano was believed to be the wife of Pythagoras, (he who brought us the calculation for determining the hypotenuse of a right triangle,) and likely continued his work and ran his school after his death. We wanted a name that gave a nod to the sciences but which was also a cute doggy name. We considered "Evo" short for "Evolution" and "Jane" for the one and only Ms. Goodall. Neither name really stood out as exceptional names for a dog. Theano, though, very cute. I got to keep Purl as her middle name too so she can be little Thea-Purl, if the mood strikes.


See a bunch of pictures of the two girls by clicking the photo above, or clicking here.

Apr 29, 2007

Barmaid Top

Here are a few progress photos, I had frogged back quite a bit because of the short row mishap. I sorta tried it on when I frogged too and I think because of all the increases that short rows will not be necessary.

I have also figured out what I'm going to do sleeve wise. I have been fashioning this top after a sort of image they always have of girls in old time movies, in the bars with the corset type tops over a poofy white shirt. Usually those girls are barmaids. So in honor of that I've named this the barmaid top. Anyway I did some picture research on what those shirts generally look like and they are almost always pretty low cut and have some sort of frilly or poofy sleeve. Soooo I am going to try binding off part of the sides and casting it back on for an opening. Then after the top is bound off I will reattach (at the underarm perhpaps) and make the sleeves. I'm still not sure EXACTLY what I'm doing but I've got two or three versions I'm going to sketch out and see what looks best. I'll keep you all posted!

Apr 23, 2007

It's not rocket surgery

Hey, it's a Lily update.

The second sleeve knit up in a jiffy, even with my lack of free time, and then it came time to join all the pieces into a single unit. While the sleeves were knit flat (more a product of my lack of US #7 DPNs than anything,) everything else is knit in the round. The process is largely like that of the relatively ubiquitous top down raglans (Good ol' Barbara Walker!) only this one is bottom up.


The pieces and I had a bit of a kerfuffle at the time of joining. The body was knit to a slightly different point in the lace repeat than the sleeves and I did not realize this until the second round of attachment. I had to decide whether to rip out the extra rows in the sleeve or attach another ball and knit up the body further. There may have been some language unbecoming a lady. Panda offered to jump on my lap and help, but we both ended up showing much restraint.

I decided on the former option, ripping down, as I can use the tails to seam the sleeves, later.

I don't feel like the rest of the piece should pose any real problems, it's not brain science, after all. I'm keeping the formula fairly simple; decreasing every other round, yet, I have this foreboding feeling that when its all done, I'm going to need to rip back. I'm not sure why. I think some of it stems from the fact that I'm not doing any sort of bind off under the arms. Will it be all bunchy and uncomfortable? I am waiting to try the piece on until I've worked a few more rounds and if I do have to work back, I have a few ideas for remedies, but I'm really hoping I don't need to go that route. Because the body is knit in the round, even a gusset would pose a lot of work. Don't you even think about using the "s" word with me. Some of us learn from our friend's blog posts.


I think I always have this sort of anxiety when I'm knitting my own designs. No matter how much I do this, there's always some portion of the process that seems more dictated by the little knitting fairies and gremlins than by math. Hopefully when I'm all done, I'll love it and wear it with pride, but for now, it's too soon to tell.

Apr 14, 2007

BLOCKING


Blocking the Body and One Sleeve--Notice all of the yarn on the side-Well, it's everywhere in my place. Not one empty surface. I plan on sewing the arms onto the body on Monday and I will decide what to do about the lower back at that point.

Apr 13, 2007

More progress!!!


Ok so here are a few pics of where I'm at. The scrunching up is coming out fine, but I added some short rows, which may or may not be needed. Anyway, I don't think I was doing them right (it's been awhile) because now I've got holes! So I need to redo them. I'm on the home stretch though, and quite pleased with myself. So hopefully you'll be seeing a finished object soon. Oh and I ended up frogging the knitted encasing for under the bust, no matter what I did, it just didn't look quite how I wanted. So instead, as you can sorta see, I just did seed stitch. It works, I just wanted a separation and that did it.

Apr 10, 2007

Several detours

Isn't the difference in color in these photos wild? The middle photo is WAY too blue and the others are too gray. Anyway, first a little background: I did decide to use increases along the front to shape the bust area, rather than short rows or increases along the sides. But what then to do with the extra stitches above the bust? I could just leave them; the front of the top would then be slightly wider than the back. I could take the extra stitches into account when I decreased to shape the armholes and/or neck edge, especially if the neckline was a deep U or V--but I was concerned this might give those edges an odd line. Or, I could place decreases directly above the bust, giving what I felt to be the most, how to put it, anatomical shaping possible. The first photo shows my initial attempt at this; unfortunately, I didn't like the way the decreases looked--to my mind, as if someone had snagged a stitch and then yanked on it. (I noticed that Hattie mentioned a similar problem, but with increases, in this post. I had luckily realized that the corded edge at the top of the Dayflower Lace--visible in the left lower corner of the above photo--hid my bust-shaping increases pretty nicely.)
Then I thought I would try a different way of decreasing, along several rows instead of one, and also try using some columns of faggoting to hide or camouflage the decreases: see the photo at left. This proved to be difficult to place so that the columns didn't look odd next to the faggoting along the neck and armhole; if I tried to center the decreases over the bust, the faggoting was off center, and the angled neckline made centering the faggoting difficult. In the end, I decided that too much going on in the upper front just detracted from the lace...but I still thought that some vertical openwork columns lined up with the Dayflower repeats might dress up the upper top, so I tried putting them on the back instead. Hmmm...that corded edge is looking a little wavy...do I like it? Or not? (Hint: RIBBIT.)

Apr 9, 2007

PROGRESS


I now have to pick up stitches and knit the bottom back. I realize I must be very careful to leave enough room for the shoulder and arm movement. I am going to lay the knitted strip flat and do a schematic to be sure to accomplice this..

Apr 5, 2007

It's me again

Another thing about me. I like to post a lot. More progress on my loverly shirt. I've been trying to think of a nice name for it. No luck as of yet. Anyway, suggestions are welcome.

I got up to the under bust band and am trying out the knitted casing like someone suggested...(Marnie maybe? I'm too tired to go look ;P ) but I don't know if it was the increases I did (M1) but it is leaving a rather unsightly line in my knitting. I am not so sure I like that. So before I rip it all out... suggestions? Comments? If I take it out I think I will just leave it plain, in pattern and forget trying to put anything there. The thing is I really wanted something to distinguish it from the top. Maybe if I kept going in the ribbing on the sides...and did the seed stitch again (like I did at the bottom of the stockinette) on the stockinette section...hmmm I might have to try that. I love seed stitch.

Ok well here's a pic so you all can see what I mean. They aren't the greatest but you can still see it.

Apr 3, 2007

Finally some progress

Ok so by now maybe you can all tell I'm very indecisive...it's horrible. Anyway after a couple days spent swatching and not finding what I wanted I decided to just quit it and go with my original idea. It's what I really want to do, so I should just do it. Either way I'm pretty happy with how it's coming out. I'm only up to about 3 inches, I had to tink back an inch or so when my first couple of shaping rows weren't working the way I wanted and now it's all fixed. Here's a pic to show how far, that's about all you can see. I am doing the side ribbing in 3 knit 1 purl, so it's subtle. I also did 3 rows of seed stitch where the stockinette is...altho it's curling anyhow. Nothing a little blocking won't fix. Ignore the jammies... ;)Oh yeah and I did a provisional cast on, hence the yellow yarn. I like knitting my ruffles down better than up. Here's my thoughts so far. I think I want to change the top, so maybe not i-cord straps like I originally thought. Maybe more like cap sleeves, but not all the way. Does that make sense? Ummm like if anyone has ever seen the top of that pretty lotus blossom tank of the cover of last summer's interweave knits? I like the shape of the top. Anyway I've got some time to kick around ideas before that. Ok now I've got to go finish hubby's resume...bad me for puttin it off till 1 am... eep!

Mar 31, 2007

Rrrriiiiiiiiiiippp!

Eeek! But it's true. After knitting away, all the while reminding myself to trust my swatch, a horrible thought occurred to me. I looked at my shrinky-dink swatch and then at the amount of yarn I was using up in the knitting. Again, I looked at the swatch and then the knitting. Holy Toledo! There's no way, under any circumstances, in any parallel universe, that I will have enough yarn. *sniffle*

Wait... can I get more? No. I bought up the store's entire stock in a sale. I'm feeling a pretty bag design coming on. Can I get some more in a different dye lot and alternate balls? Probably. But I'm horrible at joining. This will be my last resort. Hmm... Maybe something with stripes. Ugh! I could kick myself, if only I were still that flexible.

I will be thinking and sketching this week. But mostly thinking. In all seriousness, I'm thinking about winding all the Denim onto my swift and throwing the lot in the wash to shrink it up. But I'm resisting as much as possible as I want this to be a learning experience. Mommy said I always had to learn the hard way...