

Spring Boot provides built-in support for Testcontainers, making integration testing much simpler and more reliable. Instead of manually installing and configuring databases or other external services, developers can automatically start Docker containers during test execution. This ensures that tests run against real services in an isolated and production-like environment.
- Automatically starts and stops Docker containers during tests.
- Provides production-like databases without manual setup.
- Creates isolated environments for reliable integration testing.
Testcontainers
Testcontainers is an open-source Java library that launches lightweight Docker containers for testing purposes. It allows applications to connect with real databases, message brokers, search engines, and other services instead of using embedded alternatives..
- Easily integrates with Spring Boot's testing framework.
- Supports a wide range of services such as relational databases, NoSQL databases, message brokers, and other infrastructure components running inside Docker containers
How Built-in Testcontainers Support Works in Spring Boot
Spring Boot automatically integrates with Testcontainers through its testing infrastructure. During test execution, Spring Boot performs the following steps:
- Starts the required Docker container.
- Waits until the container is ready.
- Injects connection properties into the Spring application.
- Executes integration tests.
- Stops the container after the tests complete.
Prerequisites
- Java Development Kit (JDK)
- Docker Desktop (running)
- Spring Boot
- Maven or Gradle
- Spring Tool Suite (STS) or IntelliJ IDEA
Implementation of Built-in Testcontainers Support in Spring Boot
Follow these below steps to implements Built in TestContainers Support in spring boot.
Step 1: Create Spring Boot Project
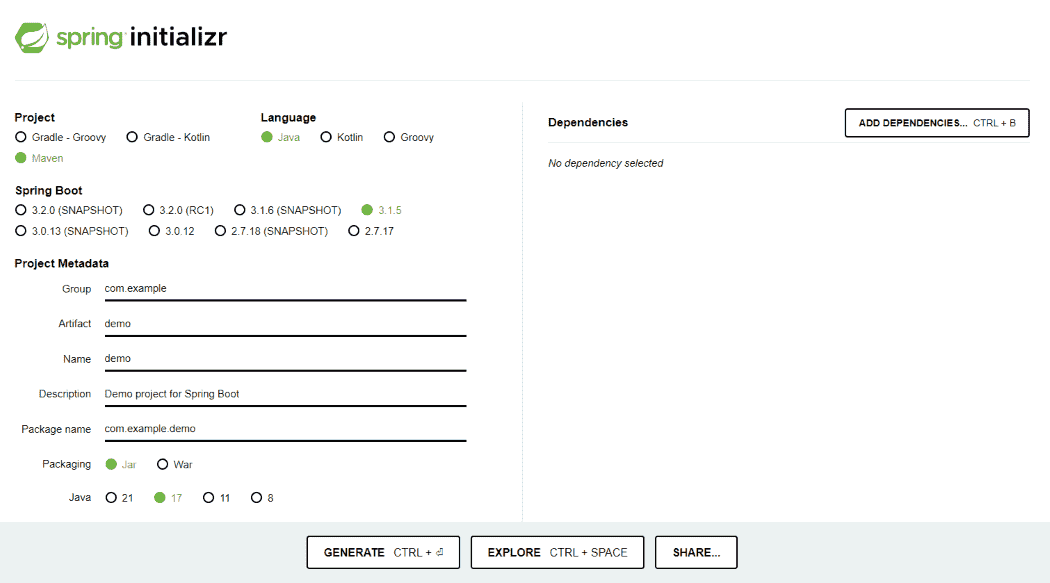
Create a Spring Boot project named Testcontainers using Spring Initializr.
Add the following dependencies while creating the project.
- Spring Web
- Spring Data MongoDB
- Spring Boot DevTools
- Spring Boot Test
- Spring Boot Testcontainers
- Testcontainers JUnit Jupiter
- Testcontainers MongoDB
Step 2: Review the Generated Pom.xml File
The generated pom.xml file should contain the following dependencies.
<?xml version="1.0" encoding="UTF-8"?>
<project xmlns="http://maven.apache.org/POM/4.0.0"
         xmlns:xsi="http://www.w3.org/2001/XMLSchema-instance"
         xsi:schemaLocation="http://maven.apache.org/POM/4.0.0
         https://maven.apache.org/xsd/maven-4.0.0.xsd">

    <modelVersion>4.0.0</modelVersion>

    <parent>
        <groupId>org.springframework.boot</groupId>
        <artifactId>spring-boot-starter-parent</artifactId>
        <version>3.3.1</version>
        <relativePath/>
    </parent>

    <groupId>com.app</groupId>
    <artifactId>Testcontainers</artifactId>
    <version>0.0.1-SNAPSHOT</version>
    <name>Testcontainers</name>
    <description>Built-in Testcontainers Support in Spring Boot</description>

    <properties>
        <java.version>17</java.version>
    </properties>

    <dependencies>

        <!-- Spring Boot Web -->
        <dependency>
            <groupId>org.springframework.boot</groupId>
            <artifactId>spring-boot-starter-web</artifactId>
        </dependency>

        <!-- MongoDB -->
        <dependency>
            <groupId>org.springframework.boot</groupId>
            <artifactId>spring-boot-starter-data-mongodb</artifactId>
        </dependency>

        <!-- DevTools -->
        <dependency>
            <groupId>org.springframework.boot</groupId>
            <artifactId>spring-boot-devtools</artifactId>
            <scope>runtime</scope>
            <optional>true</optional>
        </dependency>

        <!-- Test -->
        <dependency>
            <groupId>org.springframework.boot</groupId>
            <artifactId>spring-boot-starter-test</artifactId>
            <scope>test</scope>
        </dependency>

        <!-- Spring Boot Testcontainers -->
        <dependency>
            <groupId>org.springframework.boot</groupId>
            <artifactId>spring-boot-testcontainers</artifactId>
            <scope>test</scope>
        </dependency>

        <!-- JUnit Jupiter -->
        <dependency>
            <groupId>org.testcontainers</groupId>
            <artifactId>junit-jupiter</artifactId>
            <scope>test</scope>
        </dependency>

        <!-- MongoDB Testcontainers -->
        <dependency>
            <groupId>org.testcontainers</groupId>
            <artifactId>mongodb</artifactId>
            <scope>test</scope>
        </dependency>

        <!-- JUnit Platform Launcher -->
        <dependency>
            <groupId>org.junit.platform</groupId>
            <artifactId>junit-platform-launcher</artifactId>
            <scope>test</scope>
        </dependency>

    </dependencies>

    <build>
        <plugins>

            <plugin>
                <groupId>org.springframework.boot</groupId>
                <artifactId>spring-boot-maven-plugin</artifactId>
            </plugin>

        </plugins>
    </build>

</project>
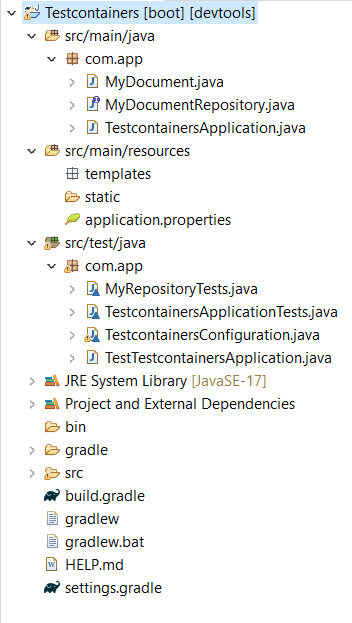
Below we provide the directory Structures for your reference.
Step 3: Configure Application Properties
Open the application.properties file and configure the application name, MongoDB connection, and DevTools settings.
spring.application.name=Testcontainers
spring.data.mongodb.uri=mongodb://localhost:27017/test
spring.devtools.restart.enabled=true
spring.devtools.livereload.enabled=true
Step 4: Main Application Class
It is the main class of the Spring Project and Application execution started from here only.
package com.app;

import org.springframework.boot.SpringApplication;
import org.springframework.boot.autoconfigure.SpringBootApplication;

@SpringBootApplication
public class TestcontainersApplication {

	public static void main(String[] args) {
		SpringApplication.run(TestcontainersApplication.class, args);
	}

}
Step 5: Create Domain Class
Create a document class named MyDocument that represents a MongoDB collection.
package com.app;

import org.springframework.data.annotation.Id;
import org.springframework.data.mongodb.core.mapping.Document;

@Document(collection = "testCollection")
public class MyDocument {
    @Id
    private String id;

    public MyDocument(String id) {
        this.id = id;
    }

    public String getId() {
        return id;
    }

    public void setId(String id) {
        this.id = id;
    }
}
Step 6: Create Repository Interface
We created a repository interface with name MyDocumentRepository and it extends to MongoRepository and it takes Domain name and Id type in the domain class as input.
package com.app;

import org.springframework.data.mongodb.repository.MongoRepository;

public interface MyDocumentRepository extends MongoRepository<MyDocument, String> {
}
Step 7: Review Generated Test Classes
We add Testcontainers dependency while creating a Spring Project. The Spring Framework by default created three class in the src/test/java folder. The names of these files depends on the application name. TestcontainersApplicationTests, TestcontainersConfiguration, TestTestcontainersApplication.
Step 8: Create Test Class(TestcontainersApplicationTests.java)
This is main test class in the spring boot project created by the Spring Boot.
package com.app;

import org.junit.jupiter.api.Test;
import org.springframework.boot.test.context.SpringBootTest;
import org.springframework.context.annotation.Import;

@Import(TestcontainersConfiguration.class)
@SpringBootTest
class TestcontainersApplicationTests {

    @Test
    void contextLoads() {
    }
}
Step 9: Create Testcontainers Configuration(TestcontainersConfiguration.java)
In this class, we define the MongoDB configuration. By using required configuration information below mention that configuration code for your reference.
package com.app;

import org.springframework.boot.test.context.TestConfiguration;
import org.springframework.context.annotation.Bean;
import org.testcontainers.containers.MongoDBContainer;

@TestConfiguration(proxyBeanMethods = false)
class TestcontainersConfiguration {

    @Bean
    MongoDBContainer mongoDBContainer() {
        MongoDBContainer mongoDBContainer = new MongoDBContainer("mongo:4.4.2")
                .withExposedPorts(27017)
                .withReuse(true);
        mongoDBContainer.start();
        return mongoDBContainer;
    }
}
Step 10: Create Test Application(TestTestcontainersApplication.java)
It is another class in the Test folder. It is used for testing the spring project.
package com.app;

import org.springframework.boot.SpringApplication;

public class TestTestcontainersApplication {

	public static void main(String[] args) {
		SpringApplication.from(TestcontainersApplication::main).with(TestcontainersConfiguration.class).run(args);
	}

}
Step 11: Create MongoDB Connection Test Class
Here, we created another test class which is used for test the MongoDB connection.
package com.app;

import org.junit.jupiter.api.Test;
import org.springframework.beans.factory.annotation.Autowired;
import org.springframework.boot.test.context.SpringBootTest;
import org.springframework.data.mongodb.core.MongoTemplate;
import org.springframework.test.context.DynamicPropertyRegistry;
import org.springframework.test.context.DynamicPropertySource;
import org.testcontainers.containers.MongoDBContainer;

import static org.assertj.core.api.Assertions.assertThat;

@SpringBootTest
class MyRepositoryTests {

    static MongoDBContainer mongoDBContainer = new MongoDBContainer("mongo:4.4.2");

    static {
        mongoDBContainer.start();
    }

    @DynamicPropertySource
    static void mongoProperties(DynamicPropertyRegistry registry) {
        registry.add("spring.data.mongodb.uri", mongoDBContainer::getReplicaSetUrl);
    }

    @Autowired
    private MongoTemplate mongoTemplate;

    @Test
    void testDatabase() {
        // Insert a document into MongoDB
        mongoTemplate.save(new MyDocument("testDocument"), "testCollection");

        // Fetch the document from MongoDB
        MyDocument retrievedDocument = mongoTemplate.findById("testDocument", MyDocument.class, "testCollection");

        // Assert the document is retrieved successfully
        assertThat(retrievedDocument).isNotNull();
        assertThat(retrievedDocument.getId()).isEqualTo("testDocument");
    }
}
Step 12: Run the Project
Once implementation is completed now run this project. By default this Spring Project run on port number 8080 with help of Tomcat server.
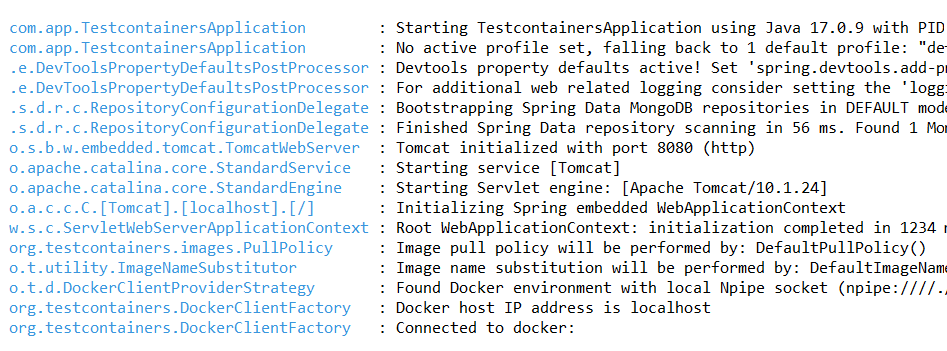
After successfully running the project. The Test containers created a docker image in the Docker tool.
Output:

Now Docker also running successfully. Observer below image.
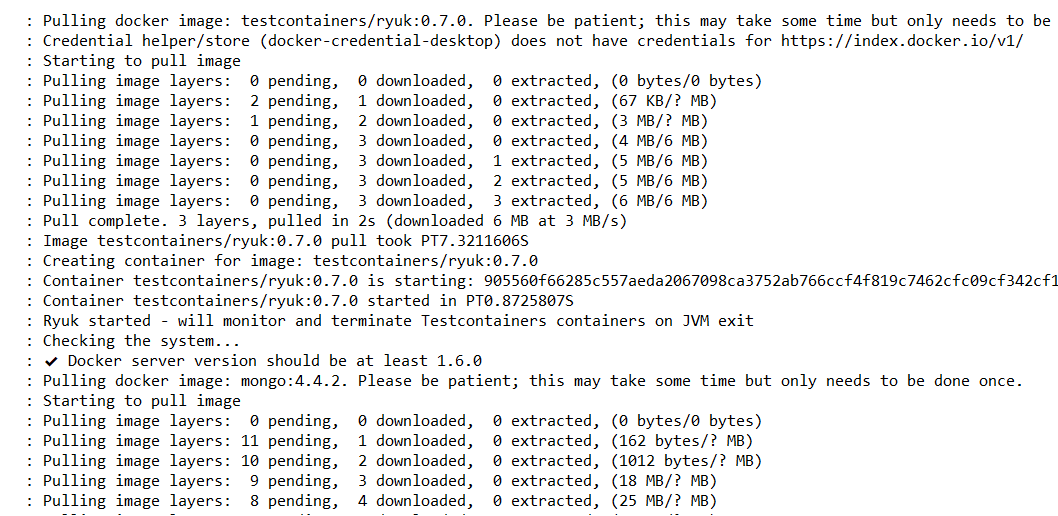
When project is running these images are created in the docker tool. That means project is fine.

