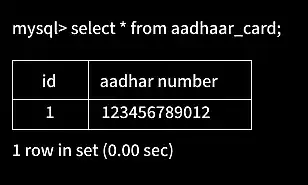
One-to-One Mapping in Spring Boot defines a relationship where one entity is associated with exactly one instance of another entity. Spring Data JPA provides the @OneToOne annotation to establish this relationship between entities.
- One record in the parent entity is associated with one record in the related entity.
- @JoinColumn is used to specify the foreign-key column.
Example of One-to-One Mapping
Suppose we have a Student and an Aadhaar Card.
- One student has one Aadhaar Card.
- One Aadhaar Card belongs to one student.
- Therefore, Student and AadhaarCard have a One-to-One relationship.
Step by Step Implementation of Example Project
Step 1: Create a Spring Boot Project
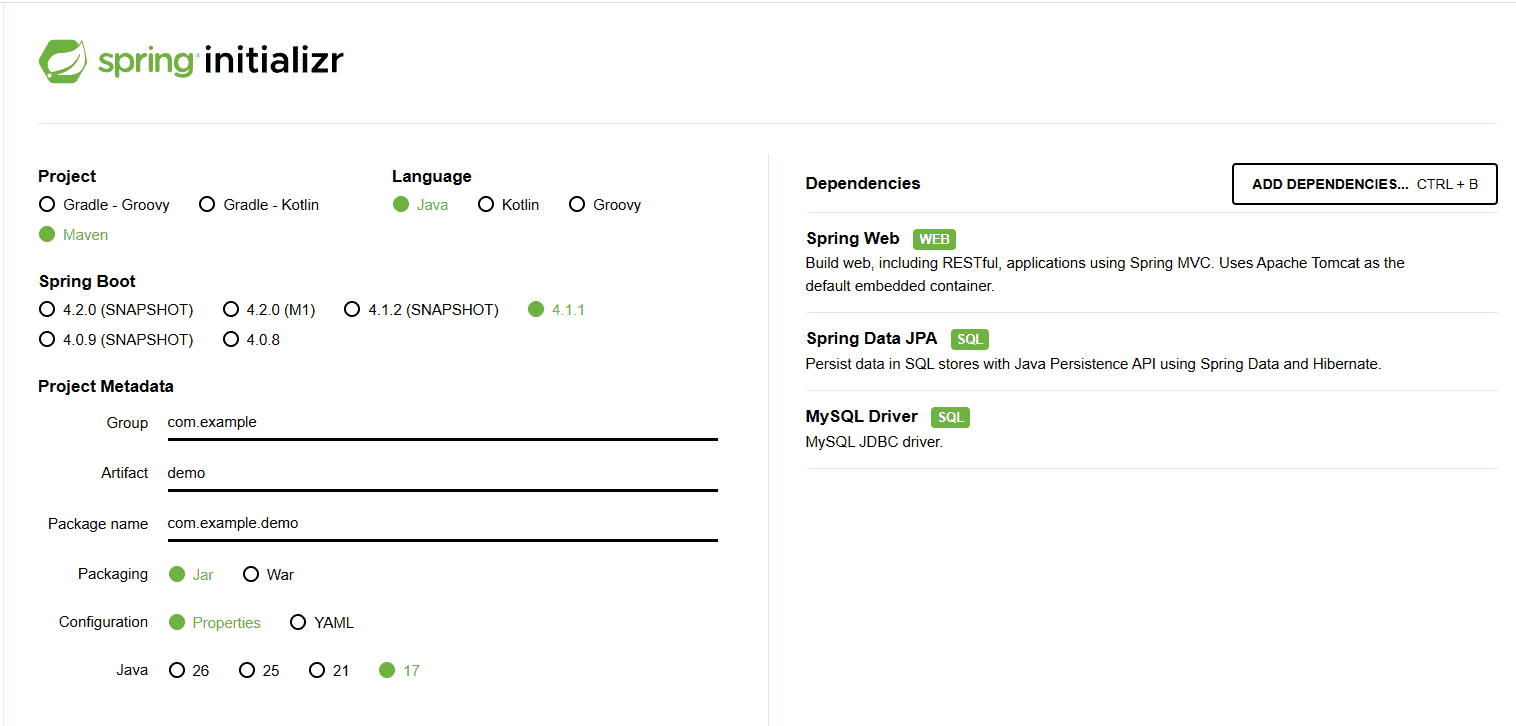
Use Spring Initializr to generate the project. Keep the project configuration:
- Project: Maven
- Language: Java
- Spring Boot: 2.5.6
- Packaging: JAR
- Java: 11
- Dependencies: Spring Web, Spring Data JPA, MySQL Driver
Click on Generate to download the starter project.
Step 2: Import the Project into IDE
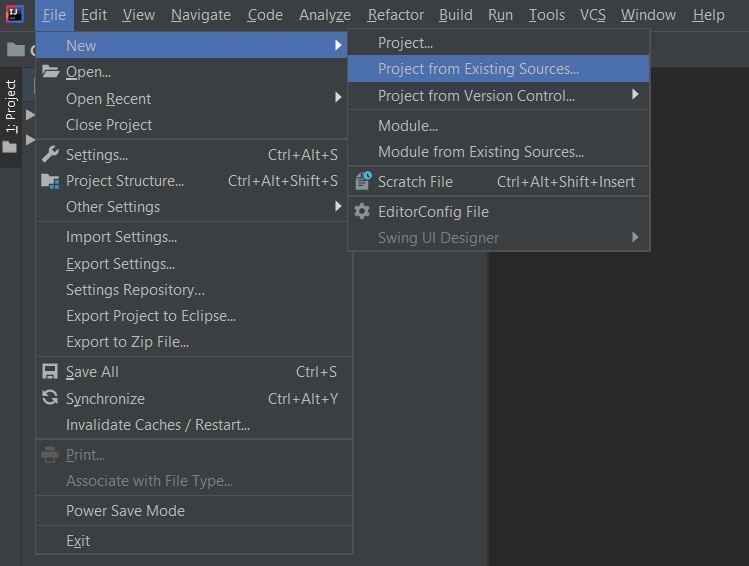
- Extract the downloaded ZIP file.
- Open the project in your IDE.
- Import it as a Maven project.
- Wait for Maven dependencies to download.
Step 3: Configure Database Properties
Add the following properties to application.properties:
spring.datasource.username=root
spring.datasource.password=your_password
spring.datasource.url=jdbc:mysql://localhost:3306/mappingspring.jpa.hibernate.ddl-auto=update
spring.jpa.show-sql=true
Step 4: Create Entity Classes
Create a Models package and add the following classes.
Student Entity:
package com.example.Mapping.Models;

import javax.persistence.*;

@Entity
@Table(name = "Student")
public class StudentInformation {

    @Id
    @GeneratedValue(strategy = GenerationType.IDENTITY)
    private int rollno;

    private String name;

    @OneToOne(cascade = CascadeType.ALL)
    @JoinColumn(name = "aadhaar_id")
    private AadhaarCard aadhaarCard;

    public StudentInformation() {
    }

    public StudentInformation(String name, AadhaarCard aadhaarCard) {
        this.name = name;
        this.aadhaarCard = aadhaarCard;
    }

    public int getRollno() {
        return rollno;
    }

    public void setRollno(int rollno) {
        this.rollno = rollno;
    }

    public String getName() {
        return name;
    }

    public void setName(String name) {
        this.name = name;
    }

    public AadhaarCard getAadhaarCard() {
        return aadhaarCard;
    }

    public void setAadhaarCard(AadhaarCard aadhaarCard) {
        this.aadhaarCard = aadhaarCard;
    }
}
Explanation:
- @OneToOne specifies that one student is associated with one Aadhaar card.
- @JoinColumn(name = "aadhaar_id") creates a foreign-key column in the Student table.
- CascadeType.ALL propagates persistence operations from StudentInformation to AadhaarCard.
AadhaarCard Entity
package com.example.Mapping.Models;

import javax.persistence.*;

@Entity
@Table(name = "AadhaarCard")
public class AadhaarCard {

    @Id
    @GeneratedValue(strategy = GenerationType.IDENTITY)
    private int id;

    private String aadhaarNumber;

    public AadhaarCard() {
    }

    public AadhaarCard(String aadhaarNumber) {
        this.aadhaarNumber = aadhaarNumber;
    }

    public int getId() {
        return id;
    }

    public void setId(int id) {
        this.id = id;
    }

    public String getAadhaarNumber() {
        return aadhaarNumber;
    }

    public void setAadhaarNumber(String aadhaarNumber) {
        this.aadhaarNumber = aadhaarNumber;
    }
}
Explanation:
- @Entity marks AadhaarCard as a JPA entity.
- @Id defines the primary key.
- @GeneratedValue automatically generates the ID.
- Each Aadhaar card is associated with one student through the relationship defined in StudentInformation.
Step 5: Create Repository Interfaces
Create a Repository package and add the following interfaces.
Student Repository:
package com.example.Mapping.Repository;

import com.example.Mapping.Models.StudentInformation;
import org.springframework.data.jpa.repository.JpaRepository;

public interface StudentRepo
        extends JpaRepository<StudentInformation, Integer> {
}
Aadhaar Repository:
package com.example.Mapping.Repository;

import com.example.Mapping.Models.AadhaarCard;
import org.springframework.data.jpa.repository.JpaRepository;

public interface AadhaarRepo
        extends JpaRepository<AadhaarCard, Integer> {
}
Explanation:
- JpaRepository provides built-in CRUD operations.
- No repository implementation class is required.
- The second generic parameter represents the type of the entity's primary key.
Step 6: Insert Data Using CommandLineRunner
Update the main application class:
package com.example.Mapping;

import com.example.Mapping.Models.AadhaarCard;
import com.example.Mapping.Models.StudentInformation;
import com.example.Mapping.Repository.StudentRepo;
import org.springframework.beans.factory.annotation.Autowired;
import org.springframework.boot.CommandLineRunner;
import org.springframework.boot.SpringApplication;
import org.springframework.boot.autoconfigure.SpringBootApplication;

@SpringBootApplication
public class MappingApplication implements CommandLineRunner {

    @Autowired
    private StudentRepo studentRepo;

    public static void main(String[] args) {
        SpringApplication.run(MappingApplication.class, args);
    }

    @Override
    public void run(String... args) {

        AadhaarCard aadhaar =
                new AadhaarCard("1234-5678-9012");

        StudentInformation student =
                new StudentInformation("Aayush", aadhaar);

        studentRepo.save(student);
    }
}
Explanation:
- CommandLineRunner executes the run() method when the application starts.
- An AadhaarCard object is created first.
- The Aadhaar card is associated with a StudentInformation object.
- studentRepo.save(student) saves the student and Aadhaar card because CascadeType.ALL is used.
- The Student table contains the foreign key aadhaar_id.
Created Databases are:
1. Student Table
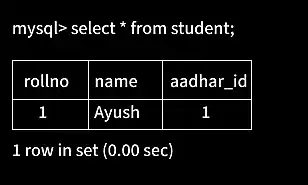
2. Aadhaar card