

Spring Security is a powerful framework used to secure Spring Boot applications. It uses a filter chain to process incoming HTTP requests before they reach the controller. Each filter performs a specific security-related task, such as authentication, authorization, request validation, and security context management.
- Each filter in the chain performs a specific security task.
- Filter ordering is important because some filters depend on the processing performed by earlier filters.
Spring Security Filter Chain Architecture
The Spring Security Filter Chain processes incoming HTTP requests before they reach the application's controller.
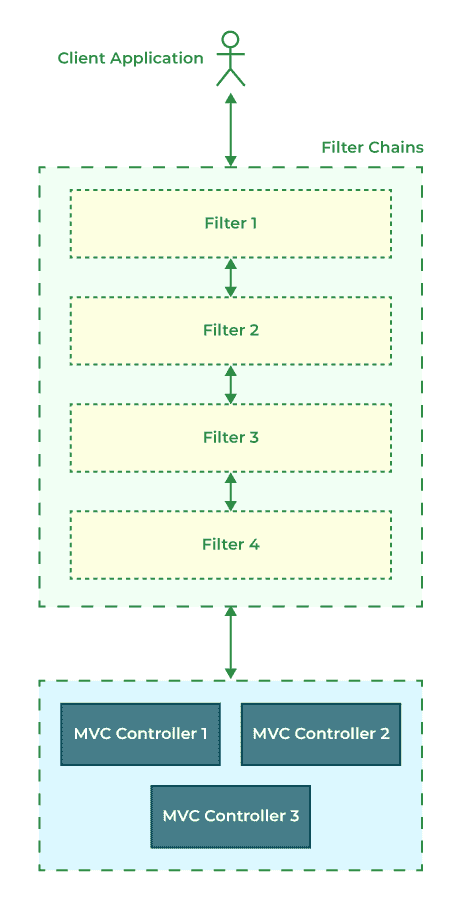
Flow of Request Processing
- Client Sends Request: The client sends an HTTP request to access an application resource.
- Request Enters Filter Chain: The request first passes through the Spring Security filter chain.
- Security Filters Process Request: Multiple filters process the request one after another.
- Authentication and Authorization: Security filters verify the user's authentication and whether the requested resource can be accessed.
- Request Reaches Controller: If the request passes the required security checks, it is forwarded to the Spring MVC controller.
- Response Sent Back: The controller processes the request and sends the response back to the client.
Step-by-Step Implementation of Security Filters with Spring Boot
Follow the steps below to understand and implement security filters in a Spring Boot application.
Step 1: Create a Spring Boot Project
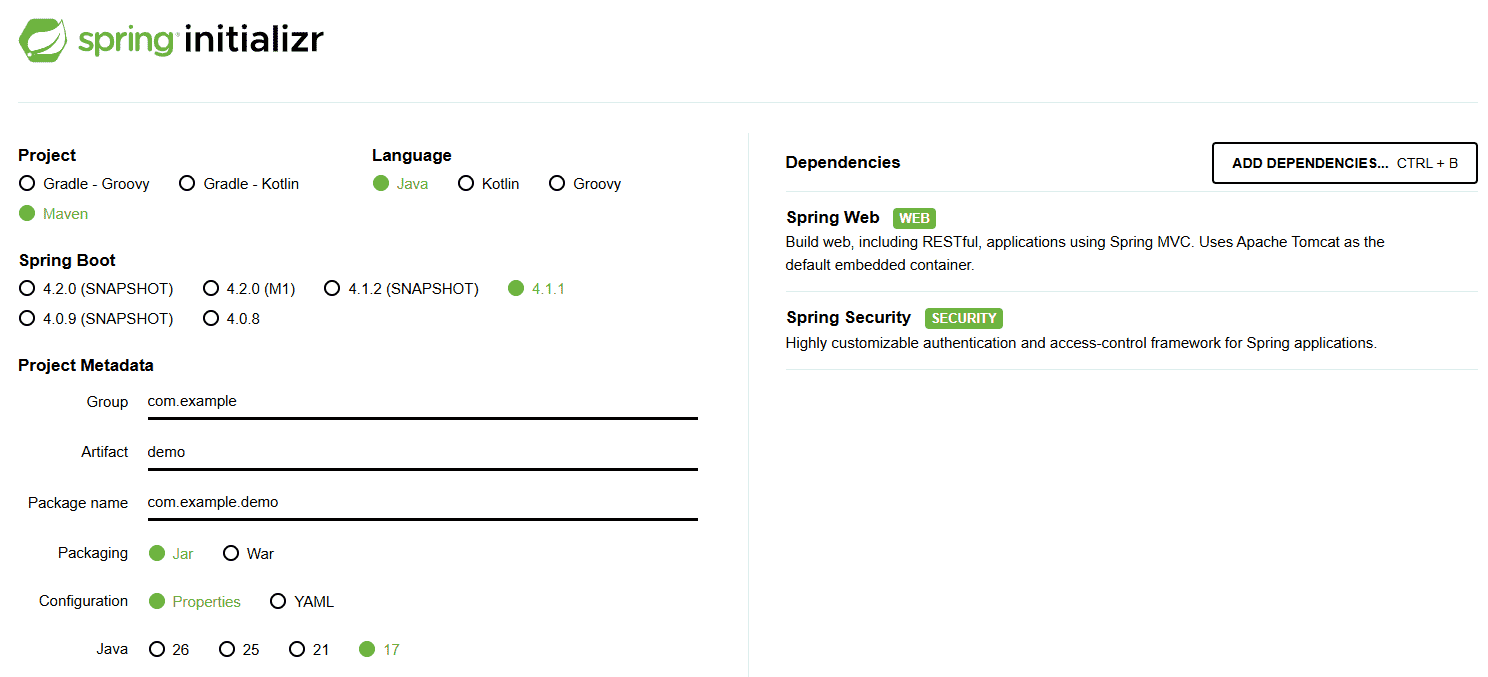
Use Spring Initializr to generate the Spring Boot project. Keep the project configuration:
- Project: Maven
- Language: Java
- Spring Boot: 3.3.1
- Packaging: JAR
- Java: 17
- Dependencies: Spring Web, Spring Security
Click on Generate to download the starter project.
Step 2: Add Dependencies to pom.xml File
Spring Boot manages the required Spring Security dependencies through its starter.
<dependencies>

    <dependency>
        <groupId>org.springframework.boot</groupId>
        <artifactId>spring-boot-starter-web</artifactId>
    </dependency>

    <dependency>
        <groupId>org.springframework.boot</groupId>
        <artifactId>spring-boot-starter-security</artifactId>
    </dependency>

</dependencies>
Step 3: Configure Application Properties
Open the application.properties file inside:
spring.application.name = security-filters
server.port=8080
Step 4: Create the Spring Boot Main Class
Create the main class that starts the Spring Boot application.
SecurityApplication.java
package com.example.security;

import org.springframework.boot.SpringApplication;
import org.springframework.boot.autoconfigure.SpringBootApplication;

@SpringBootApplication
public class SecurityApplication {

    public static void main(String[] args) {
        SpringApplication.run(SecurityApplication.class, args);
    }
}
Step 5: Configure Spring Security Filter Chain
Create a SecurityConfig class inside the config package. The SecurityFilterChain bean defines how Spring Security handles incoming HTTP requests.
SecurityConfig.java
package com.example.security.config;

import org.springframework.context.annotation.Bean;
import org.springframework.context.annotation.Configuration;
import org.springframework.security.config.annotation.web.builders.HttpSecurity;
import org.springframework.security.web.SecurityFilterChain;

@Configuration
public class SecurityConfig {

    @Bean
    public SecurityFilterChain securityFilterChain(
            HttpSecurity http) throws Exception {

        http
            .authorizeHttpRequests(auth -> auth
                .requestMatchers("/public").permitAll()
                .anyRequest().authenticated()
            )
            .formLogin();

        return http.build();
    }
}
Explanation:
- @Configuration marks the class as a configuration class.
- SecurityFilterChain defines the security rules applied to HTTP requests.
- requestMatchers("/public").permitAll() allows unauthenticated users to access /public.
- anyRequest().authenticated() requires authentication for other requests.
Step 6: Create Spring Boot Controller
Create a HomeController inside the controller package.
HomeController.java
package com.example.security.controller;

import org.springframework.web.bind.annotation.GetMapping;
import org.springframework.web.bind.annotation.RestController;

@RestController
public class HomeController {

    @GetMapping("/public")
    public String publicPage() {
        return "This is a public page";
    }

    @GetMapping("/home")
    public String homePage() {
        return "Welcome to the secured home page";
    }
}
Explanation:
- @RestController marks the class as a REST controller.
- /public can be accessed without authentication.
- /home requires authentication according to the configured security rules
Step 7: Create a Custom Security Filter
Spring Security allows developers to create custom filters when additional request processing is required. Create a CustomSecurityFilter class inside the filter package.
CustomSecurityFilter.java
package com.example.security.filter;

import java.io.IOException;

import jakarta.servlet.FilterChain;
import jakarta.servlet.ServletException;
import jakarta.servlet.http.HttpServletRequest;
import jakarta.servlet.http.HttpServletResponse;

import org.springframework.web.filter.OncePerRequestFilter;

public class CustomSecurityFilter extends OncePerRequestFilter {

    @Override
    protected void doFilterInternal(
            HttpServletRequest request,
            HttpServletResponse response,
            FilterChain filterChain)
            throws ServletException, IOException {

        System.out.println(
                "Custom Security Filter: " + request.getRequestURI());

        filterChain.doFilter(request, response);
    }
}
Explanation:
- OncePerRequestFilter ensures that the filter is executed once for each request.
- doFilterInternal() contains the custom filter logic.
- request.getRequestURI() retrieves the requested URL.
Step 8: Add the Custom Filter to the Security Filter Chain
Update the SecurityConfig class to register the custom filter.
package com.example.security.config;

import com.example.security.filter.CustomSecurityFilter;

import org.springframework.context.annotation.Bean;
import org.springframework.context.annotation.Configuration;

import org.springframework.security.config.annotation.web.builders.HttpSecurity;
import org.springframework.security.web.SecurityFilterChain;
import org.springframework.security.web.authentication.UsernamePasswordAuthenticationFilter;

@Configuration
public class SecurityConfig {

    @Bean
    public SecurityFilterChain securityFilterChain(
            HttpSecurity http) throws Exception {

        http
            .addFilterBefore(
                new CustomSecurityFilter(),
                UsernamePasswordAuthenticationFilter.class
            )
            .authorizeHttpRequests(auth -> auth
                .requestMatchers("/public").permitAll()
                .anyRequest().authenticated()
            )
            .formLogin();

        return http.build();
    }
}
Explanation:
- addFilterBefore() adds the custom filter before a specified Spring Security filter.
- CustomSecurityFilter is added before UsernamePasswordAuthenticationFilter.
- Filter ordering determines when each filter processes the request.
Step 9: Run the Spring Boot Application
Run the SecurityApplication class as a Spring Boot App.
The embedded Tomcat server starts automatically. Access the public endpoint:
http://localhost:8080/public
Step 10: Test the Security Filter
Open the application and access the secured /home endpoint. The request first passes through the custom filter. The console displays:
Custom Security Filter: /home
The request then continues through the Spring Security filter chain. After successful authentication, the request reaches the controller and displays:
http://localhost:8080/login
