Netflix Ribbon is a client-side load balancer that was widely used with Spring Cloud to distribute requests among multiple instances of a microservice. Although Ribbon has been deprecated and replaced by Spring Cloud LoadBalancer, understanding Ribbon helps developers understand the fundamentals of client-side load balancing in microservices.
- Provides client-side load balancing.
- Supports multiple load-balancing algorithms.
- Integrates easily with Feign Client and RestTemplate.
Ribbon is a particular load balancer given by Netflix you don't have to write any code to develop this load balancer or to make this pattern happens. We can simply use the Netflix Ribbon to have the client-side load balancing.
How to Use Netflix’s Ribbon in Spring Boot Microservices?
Add the following dependency in your pom.xml file
<dependency>
<groupId>org.springframework.cloud</groupId>
<artifactId>spring-cloud-starter-netflix-ribbon</artifactId>
</dependency>
Annotate your Feign Client interface with @RibbonClient. Refer to the below code snippet.
@FeignClient(name = "address-service", path = "/address-service")
@RibbonClient(name = "address-service")
public interface AddressClient {
@GetMapping("/address/{id}")
public ResponseEntity<AddressResponse> getAddressByEmployeeId(@PathVariable("id") int id);
}
Make the following changes in your application.properties file.
address-service.ribbon.listOfServers=http://localhost:8081, http://localhost:8082
Let's understand the whole thing by developing two Spring Boot Microservices.
Steps to Configure Netflix Ribbon Load Balancing in Spring Boot Microservices
Follow these steps to implement client-side load balancing using Netflix Ribbon between Employee Service and multiple instances of Address Service.
Step 1: Create Employee Service Project
Create a Spring Boot project named employee-service using Spring Initializr.
Please choose the following dependencies while creating the project.
- Spring Web
- Spring Data JPA
- MySQL Driver
- OpenFeign
- Spring Boot DevTools
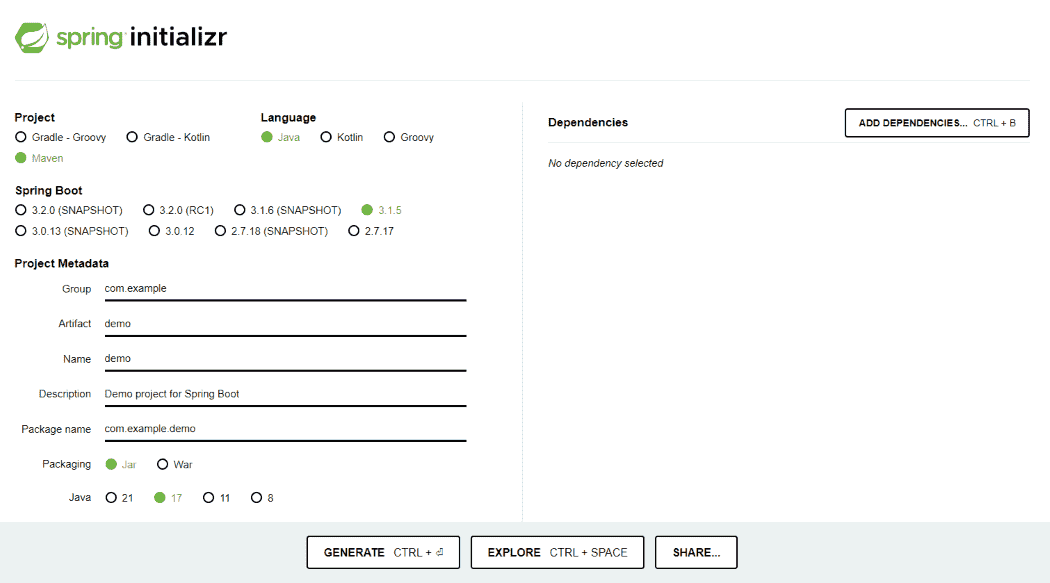
Generate the project and run it in IntelliJ IDEA by referring to the above article.
Step 2: Review the Generated pom.xml File.
The generated pom.xml file should contain the Following Dependency.
<?xml version="1.0" encoding="UTF-8"?>
<project xmlns="https://maven.apache.org/POM/4.0.0" xmlns:xsi="https://www.w3.org/2001/XMLSchema-instance"
    xsi:schemaLocation="https://maven.apache.org/POM/4.0.0 https://maven.apache.org/xsd/maven-4.0.0.xsd">
    <modelVersion>4.0.0</modelVersion>
    <parent>
        <groupId>org.springframework.boot</groupId>
        <artifactId>spring-boot-starter-parent</artifactId>
        <version>2.3.1.RELEASE</version>
        <relativePath/> <!-- lookup parent from repository -->
    </parent>
    <groupId>com.gfg.employeaap</groupId>
    <artifactId>employee-service</artifactId>
    <version>0.0.1-SNAPSHOT</version>
    <name>employee-service</name>
    <description>Employee Service</description>
    <properties>
        <java.version>1.8</java.version>
        <spring-cloud.version>Hoxton.SR5</spring-cloud.version>
    </properties>
    <dependencies>
        <dependency>
            <groupId>org.springframework.boot</groupId>
            <artifactId>spring-boot-starter-data-jpa</artifactId>
        </dependency>
        <dependency>
            <groupId>org.springframework.boot</groupId>
            <artifactId>spring-boot-starter-web</artifactId>
        </dependency>

        <dependency>
            <groupId>org.springframework.boot</groupId>
            <artifactId>spring-boot-devtools</artifactId>
            <scope>runtime</scope>
            <optional>true</optional>
        </dependency>
        <dependency>
            <groupId>mysql</groupId>
            <artifactId>mysql-connector-java</artifactId>
            <version>8.0.12</version>
        </dependency>
        <dependency>
            <groupId>org.springframework.boot</groupId>
            <artifactId>spring-boot-starter-test</artifactId>
            <scope>test</scope>
        </dependency>
        <dependency>
            <groupId>org.modelmapper</groupId>
            <artifactId>modelmapper</artifactId>
            <version>3.1.1</version>
        </dependency>
        <dependency>
            <groupId>org.springframework.cloud</groupId>
            <artifactId>spring-cloud-starter-openfeign</artifactId>
        </dependency>

        <dependency>
            <groupId>org.springframework.cloud</groupId>
            <artifactId>spring-cloud-starter-netflix-ribbon</artifactId>
        </dependency>


    </dependencies>

    <dependencyManagement>
        <dependencies>
            <dependency>
                <groupId>org.springframework.cloud</groupId>
                <artifactId>spring-cloud-dependencies</artifactId>
                <version>${spring-cloud.version}</version>
                <type>pom</type>
                <scope>import</scope>
            </dependency>
        </dependencies>
    </dependencyManagement>

    <build>
        <plugins>
            <plugin>
                <groupId>org.springframework.boot</groupId>
                <artifactId>spring-boot-maven-plugin</artifactId>
            </plugin>
        </plugins>
    </build>

</project>
Step 3: Create Schema in MySQL Workbench and Put Some Sample Data
Go to your MySQL Workbench and create a schema named gfgmicroservicesdemo and inside that create a table called employee and put some sample data as shown in the below image. Here we have created 4 columns and put some sample data.
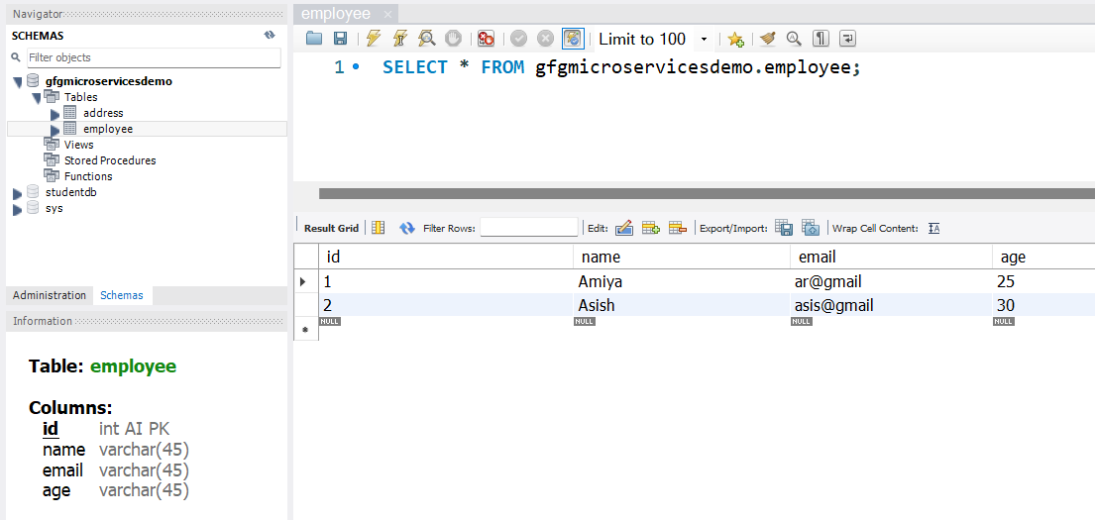
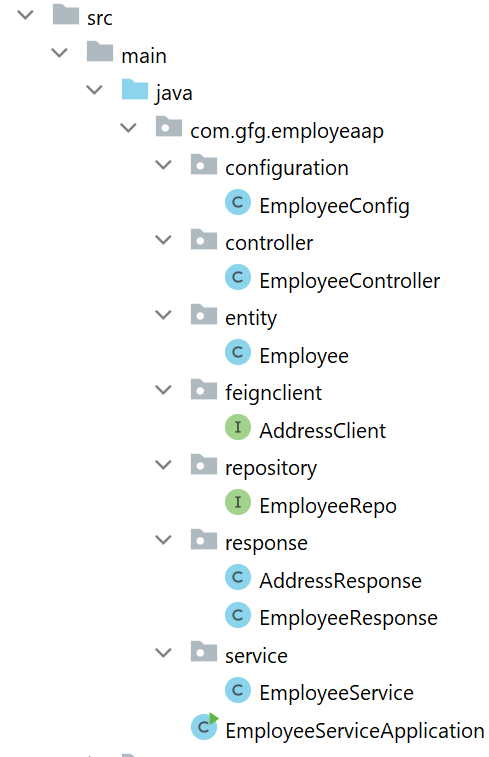
Now we are going to fetch Employee Data from Employee Table in our Spring Boot project. To do it refer to the following steps. Before moving to IntelliJ IDEA let's look at the complete project structure for our Microservices.
Step 4: Configure Employee Service Properties
Configure database properties, application name, server port, and Ribbon server list.
spring.datasource.url=jdbc:mysql://localhost:3306/gfgmicroservicesdemo
spring.datasource.username=root
spring.datasource.password=root
spring.application.name=employee-service
server.port=8080
server.servlet.context-path=/employee-service
address-service.ribbon.listOfServers=http://localhost:8081, http://localhost:8082
Step 5: Create Employee Entity
Create an entity class representing the employee table. This entity maps employee records stored in MySQL.
package com.gfg.employeaap.entity;

import jakarta.persistence.*;

@Entity
@Table(name = "employee")
public class Employee {

    @Id
    @GeneratedValue(strategy = GenerationType.IDENTITY)
    @Column(name = "id")
    private int id;

    @Column(name = "name")
    private String name;

    @Column(name = "email")
    private String email;

    @Column(name = "age")
    private String age;

    public int getId() {
        return id;
    }

    public void setId(int id) {
        this.id = id;
    }

    public String getName() {
        return name;
    }

    public void setName(String name) {
        this.name = name;
    }

    public String getEmail() {
        return email;
    }

    public void setEmail(String email) {
        this.email = email;
    }

    public String getAge() {
        return age;
    }

    public void setAge(String age) {
        this.age = age;
    }
}
Step 6: Create Employee Repository
Create a repository interface using JpaRepository. The repository performs database CRUD operations.
package com.gfg.employeaap.repository;

import com.gfg.employeaap.entity.Employee;
import org.springframework.data.jpa.repository.JpaRepository;

@Repository
public interface EmployeeRepo extends JpaRepository<Employee, Integer> {

}
Step 7: Create EmployeeResponse DTO
Create a DTO class to combine employee information with address details received from the Address Service.
package com.gfg.employeaap.response;

public class EmployeeResponse {

    private int id;
    private String name;
    private String email;
    private String age;
    private AddressResponse addressResponse;

    public int getId() {
        return id;
    }

    public void setId(int id) {
        this.id = id;
    }

    public String getName() {
        return name;
    }

    public void setName(String name) {
        this.name = name;
    }

    public String getEmail() {
        return email;
    }

    public void setEmail(String email) {
        this.email = email;
    }

    public String getAge() {
        return age;
    }

    public void setAge(String age) {
        this.age = age;
    }

    public AddressResponse getAddressResponse() {
        return addressResponse;
    }

    public void setAddressResponse(AddressResponse addressResponse) {
        this.addressResponse = addressResponse;
    }
}
Step 8: Create Response DTO Classes
Create the following DTO classes These DTOs transfer data between microservices.
AddressResponse.java
package com.gfg.employeaap.response;

public class AddressResponse {

    private int id;
    private String city;
    private String state;

    public int getId() {
        return id;
    }

    public void setId(int id) {
        this.id = id;
    }

    public String getCity() {
        return city;
    }

    public void setCity(String city) {
        this.city = city;
    }

    public String getState() {
        return state;
    }

    public void setState(String state) {
        this.state = state;
    }
}
EmployeeResponse.java
package com.gfg.employeaap.response;

public class EmployeeResponse {

    private int id;
    private String name;
    private String email;
    private String age;

    // Add AddressResponse Here
    private AddressResponse addressResponse;

    public int getId() {
        return id;
    }

    public void setId(int id) {
        this.id = id;
    }

    public String getName() {
        return name;
    }

    public void setName(String name) {
        this.name = name;
    }

    public String getEmail() {
        return email;
    }

    public void setEmail(String email) {
        this.email = email;
    }

    public String getAge() {
        return age;
    }

    public void setAge(String age) {
        this.age = age;
    }

    public AddressResponse getAddressResponse() {
        return addressResponse;
    }

    public void setAddressResponse(AddressResponse addressResponse) {
        this.addressResponse = addressResponse;
    }
}
Step 9: Create Feign Client with Ribbon
Create a Feign Client interface and enable Ribbon. Ribbon intercepts Feign requests and performs load balancing.
package com.gfg.employeaap.feignclient;

import com.gfg.employeaap.response.AddressResponse;
import org.springframework.cloud.netflix.ribbon.RibbonClient;
import org.springframework.cloud.openfeign.FeignClient;
import org.springframework.http.ResponseEntity;
import org.springframework.web.bind.annotation.GetMapping;
import org.springframework.web.bind.annotation.PathVariable;

@FeignClient(name = "address-service", path = "/address-service")
@RibbonClient(name = "address-service")
public interface AddressClient {

    @GetMapping("/address/{id}")
    public ResponseEntity<AddressResponse> getAddressByEmployeeId(@PathVariable("id") int id);

}
Step 10: Enable Feign Client
Enable Feign Client support in the main class. This allows Spring to generate Feign proxy implementations.
package com.gfg.employeaap;

import org.springframework.boot.SpringApplication;
import org.springframework.boot.autoconfigure.SpringBootApplication;
import org.springframework.cloud.openfeign.EnableFeignClients;

@SpringBootApplication
@EnableFeignClients
public class EmployeeServiceApplication {

    public static void main(String[] args) {
        SpringApplication.run(EmployeeServiceApplication.class, args);
    }

}
Step 11: Create Employee Service Layer
Create a service class to fetch employee and address details. This service combines data from multiple microservices.
package com.gfg.employeaap.service;

import com.gfg.employeaap.entity.Employee;
import com.gfg.employeaap.feignclient.AddressClient;
import com.gfg.employeaap.repository.EmployeeRepo;
import com.gfg.employeaap.response.AddressResponse;
import com.gfg.employeaap.response.EmployeeResponse;
import org.modelmapper.ModelMapper;
import org.springframework.beans.factory.annotation.Autowired;
import org.springframework.http.ResponseEntity;
import org.springframework.stereotype.Service;

import java.util.Optional;

@Service
public class EmployeeService {

    @Autowired
    private EmployeeRepo employeeRepo;

    @Autowired
    private ModelMapper mapper;

    // Spring will create the implementation
    // for this class
    // and will inject the bean here (proxy)
    @Autowired
    private AddressClient addressClient;

    public EmployeeResponse getEmployeeById(int id) {

        Optional<Employee> employee = employeeRepo.findById(id);
        EmployeeResponse employeeResponse = mapper.map(employee, EmployeeResponse.class);

        // Using FeignClient
        ResponseEntity<AddressResponse> addressResponse = addressClient.getAddressByEmployeeId(id);
        employeeResponse.setAddressResponse(addressResponse.getBody());

        return employeeResponse;
    }

}
Step 12: Create Employee Controller
Create a REST Controller to expose an API endpoint that fetches employee details along with address information from another microservice.
package com.gfg.employeaap.controller;

import com.gfg.employeaap.response.EmployeeResponse;
import com.gfg.employeaap.service.EmployeeService;
import org.springframework.beans.factory.annotation.Autowired;
import org.springframework.http.HttpStatus;
import org.springframework.http.ResponseEntity;
import org.springframework.web.bind.annotation.GetMapping;
import org.springframework.web.bind.annotation.PathVariable;
import org.springframework.web.bind.annotation.RestController;

@RestController
public class EmployeeController {

    @Autowired
    private EmployeeService employeeService;

    @GetMapping("/employees/{id}")
    private ResponseEntity<EmployeeResponse> getEmployeeDetails(@PathVariable("id") int id) {
        EmployeeResponse employee = employeeService.getEmployeeById(id);
        return ResponseEntity.status(HttpStatus.OK).body(employee);
    }

}
Step 13: Create a Configuration Class
Create a configuration class to register the ModelMapper bean that converts Entity objects into DTO objects.
package com.gfg.employeaap.configuration;

import com.gfg.employeaap.service.EmployeeService;
import org.modelmapper.ModelMapper;
import org.springframework.context.annotation.Bean;
import org.springframework.context.annotation.Configuration;

@Configuration
public class EmployeeConfig {

    @Bean
    public ModelMapper modelMapperBean() {
        return new ModelMapper();
    }

}
Developing address-service Step by Step
Step 1: Create Address Service Project
Create a Spring Boot project named employee-service using Spring Initializr.
Please choose the following dependencies while creating the project.
- Spring Web
- Spring Data JPA
- MySQL Driver
- Spring Boot DevTools
Generate the project and run it in IntelliJ IDEA by referring to the above article.
Step 2: Create Schema in MySQL Workbench and Put Some Sample Data
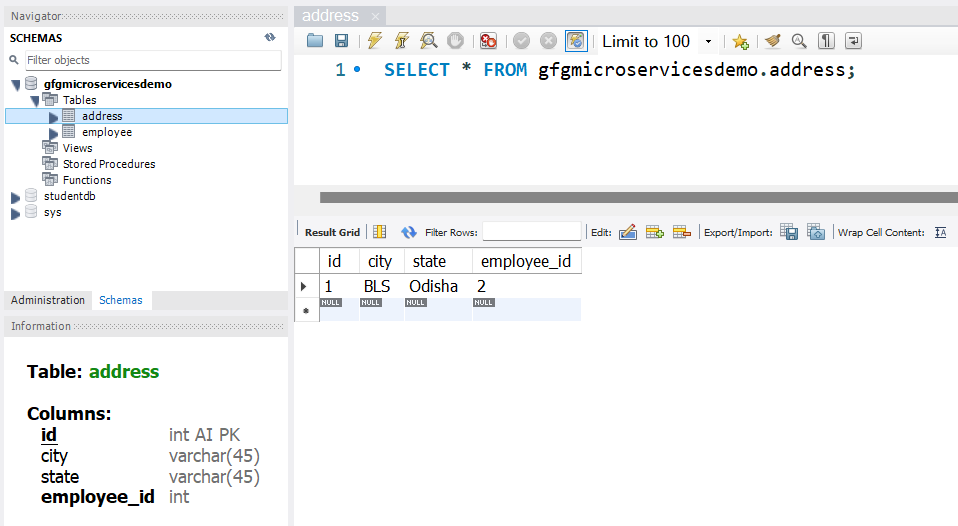
Go to your MySQL Workbench and create a schema named gfgmicroservicesdemo and inside that create a table called address and put some sample data as shown in the below image.
Note: In the Address table, employee_id is a foreign key so create it accordingly. We are going to perform a SQL join operation in our native SQL query. So create tables carefully.
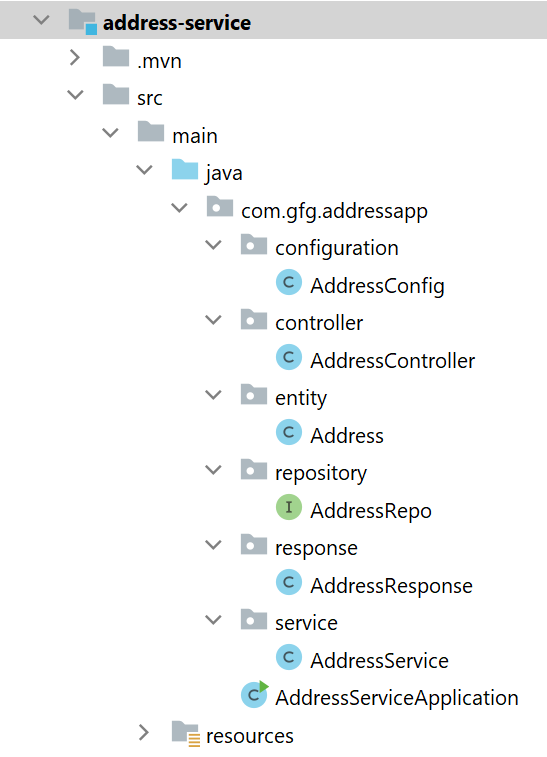
Before moving to IntelliJ IDEA let's have a look at the complete project structure for our Microservices.
Step 3: Configure Address Service Instance 1
Now make the following changes in your application.properties file to Configure the first instance.
spring.datasource.url=
jdbc:mysql://localhost:3306/gfgmicroservicesdemo
spring.datasource.username=root
spring.datasource.password=root
spring.application.name=address-service
server.port=8081
server.servlet.context-path=/address-service
Step 4: Configure Address Service Instance 2
Run another instance with a different port.
spring.datasource.url=jdbc:mysql://localhost:3306/gfgmicroservicesdemo
spring.datasource.username=root
spring.datasource.password=root
spring.application.name=address-service
server.port=8082
server.servlet.context-path=/address-service
Step 5: Create Address Entity
Create an entity class for address data. This entity maps the address table.
package com.gfg.addressapp.entity;

import jakarta.persistence.*;

@Entity
@Table(name = "address")
public class Address {

    @Id
    @GeneratedValue(strategy = GenerationType.IDENTITY)
    @Column(name = "id")
    private int id;

    @Column(name = "city")
    private String city;

    @Column(name = "state")
    private String state;

    public int getId() {
        return id;
    }

    public void setId(int id) {
        this.id = id;
    }

    public String getCity() {
        return city;
    }

    public void setCity(String city) {
        this.city = city;
    }

    public String getState() {
        return state;
    }

    public void setState(String state) {
        this.state = state;
    }
}
Step 6: Create Address Repository
Create repository interface. This repository fetches address data.
package com.gfg.employeaap.feignclient;

import com.gfg.employeaap.response.AddressResponse;
import org.springframework.cloud.netflix.ribbon.RibbonClient;
import org.springframework.cloud.openfeign.FeignClient;
import org.springframework.http.ResponseEntity;
import org.springframework.web.bind.annotation.GetMapping;
import org.springframework.web.bind.annotation.PathVariable;

@FeignClient(name = "address-service", path = "/address-service")
@RibbonClient(name = "address-service")
public interface AddressClient {

    @GetMapping("/address/{id}")
    public ResponseEntity<AddressResponse> getAddressByEmployeeId(@PathVariable("id") int id);

}
Step 7: Create AddressResponse DTO
It is used for fetching data from database using repository
package com.gfg.employeaap.response;

public class AddressResponse {

    private int id;
    private String city;
    private String state;

    public int getId() {
        return id;
    }

    public void setId(int id) {
        this.id = id;
    }

    public String getCity() {
        return city;
    }

    public void setCity(String city) {
        this.city = city;
    }

    public String getState() {
        return state;
    }

    public void setState(String state) {
        this.state = state;
    }
}
Step 8: Create Address Service
Create service layer. This service performs business logic.
package com.gfg.addressapp.service;

import com.gfg.addressapp.entity.Address;
import com.gfg.addressapp.repository.AddressRepo;
import com.gfg.addressapp.response.AddressResponse;
import org.modelmapper.ModelMapper;
import org.springframework.beans.factory.annotation.Autowired;
import org.springframework.stereotype.Service;

import java.util.Optional;

@Service
public class AddressService {

    @Autowired
    private AddressRepo addressRepo;

    @Autowired
    private ModelMapper mapper;

    public AddressResponse findAddressByEmployeeId(int employeeId) {
        Optional<Address> addressByEmployeeId = addressRepo.findAddressByEmployeeId(employeeId);
        AddressResponse addressResponse = mapper.map(addressByEmployeeId, AddressResponse.class);
        return addressResponse;
    }

}
Step 9: Create Address Controller
Create repository interface. This repository fetches address data.
package com.gfg.addressapp.controller;

import com.gfg.addressapp.response.AddressResponse;
import com.gfg.addressapp.service.AddressService;
import org.springframework.beans.factory.annotation.Autowired;
import org.springframework.http.HttpStatus;
import org.springframework.http.ResponseEntity;
import org.springframework.web.bind.annotation.GetMapping;
import org.springframework.web.bind.annotation.PathVariable;
import org.springframework.web.bind.annotation.RestController;

@RestController
public class AddressController {

    @Autowired
    private AddressService addressService;

    @GetMapping("/address/{employeeId}")
public ResponseEntity<AddressResponse>
getAddressByEmployeeId(
      @PathVariable int employeeId){

    System.out.println(
      "Request served by port : "
      + environment.getProperty("local.server.port"));

    AddressResponse response =
          addressService
            .findAddressByEmployeeId(employeeId);

    return ResponseEntity.ok(response);
}

}
Step 10: Configure ModelMapper Bean
Create configuration class. This bean maps entities to DTO objects.
package com.gfg.addressapp.configuration;

import com.gfg.addressapp.service.AddressService;
import org.modelmapper.ModelMapper;
import org.springframework.context.annotation.Bean;
import org.springframework.context.annotation.Configuration;

@Configuration
public class AddressConfig {

    @Bean
    public ModelMapper modelMapperBean() {
        return new ModelMapper();
    }

}
Step 11: Run Both Address Service Instances
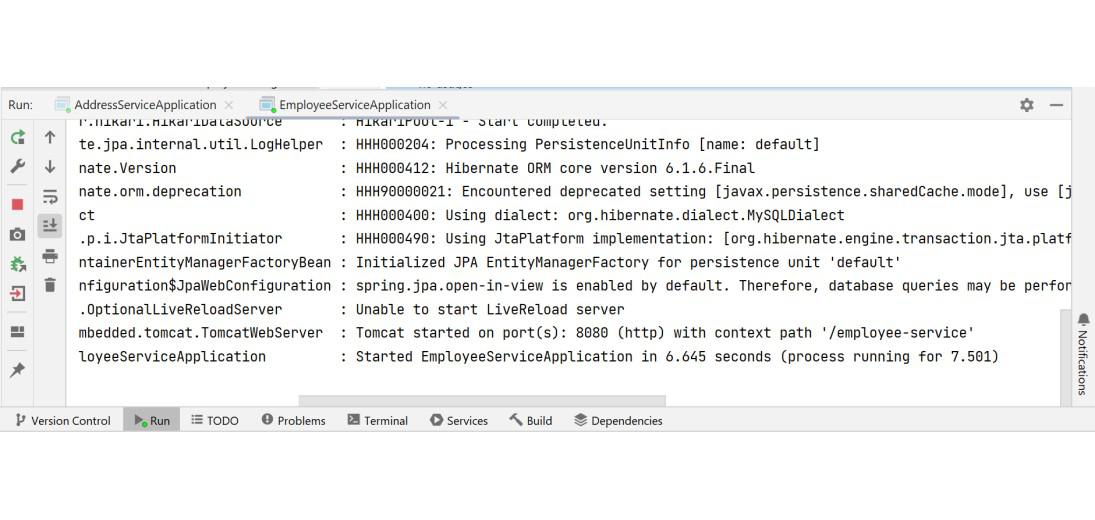
Now run your both Address and Employee Microservices. If everything goes well then you may see the following screen in your console. Please refer to the below image.
Step 12: Test Your Endpoint in Postman
Now open Postman and hit the following URL
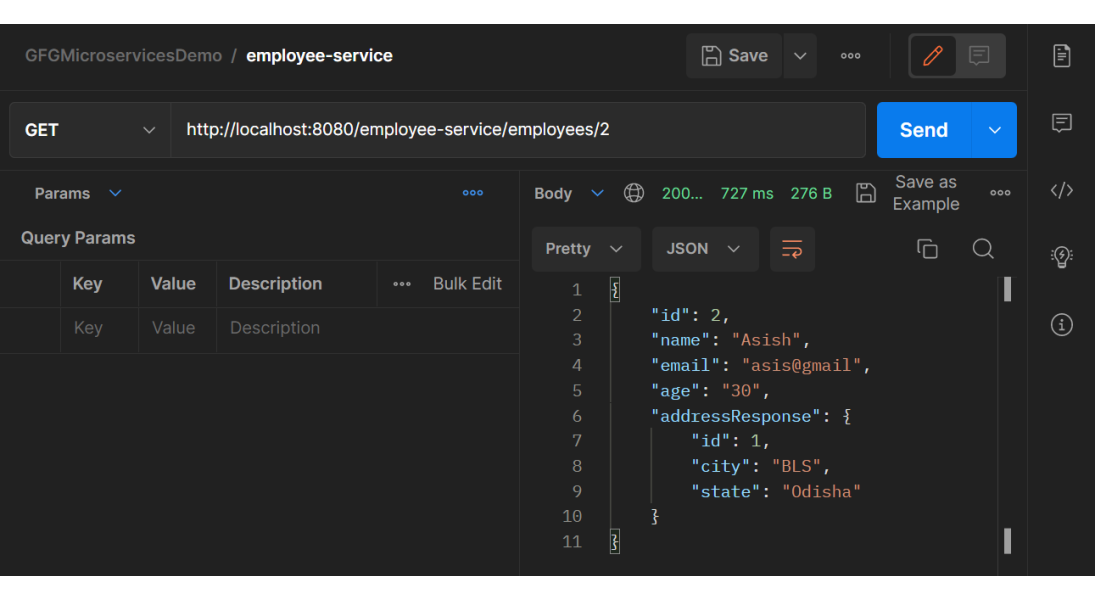
GET: http://localhost:8080/employee-service/employees/2
And you can see the following response